28
© Titan Tool Inc. All rights reserved.
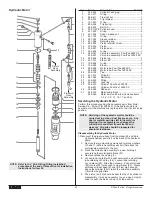
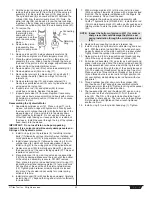
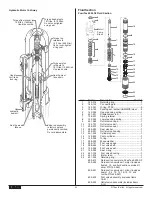
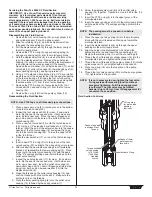
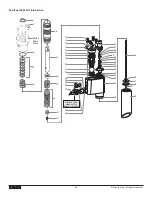
Servicing the Shovel valve
Servicing the valve Rod assembly
1. Remove the shovel valve assembly from the fluid section
by following steps 1 – 5 in the “Disassembling the Fluid
Section” procedure.
2. Unscrew the suction tube (46) from the inlet valve housing
(40).
3. Remove the shovel valve (45) and shovel valve plate
(44) by holding the valve rod (42) at the wrench flats and
removing the cap nut (31).
4. Slide the valve rod assembly out of the top of the inlet
valve housing (40).
5. Inspect the valve rod (42), rod housing assembly (35), and
o-ring (37). If the valve rod is scored, replace both the
valve rod and the rod housing assembly.
a. To remove the rod housing assembly: Turn the rod
housing assembly clockwise using a deep 19 mm
socket from the bottom of the inlet valve housing (43).
The rod housing assembly will come out the top of the
inlet valve housing.
b. To install the rod housing assembly: Place the o-ring
(37) into the groove above the threads on the rod
housing assembly. Thread the rod housing assembly
into the inlet valve housing. From the bottom of the
inlet valve housing, turn the rod housing assembly
counterclockwise using a deep 19 mm socket until it is
snug.
6. Install the valve rod assembly into the top of the inlet valve
housing (40) and through the rod housing assembly (35).
7. Hold the valve rod at the wrench flats and place the
washer (43), shovel valve plate (44), and shovel valve (45)
onto the bottom of the of the valve rod. Thread the cap
nut (31) onto the valve rod and tighten securely.
8. Make sure the o-ring (41) is in position and thread the
suction tube (46) onto the inlet valve housing (40).
Tighten securely.
9. Install the shovel valve assembly onto the fluid section
by following steps 10 – 14 in the “Reassembling the Fluid
Section” procedure.
Servicing the Inlet valve
1. Remove the shovel valve assembly from the fluid section
by following steps 1 – 5 in the “Disassembling the Fluid
Section” procedure.
2. Unscrew the suction tube (46) from the inlet valve housing
(40).
3. Remove the four hex head screws (12) and washers
(13) that secure the pressure plate (15) to the inlet valve
housing (40).
NOTE: It is not necessary to remove the center hex
screw on the pressure plate.
4. Carefully pry the pressure plate (13) off of the inlet valve
housing (40).
5. Remove the inlet valve cage (19), pressure spring (20),
and inlet valve ball (21) from the inlet valve housing (40).
6. Remove the inlet valve seat (22) and white o-ring (17)
from the inlet valve housing (40). Inspect the inlet valve
seat for wear and replace if necessary.
7. Replace the white o-ring (17) on the pressure plate (15).
8. Replace the black sealing ring (18) in the inlet valve
housing (40).
9. Install the inlet valve seat (22) into the inlet valve housing
(40) with the chamfered side facing up. Replace the white
o-ring (17) on the inlet valve seat.
10. Install the inlet valve cage (19) into the inlet valve housing
(40) with the wider rim facing down.
11. Drop the inlet valve ball (21) into the inlet valve cage (19)
and place the pressure spring (20) on top of the ball.
12. Position the pressure plate (15) on top of the inlet valve
housing (40), and insert the four hex head screws (12)
and washers (13). Tighten the hex head screws evenly
to prevent damage to the o-rings inside the inlet valve
housing.
13. Make sure the o-ring (41) is in position and thread the
suction tube (46) onto the inlet valve housing (40).
Tighten securely.
14. Install the shovel valve assembly onto the fluid section
by following steps 10 – 14 in the “Reassembling the Fluid
Section” procedure.

