background image


www.titan-appliances.com


Electrical Requirements 
 

WARNING - ELECTRICAL SHOCK HAZARD! 


è


ALWAYS plug into a grounded 3-prong outlet. 

è


NEVER remove the grounding prong from the plug 

è


NEVER use an adapter to bypass the grounding prong 

è


DO NOT use an extension cord 

è


Failure to follow these instructions can result in fire, electrical shock, or 
personal   injury. 

 
Please make sure you have the following: 
 
1.


Proper electrical connection before you move your appliance into its final location. 

2.


A standard electrical supply (115 V, 60Hz), properly grounded in accordance with the National 
Electrical Code and local codes and ordinances. 

3.


A separate circuit, serving only your appliance is highly recommended. Use receptacles that cannot 
be turned off by a switch or pull chain. 

4.


The fuse (or circuit breaker) rating should be 3 Amps. 

5.


It is very important to have the appliance properly grounded to minimize possible shock hazard.  The 
following grounding method must be strictly observed: 


The appliance is equipped with a power supply cord having a 3-prong grounding plug and must 
be properly grounded.  


The cord must be plugged into a mating 3-pronged wall socket and grounded in accordance with 
the National Electrical Code and local codes and ordinances.  


If a mating wall socket is not available, please ensure to have a properly grounded 3-prong wall 
receptacle installed by a qualified electrician. 


Leveling the Unit 


IMPORTANT:


Regardless of which type of installation you choose, the appliance must be properly leveled in order to 
work properly.  
 
The feet at the bottom of the unit can be raised or lowered individually by rotating the plastic sheaths 
around each of the feet.  Rotate the feet until the appliance becomes level.  Use a carpenter’s leveling 
tool to verify the leveling. You may need to make several adjustments to level the unit.  
 
Place a carpenter’s level on top of the product to see if the appliance is level from front to back and side 
to side. 
 
To adjust the height of the feet: 
 
1.


Turn the leveling feet to the right to lower that side of the unit. 

2.


Turn the leveling feet to the left to raise that side of the unit. 

Summary of Contents for TT-CBC1580SZ

Page 1: ...OWNERS MANUAL BEVERAGE COOLER TT CBC1580SZ TT CBC24142SZ TT CBC1580SZL TT CBC24142SZL ...

Page 2: ...ions 16 Warranty 17 IMPORTANT Instructions Before Using Your Appliance Before use make sure all packaging labels and materials are removed from the unit Be sure to keep track of all included parts and pieces before discarding packaging materials It is advised that you keep the original box and packaging materials in case you are ever to move or ship the appliance in the future Clean the interior s...

Page 3: ...unit Only use in an upright position on a flat leveled surface and with proper ventilation Do not turn the unit upside down on its side or at an angle Do not place hot or warm food or beverages into the unit until they reach room temperature This unit is designed to be used indoors and must be protected from weather elements such as direct sunlight rain snow or moisture Do not place the unit near ...

Page 4: ...he unit by switching the circuit s power on and off Always turn the unit off and unplug it when cleaning Unplug the unit if it is not going to be used for an extended period of time Be sure the appliance is properly grounded Do not plug or unplug the unit with wet hands Do not bypass cut or remove the grounding plug Never repair the unit while it is plugged in Unplug the unit immediately if it mak...

Page 5: ... back of your unit and are needed for service under warranty We suggest stapling your receipt to this manual as it serves as the proof of your purchase and needed for service under your warranty Before contacting customer service please ensure that you have done the following 1 If the unit is damaged when you receive it please contact the retailer or dealer that sold you the appliance right away 2...

Page 6: ...g on the unit s exposure level to odor the carbon filter should be replaced every 3 6 months If the unit is installed in kitchen the replacement should be carried out every 3 months Tip Please obtain the model and the serial numbers of the unit prior to installation ...

Page 7: ...of your appliance IMPORTANT Do not remove any safety warning or product information labels from your appliance TYPES OF INSTALLATION This appliance can be installed as a free standing or built in unit Keep in mind adequate ventilation and access for service is a must 1 For free standing installation Allows the installation of the appliance in almost any place you desire Please follow the stated in...

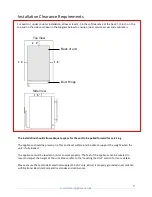
Page 8: ...liance can be rotated to level and adjust the height of the unit Please refer to the Leveling the Unit section for more details Please ensure that a standard electrical supply 115 VAC only 60 Hz is properly grounded in accordance with National Electrical Code and local codes and ordinances For built in under counter installation allow at least 2 3 inches of clearance at the back 1 5 inch on the to...

Page 9: ...trictly observed The appliance is equipped with a power supply cord having a 3 prong grounding plug and must be properly grounded The cord must be plugged into a mating 3 pronged wall socket and grounded in accordance with the National Electrical Code and local codes and ordinances If a mating wall socket is not available please ensure to have a properly grounded 3 prong wall receptacle installed ...

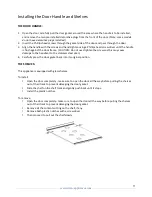
Page 10: ... tighten the screws as this may cause damage to the handle or to the stainless steel door 4 Carefully press the door gasket back into its original position THE SHELVES This appliance is equipped with glass shelves To install Open the door completely make sure to open the door all the way before pulling the shelves out of their track to prevent damaging the door gasket Slide the shelf on the shelf ...

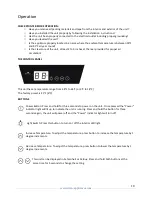
Page 11: ... unit has a temperature range from 38 F to 65 F or 3 C to 18 C The factory preset is 43 F 6 C F BUTTONS Power Button Press and hold for three seconds to power on the unit Once pressed the Power indicator light will lit up to indicate the unit is running Press and hold the button for three seconds again the unit will power off and the Power Indicator light will turn off Light Switch Press this butt...

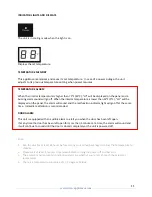
Page 12: ...l sound and the malfunction indicator light will go off at the same time Immediate attention is recommended DOOR ALARM This unit is equipped with an audible alarm to alert you when the door has been left open If at any time the door has been left open for more than 5 minutes at a time the alarm will sound and it will continue to sound until the door is closed completely or the unit is powered off ...

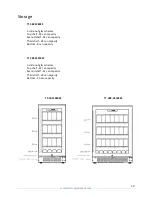
Page 13: ...op shelf 24 can capacity Second shelf 24 can capacity Third shelf 24 can capacity Bottom 8 can capacity TT CBC24142SZ 3 slide out glass shelves Top shelf 42 can capacity Second shelf 42 can capacity Third shelf 42 can capacity Bottom 16 can capacity TT CBC1580SZ TT CBC 24142SZ ...

Page 14: ...rost may build up under colder settings Additionally frost may also build up under more humid ambient conditions Keep the door closed as much as possible and avoid opening the door unnecessarily to minimize frost build up If frost prevents the door from closing properly power the unit off until the frost melts Use a soft absorbent towel to dry the unit WARNING NEVER attempt to remove frost with sh...

Page 15: ...cleaners NEVER use an abrasive or caustic cleaning agent Stainless Steel can discolor when exposed to chlorine gas and moisture INTERIOR CLEANING 1 Turn the unit off and disconnect from power supply 2 Open the door and remove contents and shelves 3 Wait until the unit defrosts 4 Wipe the interior of the unit with a clean cloth 5 Reinsert shelves and beverages 6 Reconnect power to the unit Energy S...

Page 16: ... follow the Installation Clearance Requirements section of this manual Close the door tightly and do not open the door too frequently or for long periods of time The appliance is making strange sounds Some sounds are normal The unit is not properly leveled The unit is touching another appliance Read the Sounds section Check to make sure that the unit is leveled Ensure the unit is not touching anot...

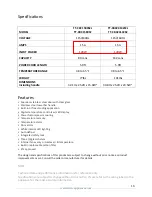
Page 17: ...ion Digital temperature controls w LED display Powerful compressor cooling Temperature memory Temperature alarm Door alarm White interior LED lighting Auto defrost Integrated safety lock Three 3 glass shelves Internal fan evenly circulates air temperature Built in replaceable carbon filter ETL approved The design and specifications of this product are subject to change without prior notice as prod...

Page 18: ...rer Acts of God such as fire flood hurricanes earthquakes and tornadoes Products sold as is or by an unauthorized seller Freight and Insurance cost for the warranty service Obtaining Warranty Service Contact Titan Customer Service at service titan appliances com for troubleshooting assistance and warranty service Please have your model number serial number and proof of purchase before contacting C...

Reviews: