background image

EN

32

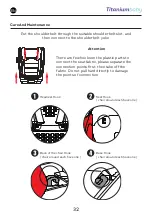
Care And Maintenance 

Put the shoulder belt through the suitable shoulder belt slot, and 

then connect to the shoulder belt yoke. 

Attention

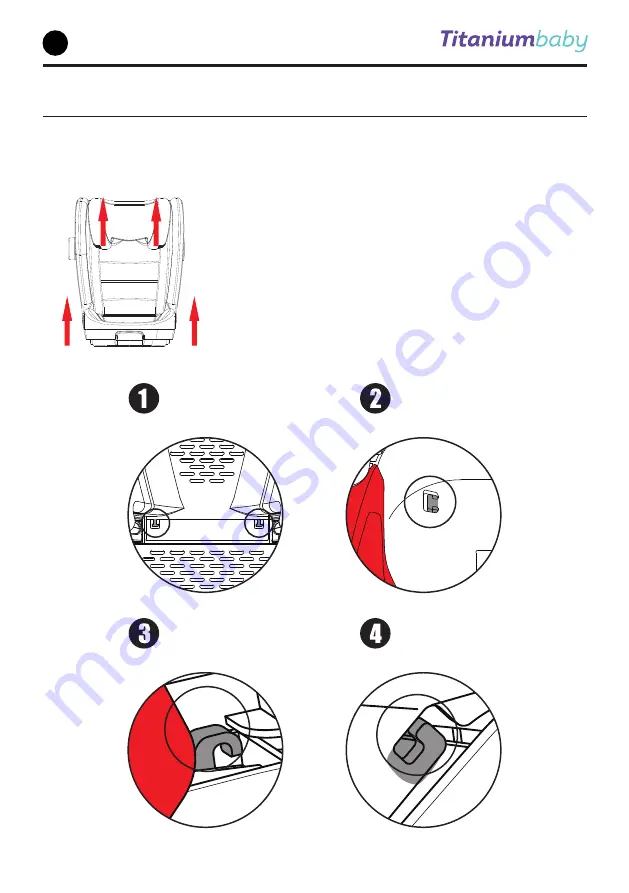
There are few hooks on the plastic parts to 

connect the seat fabric, please separate the 

connection points first, then take off the 

fabric. Do not pull hard directly to damage 

the points of connection. 

Headrest Hook

Seat Hook 

( chair around each have one ) 

Back of the chair Hook

( chair around each have one ) 

Base Hook 

( chair around each have one ) 

Summary of Contents for 5955

Page 1: ...Autostoel groep II III Gebruiksaanwijzing Car seat group II III Instructions for use NL EN Arctic i Safety Model no 5955 Groep II III 15 36 Kg ...

Page 2: ...s voor groep II en III Productoverzicht Gebruik in de auto Installatie van groep II III De hoogte van de hoofdsteun aanpassen De zitstand aanpassen ASIP installatie Behandeling en onderhoud Reiniging Garantie Pagina 3 4 5 6 7 8 9 10 11 12 13 14 15 16 17 ...

Page 3: ... kunnen raken tussen een verstelbare stoel of een portier Zorg dat heupriemen laag worden gedragen zodat de heupen worden beschermd Vervang het autostoeltje als het tijdens een ongeval onder hevige span ning heeft gestaan Pas het autostoeltje niet aan en probeer geen onderdelen toe te voegen Dit kan ernstige gevolgen hebben voor de veiligheid en functie Kinderen mogen niet onbewaakt in het autosto...

Page 4: ...n de eisen die golden voor oudere ontwerpen die deze kennisgeving niet dragen Raadpleeg bij twijfel de fabrikant van het autostoeltje of de verkoper Alleen geschikt als de goedgekeurde voertuigen zijn voorzien van 3 punts gordels die zijn goedgekeurd overeenkomstig VN ECE verordening 16 of andere vergelijkbare normen Dit autostoeltje is geclassificeerd voor semi universeel gebruik en is geschikt v...

Page 5: ...icator 2 2 ISOFIT knop 3 Compartiment voor gebruikshandleiding 3 1 Vak voor handleiding 4 4 1 ASIP PLUS 4 2 Knop verwijderbare ASIP 4 3 Vaste ASIP 4 4 Installatieconstructie vaste ASIP 5 Riemgeleider 6 Riemgeleider 7 Hoofdsteun 8 Hendel voor aanpassing van de hoogte 9 Hendel voor achterover kantelen 4 3 4 4 ...

Page 6: ...NL 6 Gebruik in het voertuig Gewoon gebruik in auto s met ISO FIT connector ...

Page 7: ...toptether Als er een voorairbag is Schuif de bijrijdersstoel ver naar achteren en lees de relevante instructies in de gebruikershandleiding van het voertuig Op de bijrijdersstoel Niet gebruiken op bijrijdersstoelen met een voorairbag De bijrij dersstoel kan met of zonder ISOFIX worden gebruikt waarbij de zelfde instructies gelden als voor de ISOFIX schuif de stoel naar achteren en lees de handleid...

Page 8: ...de gebruikshandlei ding Kinderen mogen niet op het auto stoeltje staan en spelen als er geen veiligheidsgordel is aangebracht Installeer het autostoeltje op de juiste manier overeenkomstig de gebruikshand leiding Vermijd direct zonlicht om de gebruiksduur van het autostoeltje te garanderen Het autostoeltje mag nooit op de bijrijdersstoel wor den gebruikt als de airbag is geacti veerd ...

Page 9: ... geplaatst De Arctic is goedgekeurd voor twee installatiemethoden Groep Installatie Bevestiging van het kind II 15 25 kg Veiligheidsgordel Veiligheidsgordel II 15 25 kg ISOFIT veiligheidsgordel Veiligheidsgordel III 22 36 kg Veiligheidsgordel Veiligheidsgordel III 22 36 kg ISOFIT veiligheidsgordel Veiligheidsgordel 3 puntsgordel 1 Trek de veiligheidsgordel uit en leid deze voor uw kind langs naar ...

Page 10: ...IT aansluiting tevoorschijn te halen Installatie Bevestig de FIX in de FIX aansluiting De FIX indicator wordt groen als de onderdelen goed zijn bevestigd Duw het autostoeltje vervolgens tegen de rug leuning en zorg dat er geen ruimte tussen het autostoeltje en de rugleuning is Installatie van groep II III 15 36 kg ...

Page 11: ...Trek de veiligheidsgordel uit en leid deze voor uw kind langs naar de gesp Zorg dat de veiligheidsgordel vast zit door aan het diagonale gedeelte te trekken 2 Het stoeltje verwijderen Druk op de knop aan de zijkant van de ISOFIT aansluiting De ISOFIT aansluiting wordt nu geopend Verwijder het autostoeltje ...

Page 12: ...NL 12 De hoogte van de hoofdsteun aanpassen De hoofdsteun kan omhoog en omlaag worden geplaatst en in een geschikte positie worden ingesteld 2CM Controleer of de hoofdsteun is vergrendeld ...

Page 13: ...tstand aanpassen U kunt de zitstand aan passen door aan de rode hendel aan de onderkant te trekken De stoel heeft vier standen Maak de hendel los en stel de stand van de stoel nauwkeurig af Indicator voor positie ...

Page 14: ...re ASIP 1 2 Volg de instructies op de ASIP zijde die overeen komt met het vaste deel dat in de ASIP bajonet sluiting is gestoken De verwijderbare ASIP is nu gezekerd Laat de schakelaar los ASIP is nu geïnstalleerd Schud na de installatie aan de ASIP om te controleren of de installatie goed heeft plaatsgevonden ASIP verwijderen Druk op de schakelaar voor het bedienings mechanisme van de verwijderba...

Page 15: ...f onderdelen bevatten een paar haken waaraan de stoelhoes moet worden bevestigd Maak de verbindingspunten eerst los en verwijder daarna de stof Trek niet hard hierdoor worden de verbindingspunten beschadigd Haak op hoofdsteun Haak op stoel aan weerszijden van de stoel Haak op de rug aan weerszijden van de stoel Haak aan de onderkant aan weerszijden van de stoel ...

Page 16: ...n gewassen op 30 C Laat de hoes alleen aan de lucht drogen Koude was Niet bleken Niet drogen Niet in de wasdroger Niet strijken ECE Europese veiligheidsnorm De productkwaliteit van het autostoeltje overtreft de veiligheidseisen van de Europese Unie De meest recente ECE R44 04 norm werd in juni 2006 van kracht De norm schrijft realistische botstests voor en stelt hogere eisen aan bescherming van he...

Page 17: ...komen moet het product schoon en compleet worden geretourneerd aan of teruggebracht naar de dealer die het oorspronkelijk aan u heeft verkocht Er moet bovendien een origi neel aankoopbewijs kassabon of factuur worden overlegd Retourneer het product niet rechtstreeks aan de fabrikant en lever het daar niet af 3 Deze garantie dekt geen schade die veroorzaakt is door verkeerd gebruik omgevingsfactore...

Page 18: ...18 Car seat group II III Instructions for use EN Arctic i Safety Model no 5955 Groep II III 15 36 Kg ...

Page 19: ...tion Productoverview Use In The Vehicle Installation group II III Adjust the headrest height Multiple adjustable sitting position ASIP installation Care And Maintenance Washing Warranty Notes Page 20 21 22 23 24 25 26 27 28 29 30 31 32 33 34 35 ...

Page 20: ...rap is worn low down so that the pelvis is firmly en gaged shall be stressed The device should be changed when it has been subject to violent stresses in an accident Do not attempt to modify or add to any part of the child seat Otherwise it will seriously effect its safety and function Children are not left in their child restraint system unattended The child restraint must not be used without the...

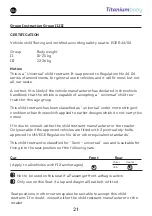
Page 21: ...tions than those which applied to earlier designs which do not carry this notice If in doubt consult wither the child restraint manufacturer or the retailer Only suitable if the approved vehicles are fitted with 3 point safety belts approved to UN ECE Regulation No 16 or other equivalent standards This child restraint is classified for Semi universal use and is suitable for fixing into the seat po...

Page 22: ...ISOFIT connector 2 1 ISOFIT indicator 2 2 ISOFIT Button 3 User Guide Compartment 3 1 Vak voor handleiding 4 4 1 ASIP PLUS 4 2 Button removable ASIP 4 3 Stationary ASIP 4 4 Installation Structure Stationary ASIP 5 Belt Guider 6 Belt Guider 7 Headrest 8 Height Adjuster Handle 9 Recline Handle ...

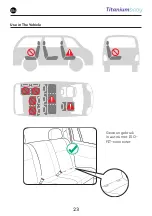
Page 23: ...EN 23 Use in The Vehicle Gewoon gebruik in auto s met ISO FIT connector ...

Page 24: ...he ISOFIX and Top Tether anchoring systems If there is a front airbag Slide the passenger seat a long way back and refer to any instructions in vehicle owner s manual On frontpassenger seat Do not use on passenger seats with a front airbag The front passenger seat may be used with or without ISOFIX with the same notes as currently given for the ISOFIX slide the seat back and refer to vehicle instr...

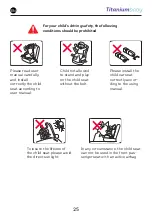
Page 25: ... seat according to user manual Child not allowed to stand and play on the child seat without the belt Please install the child car seat correctly accor ding to the using manual To insure the lifeime of the child seat please avoid the direct sunlight In any circumstance the child seat can not be used in the front pas senger seat with an active airbag ...

Page 26: ...to rocking or other by the child The Arctic is approved for two methods of installation Groep Installatie Bevestiging van het kind II 15 25 kg vehicle belt vehicle belt II 15 25 kg Isofit vehicle belt vehicle belt III 22 36 kg vehicle belt vehicle belt III 22 36 kg Isofit vehicle belt vehicle belt Vehicle 3 point belt 1 Pull out the vehicle belt and guide it in front of your child to the vehicle s...

Page 27: ...s then ISOFIT interface goes out Installation Insert the FIX into the FIX connector The FIX indicator will become green if install correctly then push the child car seat in the direction of car seat back make sure there is no space between the child car seat and car back Group II III 15 36 KG Installation ...

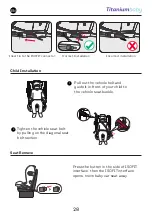
Page 28: ...tallation 1 Pull out the vehicle belt and guide it in front of your child to the vehicle seat buckle Tighten the vehicle seat belt by pulling on the diagonal seat belt section 2 Seat Remove Press the button in the side of ISOFIT interface then the ISOFIT interface opens move baby car seat away ...

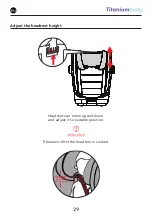
Page 29: ...EN 29 Adjust the headrest height Headrest can move up and down and adjust it to suitable position 2CM Please confirm the headrest is Locked ...

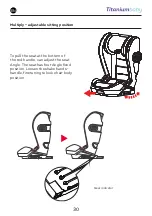
Page 30: ...stable sitting position To pull the seat at the bottom of the red handle can adjust the seat Angle The seat has four Angle fixed position Loosen the shake hands handle finetuning to lock chair body position Gear indicator ...

Page 31: ...mechanism of it 1 2 According to the instruction from the ASIP surface cor responding to the fixed end inserted into the bayonet fixed ASIP The removable type ASIP right under stati onary ASIP armor Release the switch ASIP installation is successful After the installation is complete please shake ASIP to check whether the correct installation Remove the ASIP Press the switch on the removable ASIP ...

Page 32: ...ion There are few hooks on the plastic parts to connect the seat fabric please separate the connection points first then take off the fabric Do not pull hard directly to damage the points of connection Headrest Hook Seat Hook chair around each have one Back of the chair Hook chair around each have one Base Hook chair around each have one ...

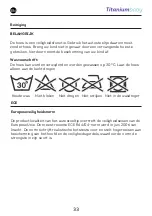
Page 33: ...n gewassen op 30 C Laat de hoes alleen aan de lucht drogen Koude was Niet bleken Niet drogen Niet in de wasdroger Niet strijken ECE Europese veiligheidsnorm De productkwaliteit van het autostoeltje overtreft de veiligheidseisen van de Europese Unie De meest recente ECE R44 04 norm werd in juni 2006 van kracht De norm schrijft realistische botstests voor en stelt hogere eisen aan bescherming van he...

Page 34: ...To obtain the warranty please take or ship the product to the original retailer Who initially sold this product to you in a clean and complete condition and submit an original proof of purchase sales receipt or invoice Please do not take or ship the product to the manufacturer directly 3 This warranty does not cover any damages which result from misuse environmental influence water fire accidents ...

Page 35: ...PL 35 Notities Notes EN NL NL ...

Page 36: ...This car seat is supplied by Deze autostoel wordt geleverd door Monierweg 30 7741 KT Coevorden The Netherlands T 31 0 591 63 24 24 www titaniumbaby com info titaniumbaby nl ...

Reviews: