background image

18

Wiring Diagrams

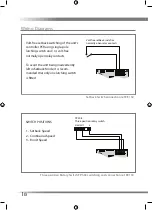
Volt-free setback switching of the unit’s 
controller PCB using single-pole 
latching switch and / or volt-free 
normally open relay contacts.

To avoid the unit being inadvertently  
left in Setback Mode, it is recom-
mended that only one latching switch 
is fitted. 

Volt-free setback switch or

normally open relay contacts

Setback Switch connection ref EE 152 

Three position Rotary Switch TP 508 switching and connection ref EE 153 

SWITCH POSITIONS

1 -  Setback Speed
2 -  Continuous Speed
3 -  Boost Speed

L

U1

U2

U3

TP 508

Three position rotary switch

Summary of Contents for CME2 Q Plus LS

Page 1: ...tion systems Extract Ventilation Unit Product Manual EN CME2 Q Plus TP302A TP303A CME2 1 Q Plus TP312A TP313A CME2 Q Plus with Humidity Sensor TP302HA TP303HA CME2 1 Q Plus with Humidity Sensor TP312HA TP313HA ...

Page 2: ...e pole isolation switch with a contact separation of at least 3mm Ideally located adjacent to the unit 4 The appliance must be earthed 5 Units are suitable for 230V 50 60Hz single phase with a fuse rating of 3A 6 Boost cable Unshielded 4 Core 18 24AWG Stranded Tinned Copper 7 Boost cables should not be placed within 50mm or on the same metal cable tray as any 230V lighting or power cables 8 The un...

Page 3: ... a safe way and understand the hazards involved 12 Children should be supervised to ensure that they do not play with the appliance 13 Ensure that external grilles are located away from any flue outlet in accordance with relevant Building Regulations 14 The unit must not be connected to a tumble dryer 15 The unit must not be connected to a cooker hood 16 Precautions must be taken to avoid the back...

Page 4: ...rior 26 Access to the Interior for Cleaning 27 Service Record 29 Technical Product Fiche 30 Product Fiche 31 Warnings Safety information and Guidance Important Information 2 Product Overview Dimensions 5 Component Identification 6 Packaging Contents 7 Product Features 8 Auto Setback Speed 9 Setback Speed 9 Continuous Speed 9 Boost Speed with OverrunTimer 9 Boost OverrunTimer 9 Integrated Humidity ...

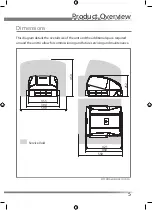
Page 5: ... This diagram details the overall size of the unit and the additional space required around the unit to allow for commissioning and future servicing and maintenance 450 421 355 390 252 550 450 590 Service Void All dimensions in mm ...

Page 6: ...6 Component Identification Unit components Cover Inlet ring Scroll Base Cover Scroll Inlet Ring assembly ...

Page 7: ...y Check the unit for damage and that all accessories have been supplied The box contains CME2 Q Plus or CME2 1 Unit x 1 Port covers x 3 This Product manual x 1 Screw Pack x 1 User Guide x 1 All shortages or damage must be immediately reported to the supplier ...

Page 8: ...can be achieved by use of the Titon Boxed Relay 5A TP 505 The following describes the controls and features of the CME Q Plus and how they are controlled Ensure all controls are adequately labelled indicating their function clearly Model CME2 Q Plus CME2 1 Q Plus Part Number TP302A TP312A TP303A TP313A TP302HA TP312HA TP303HA TP313HA Complete unit l l 2nd Fix Cover Scroll Inlet Ring assembly l l S...

Page 9: ...or combined with the Boost Speed with the 3 position switch TP 508 Continuous Speed Continuous Speed is the normal running speed of the unit Continuous Speed is configured using a step less independent fan control potentiometer Boost Speed with Overrun Timer Boost Speed is an increased speed providing higher extract air flow Boost Speed is configured using a step less independent fan control poten...

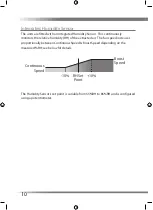
Page 10: ...elative humidity RH of the extracted air The fan speed increases proportionally between Continuous Speed Boost Speed depending on the measured RH see below for details The Humidity Sensor s set point is variable from 55 RH to 85 RH and is configured using a potentiometer RH Set Point 10 10 Continuous Speed Boost Speed ...

Page 11: ...e 4mm Pan Head screws Always use a fixing type and length suited to the substrate type The unit weighs approximately 5kg 4 Mount the Base ensuring it is not distorted by the fixings or mounting surface 5 Clip the Motor and Lid assembly to the Base ensure that all 6 clips have engaged Tighten screws by hand DO NOT over tighten screws or use power tools 1 2 3 4 5 6 260 260 EXTRACT PORT Positions of ...

Page 12: ...the preformed holes at the front of the Inlet Ring to securely fix the Inlet Ring Scroll assembly to the Base 8 Fit one screw from the Screw Pack through the preformed hole in the back of the Base to securely fix the Inlet Ring Scroll assembly to the Base 9 Re fit the Cover using the 2 screws retained and 1 screw from the Screw Pack ...

Page 13: ...y sharp bends in duct work 4 Ducting should be insulated where it passes through unheated areas and voids 5 Unit should be insulated when fitted in unheated area 6 Where a duct extends externally above roof level the section above the roof should be insulated or a condensate trap should be fitted just below roof level 7 Where ducts pass through fire barriers they must be appropriately fire stopped...

Page 14: ... be to the external air outside the building envelope 13 All ducting joints including those to the CME2 2 1 Q Plus unit s Duct Ports and Convertible Port Covers must be permanently connected and sealed 14 Do not distort ducting Convertible Port Cover or Duct Ports 15 204 x 60mm ducting fits inside the units Duct Ports 16 110 x 54mm ducting fits inside the Convertible Port Cover 17 Unused extract p...

Page 15: ...onvert Port Cover 1 To enable fitment of 110 x 54mm ducting modify the Convertible Port Cover by tearing out the rip strip 2 When using the convertible port cover ensure the tear out section is completely removed ...

Page 16: ...ions Access Access to the connections for mains boost and other volt free control functions is via removal of the Cover Cables must be routed as shown and secured with clamps provided Internal Cable Routing Cable Access ...

Page 17: ...0Hz EE 141 Volt free boost switching of unit s controller PCB using single pole switches TP 502 TP 503 TP 507 and or TP500 TP501 Humidistat There maximum of 10 single pole switches or humidistats that can used TP500 TP501 1 2 3 Boost switching and External Humidistat connection ref EE 151 ...

Page 18: ...eing inadvertently left in Setback Mode it is recom mended that only one latching switch is fitted Volt free setback switch or normally open relay contacts Setback Switch connection ref EE 152 Three position Rotary Switch TP 508 switching and connection ref EE 153 SWITCH POSITIONS 1 Setback Speed 2 Continuous Speed 3 Boost Speed L U1 U2 U3 TP 508 Three position rotary switch ...
Page 19: ...or to the first commission set the Continuous Speed potentiometer to minimum by rotating fully anti clockwise and set the Boost Speed potentiometer to maximum by rotating fully clockwise Control Parameters All volt free switch inputs are disabled when the Program Run Header Link is in the Program position All speed control potentiometers are disabled when the Program Run Header Link is in the Run ...

Page 20: ...ustment potentiometer to achieve required boost air flow 4 Return Program Run Header Link to Run Position fitted to one pin to exit commissioning After commissioning the Program Run Header Link must be placed in the Run position Alternatively the Program Run Header Link can be completely removed to lock the commissioned settings Header Link in Program position Header Link in Run positions Boost Ov...

Page 21: ...eed and Boost Speed adjustment fully clockwise 3 Place Program Run Header Link in the Program Position 4 Rotate the Continuous Speed adjustment potentiometer fully anti clockwise Hardware Reset Certain conditions repeated supply interruptions etc can activate the automatic motor protection mode Where by the fan motors are prevented from operating This requires a hardware reset to return the unit t...

Page 22: ...l volt free switch inputs are disabled when the Program Run Header Link is in the Program position All speed control potentiometers are disabled when the Program Run Header Link is in the Run position Boost Overrun Timer Humidity Sensor adjustment can be done at any time without the need to move the Program Run Header Link The unit needs to be powered up for the commissioning settings to be stored...

Page 23: ...stment potentiometer to achieve required air flow for each speed 3 Return Program Run Header Link to Run Position fitted to one pin to exit commissioning After commissioning the Program Run Header Link must be placed in the Run position Alternatively the Program Run Header Link can be completely removed to lock the commissioned settings Header Link in Program position Header Link in Run position P...

Page 24: ... need to move the Program Run Header Link Humidity Sensor The Humidity Sensor s set point is variable from 55 RH to 85 RH Rotate potentiometer to change set point Humidity Sensor adjustment can be done at any time without the need to move the Program Run Header Link Boost Overrun Pot positions 0 30 15 Humidity Sensor Pot positions Program Run Header Link 0 30 15 55 85 70 ...

Page 25: ...he Setback Speed potentiometer fully anti clockwise and the Continuous Speed adjustment potentiometer to the mid position Hardware Reset Certain conditions repeated supply interruptions etc can activate the automatic motor protection mode Where by the fan motors are prevented from operating This requires a hardware reset to return the unit to normal operating mode to achieve this power to the unit...

Page 26: ... the system installer WARNING The unit uses a 230V supply and contains rotating mechanical parts ISOLATE the unit from mains power supply and allow sufficient time for all moving parts to stop before undergoing any Servicing or Maintenance Cleaning Exterior For best results use a clean cloth and warm water with a mild detergent solution Do not use solvents or abrasive cleaners Cleaning Interior Fo...

Page 27: ...r cleaning 1 Unscrew the 3 retaining screws that hold on the Cover and remove 2 Remove the 4 Scroll retaining screws 3 Using a flat bladed screw driver un clip Scroll from Inlet Ring by disengaging the 3 retaining clips Ensure that the Scroll is supported and does not strain the cables ...

Page 28: ...and fan blades using a vacuum cleaner 7 Wipe with damp cloth and mild detergent 8 Check fixing screws 9 Assembly is the reverse of the preceding instructions 10 Ensure all fasteners are secure before returning power to the unit Tighten screws by hand DO NOT over tighten screws or use power tools After servicing always complete the service record 2 1 4 3 1 2 Positions of Clips ...

Page 29: ...29 Service Record Serviced by Company Name Date Notes ...

Page 30: ...alled Multi speed drive Type of heat recovery system none Thermal efficiency of heat recovery not applicable Nominal NRVU Flow Rate m3 s 0 102 Effective power input kW 0 06 SFPint W m3 s n a Face velocity in m s n a Nominal external pressure in Pa 200 Internal pressure drop in Pa n a Static efficiency of fan in accordance with EU No 327 2011 35 125W motor Declared maximum internal leakage rate n a...

Page 31: ...lled Multi speed drive Type of heat recovery system none Thermal efficiency of heat recovery not applicable Nominal NRVU Flow Rate m3 s 0 067 Effective power input kW 0 04 SFPint W m3 s n a Face velocity in m s n a Nominal external pressure in Pa 200 Internal pressure drop in Pa n a Static efficiency of fan in accordance with EU No 327 2011 32 125W motor Declared maximum internal leakage rate n a ...

Page 32: ...ervice Respect the local environmental rules If any doubt contact your local authorities about waste disposal rules 2022 TITON MARKETING DIVISION 894 The Crescent Colchester Business Park Colchester CO4 9YQ Tel 44 0 1206 713800 Fax 44 0 1206 543126 Email ventsales titon co uk Web www titon com In the event of any queries please contact the system installer Ensure this booklet is passed to the hous...

Reviews: