background image


Medium & Heavy Payload Series-Hardware Installation Manual TM12/14 Series Hardware Version: 3.2 

Document Version: 1.01


45 


Figure 35: Top View of TM Robot Placed on the AGV/AIV 


4.4 

Working distance and field of view of TM Robot’s EIH camera 

The field of view of TM Robot’s EIH camera varies linearly in accordance with the working distance. The 

minimum working distance is about 100 mm and the maximum working distance is about 300 mm. The zero 

working distance point is approximately 49 mm in front of the flange surface and right behind the center of the 

protection lens.   

AGV/AIV Footprint 

Summary of Contents for Heavy Payload Series

Page 1: ...Hardware Version 3 2 Document Version 1 01 Release Date 2020 02 12 Medium Heavy Payload Series Hardware Installation Manual Corresponding models TM12 14 Series Original Instruction ...

Page 2: ...Corporation No part of this publication may be reproduced or copied in any way shape or form without prior authorization from the Corporation No information contained herein shall be considered an offer or commitment It may be subject to change without notice This Manual will be reviewed periodically The Corporation will not be liable for any error or omission logo is registered trademark of TECHM...

Page 3: ... 13 2 9 Movement without Drive Power 13 2 10 Labels 15 3 Transportation and Storage 17 4 System Hardware 18 4 1 Overview 18 4 2 System Overview 18 4 2 1 Robot Arm 19 4 2 1 1 Dimension Drawings of Robot 19 4 2 1 2 Robot Assembly Diagram 22 4 2 1 3 Range of Motion 27 4 2 1 4 Robot Hazard Zone Diagram and Operator Position Diagram 30 4 2 1 5 Payload and Torque 32 4 2 1 6 Robot Arm Installation 34 4 2...

Page 4: ...Digital Output 55 5 3 4 Analog In 57 5 3 5 Analog Out 58 5 3 6 System Remote Power ON OFF 58 5 3 7 EtherCAT For EtherCAT Slave I O Expansion 59 5 3 8 USB Port 59 5 4 Tool End I O Interface 59 5 4 1 I O Terminals 59 5 4 2 Connecting Tool End Digital Output 61 5 4 3 Connecting Tool End Digital Input 62 5 4 4 Connecting Tool End Analog Input 62 5 5 Control Box Interfaces 63 5 5 1 SEMI Emergency OFF B...

Page 5: ...rporation 82 Appendix A Technical Specifications 86 Tables Table 1 Manual Title Description 10 Table 2 Danger Warning and Caution Symbols 11 Table 3 Denotation of Labels 16 Table 4 Rated Torque and Limit for Repeated Peak Torque of Regular Payload Robot Series 34 Table 5 Robot Stick Basic Functions 41 Table 6 Robot Stick Advanced Functions 41 Table 7 Reference of the Symbol and Unit in Calculation...

Page 6: ...re 10 Assembly of TM14 TM14M 24 Figure 11 Assembly of TM12X 25 Figure 12 Assembly of TM14X 26 Figure 13 Side View of TM12 TM12M TM12X Movement Range Diagram 27 Figure 14 Pictorial view of TM12 TM12M TM12X Movement Range Diagram 28 Figure 15 Top view of TM12 TM12M TM12X Movement Range Diagram 28 Figure 16 Side view of TM14 TM14M TM14X Movement Range Diagram 29 Figure 17 Pictorial view of TM14 TM14M...

Page 7: ...e Wiring Diagram Example of Switch Type Safety Device 50 Figure 41 The Wiring Diagram Example of PNP Output Type Safety Device 50 Figure 42 The Wiring Diagram Example of PNP Output Type Safety Device 51 Figure 43 Safety Output Connector 52 Figure 44 Safety Output Connector Wiring Diagram 52 Figure 45 Power Connector 53 Figure 46 Digital Input 54 Figure 47 Set to Sink Input Type 54 Figure 48 Set to...

Page 8: ...f Interface 68 Figure 68 Detachable I O Panel 68 Figure 69 Robot Arm Carton 70 Figure 70 SEMI Emergency OFF Switch Carton 70 Figure 71 Control Box Carton 70 Figure 72 SEMI Emergency OFF Box Carton 70 Figure 73 Moving the Control Box 1 2 74 Figure 74 Moving the Control Box 2 2 75 Figure 75 Moving the Robot Arm 1 2 76 Figure 76 Moving the Robot Arm 2 2 76 Figure 77 Moving the SEMI Emergency OFF Box ...

Page 9: ...ual TM12 14 Series Hardware Version 3 2 Document Version 1 01 9 Revision History Table Revision Date Revised Content 1 00 2019 08 01 Original release 1 01 2020 02 12 Added the section of the robot light module and the section of control box I O interfaces ...

Page 10: ...ty to run at full speed with barriers and operate in collaborative workspace 1 2 How Can I Get Help You can access information sources on the corporate website http tm robot com Related Manuals This manual covers the hardware installation operation and user maintenance of TM Robot See the following table for additional available manuals Manual Title Description Safety Manual Contains safety inform...

Page 11: ...operty damage CAUTION Identifies a potentially hazardous situation which if not avoided might result in minor injury moderate injury or property damage Table 2 Danger Warning and Caution Symbols 2 3 Safety Precautions DANGER This product can cause serious injury or death or damage to itself and other equipment if the following safety precautions are not observed All personnel who install operate t...

Page 12: ...based on the results of the risk assessment Using appropriate software safety features Ensuring Users will not modify any safety measures Ensuring all systems are correctly designed and installed Clearly labeling user instructions Clearly marking the contact information for the integrator Making relevant documents accessible including the risk assessment and this manual CAUTION This product is a p...

Page 13: ... on the system controller When Users presses the Emergency Stop switch the TM Robot will disconnect power from the robot and activate the brakes after the robot motion is stopped The indication light ring of the robot will not display light and the three lights from the robot stick will be constantly blinking Once the risk assessment has been conducted if an Emergency Stop switch needs to be insta...

Page 14: ...olenoid shown in the following figures TM12 TM12M 1st Joint 2nd Joint 3rd Joint 5th Joint 4th Joint 6th Joint Upper arm Lower arm Base TM14 TM14M 1st Joint 2nd Joint 3rd Joint 5th Joint 4th Joint 6th Joint Upper arm Lower arm Base TM12X 1st Joint 2nd Joint 3rd Joint 5th Joint 4th Joint 6th Joint Upper arm Lower arm Base TM14X 1st Joint 2nd Joint 3rd Joint 5th Joint 4th Joint 6th Joint Upper arm Lo...

Page 15: ...d by Joints WARNING 1 Due to gravity additional supports are recommended when manually releasing the brake 2 When manually moving each robot joint the movement angle must be within a range of 45 2 10 Labels The following labels especially the warning ones are attached to the locations where specific dangers may 1st 2nd Joint 3rd Joint 4th 5th 6th Joint ...

Page 16: ...cidents Do not tear damage or remove the labels Be very careful if you need to handle the parts where the labels are attached A Do not put your hand or fingers close to moving parts B Be careful not to be close to the moving parts and nearby areas to avoid impact C Do not touch any internal electric parts to avoid electric shock D Product label Table 3 Denotation of Labels Figure 3 Locations of La...

Page 17: ...ng the arm and control box cartons to avoid back injury The Corporation will not be liable for any injuries caused during transportation WARNING This product must be shipped and stored in a temperature controlled environment within the range 20 C to 60 C 4 F to 140 F The recommended humidity is up to 75 percent non condensing It should be shipped and stored in the supplied package which is designe...

Page 18: ...dware Version 3 2 Document Version 1 01 18 4 System Hardware 4 1 Overview This chapter introduces the mechanical interface of the TM Robot System 4 2 System Overview TM Robot is made up of the robot arm and control box including a robot stick Robot arm Control Box Robot Stick ...

Page 19: ...Installation Manual TM12 14 Series Hardware Version 3 2 Document Version 1 01 19 4 2 1 Robot Arm 4 2 1 1 Dimension Drawings of Robot Shown below is the dimension drawing of the robot Figure 5 Dimension of TM12 TM12M All measures are in mm ...

Page 20: ...Medium Heavy Payload Series Hardware Installation Manual TM12 14 Series Hardware Version 3 2 Document Version 1 01 20 Figure 6 Dimension of TM14 TM14M All measures are in mm ...

Page 21: ...Medium Heavy Payload Series Hardware Installation Manual TM12 14 Series Hardware Version 3 2 Document Version 1 01 21 Figure 7 Dimension of TM12X All measures are in mm ...

Page 22: ...ment Version 1 01 22 Figure 8 Dimension of TM14X All measures are in mm 4 2 1 2 Robot Assembly Diagram Shown below is an illustration of the robot components To avoid safety risks do not attempt to disassemble any component on your own Contact your local corporation support for any service request ...

Page 23: ...Medium Heavy Payload Series Hardware Installation Manual TM12 14 Series Hardware Version 3 2 Document Version 1 01 23 Figure 9 Assembly of TM12 TM12M ...

Page 24: ...Medium Heavy Payload Series Hardware Installation Manual TM12 14 Series Hardware Version 3 2 Document Version 1 01 24 Figure 10 Assembly of TM14 TM14M ...

Page 25: ...Medium Heavy Payload Series Hardware Installation Manual TM12 14 Series Hardware Version 3 2 Document Version 1 01 25 Figure 11 Assembly of TM12X ...

Page 26: ...Medium Heavy Payload Series Hardware Installation Manual TM12 14 Series Hardware Version 3 2 Document Version 1 01 26 Figure 12 Assembly of TM14X ...

Page 27: ...cessible during manual mode At least one emergency switch is installed outside of the motion range of the robot When no motion limit is set for the robot the motion range of the robot is equal to the maximum motion range of the robot arm You can set a motion limit to avoid the situation whereby all operators have to be outside of the maximum motion range of the robot arm The robot stick should be ...

Page 28: ...ion 1 01 28 Figure 14 Pictorial view of TM12 TM12M TM12X Movement Range Diagram Figure 15 Top view of TM12 TM12M TM12X Movement Range Diagram All measures are in mm Operator Position Warning Risk of crushing within the operating area of the arm Warning Risk of collision within the operating area of the arm ...

Page 29: ...14 Series Hardware Version 3 2 Document Version 1 01 29 Figure 16 Side view of TM14 TM14M TM14X Movement Range Diagram All measures are in mm Figure 17 Pictorial view of TM14 TM14M TM14X Movement Range Diagram TM14 TM14M TM14X Movement Range Diagram Pictorial view ...

Page 30: ... are in mm 4 2 1 4 Robot Hazard Zone Diagram and Operator Position Diagram Shown below is an illustration of the robot hazard zone and operator position diagrams Do not operate the robot while anyone is inside of the hazard zone to avoid safety risks Operator Position Warning Risk of crushing within the operating area of the arm Warning Risk of collision within the operating area of the arm ...

Page 31: ...sion 3 2 Document Version 1 01 31 Figure 19 Robot Hazard Zone Diagram and Operator Position Diagram of TM12 TM12M TM12X All measures are in mm Operator Position Warning Risk of crushing within the operating area of the arm Warning Risk of collision within the operating area of the arm ...

Page 32: ...rque The maximum allowed payload of the robot arm is related to its center of gravity offset which is defined as the distance from the center point of tool flange to the payload s center of gravity The following figure shows the relationship between payload and the center of gravity offset Operator Position Warning Risk of crushing within the operating area of the arm Warning Risk of collision wit...

Page 33: ...t in TM12 TM12M TM12X Figure 22 Relationship between Payload and the Center of Gravity Offset in TM14 TM14M TM14X Refer the table below for the rated torque and the limit of repeated peak torque of the robot Exceeding torque may reduce the life of the robot or damage the robot TM12 TM12M TM12X Payload kg Center of gravity offset mm TM14 TM14M TM14X Payload kg Center of gravity offset mm ...

Page 34: ...ounting pattern is shown below The recommended tightening torque is 40 Nm Optional Two openings for 6 mm position pins are provided for more secure position mounting Ensure the strength of the mounting surface and its surround area before installations for upside down mounting and side mounting such as on the ceiling or the wall Wherever the installation takes place the robot setting remains equiv...

Page 35: ...Version 3 2 Document Version 1 01 35 Figure 23 Bottom View of Robot Base All measures are in mm Use the M4L5 pan head screw to secure the ground wire with the robot as shown below Figure 24 Securing the ground wire with the robot 4 2 2 Robot End Module 4 2 2 1 End Module Components ...

Page 36: ... 2 Document Version 1 01 36 Figure 25 References of TM12 TM12M TM14 TM14M End Module Components GRIPPER Button Camera module Flange ISO 9409 1 50 4 M6 Digital I O Indication Light Ring Analog I O FREE Button VISION Button POINT Button TM12 TM12M TM14 TM14M End Module Components Light module ...

Page 37: ...12 14 Series Hardware Version 3 2 Document Version 1 01 37 Figure 26 References of TM12X TM14X End Module Components GRIPPER Button Flange ISO 9409 1 50 4 M6 POINT Button Digital I O Indication Light Ring Analog I O FREE Button TM12X TM14X End Module Components ...

Page 38: ...d Series Hardware Installation Manual TM12 14 Series Hardware Version 3 2 Document Version 1 01 38 4 2 2 2 End Flange Surface Figure 27 References of End Flange Surface All measures are in mm Digital l O Analog l O Camera ...

Page 39: ... the tool or part to fall out or even cause personal injury and death 2 Securing tools with screws longer than 8mm at the end of the flange may result in short circuits or irreparable damages at the bottom of the flange leading to the relevant parts replacement 4 2 2 4 End Indication Light Ring Table The Indication Light Ring of the TM Robot has several colors which represent different modes and e...

Page 40: ...y Switch Default emergency button for the robot Power Button Power initiation single press Shutdown long press M A Mode Switch Button Toggle Manual Auto Mode single press See Safety Manual for details Play Pause Button Play Pause Project single press Stop Button Press this button to stop any project Button Adjust project speed single press under Manual Trial Run Mode See Safety Manual for details ...

Page 41: ...and hold both the button and the button until the mode indicator light flashes then follow the sequence to lock unlock the Robot Stick except the Power Button Table 6 Robot Stick Advanced Functions CAUTION The robot stick is magnetic so that it can be attached to iron or steel surfaces However the risk of falling or rotating caused by poor attachment should be taken into account It is recommended ...

Page 42: ...crews to fix and the recommended tightening torque is 1 Nm For higher accuracy on usages in demand use both of the 2 mm diameter openings with the positioning pins to get the better steadiness Users can replace the light module by applications in demand The choice depends on the torque load of the light module the available load of the robot the possible influence the other light module made to th...

Page 43: ...f the light module must match the relative relationship between the maximum allowed payload and the center of gravity offset distance If the tool end flange goes with additional applications it is required to generate the equivalent center of gravity for its position and total load from the combination of the light module and the application tool as well as follow 4 2 1 5 Payload and Torque of thi...

Page 44: ...bot comes with the IP54 rating but the Corporation does not guarantee this rating if users replace with the other light modules DANGER Be aware that the tool must be correctly and firmly secured to use with this product otherwise personal injuries or death may occur should the tool or the workpiece fall 4 3 Operating Position of TM Robot with AGV AIV When TM Robot is placed on an AGV AIV in operat...

Page 45: ...e and field of view of TM Robot s EIH camera The field of view of TM Robot s EIH camera varies linearly in accordance with the working distance The minimum working distance is about 100 mm and the maximum working distance is about 300 mm The zero working distance point is approximately 49 mm in front of the flange surface and right behind the center of the protection lens AGV AIV Footprint ...

Page 46: ...ing Distance and Field of View of TM Robot s EIH camera All measures are in mm The relation between the working distance and the field of view is listed below Working distance mm Field of view mm 300 100 Width 281 6 96 9 Height 211 2 72 7 Table 9 The Relation between the Working Distance and the Field of View 46 5 Working distance 0 ...

Page 47: ...power and contact your supplier 2 Only use the original cables included with the robot If you need longer cables contact your supplier 3 Ensure that the robot is properly grounded If the grounding is not correct it may cause a fire or electric shock WARNING The I O cables used for the link between the control box and other pieces of equipment should not be longer than 30 meters unless testing show...

Page 48: ... SO1 1 SO1 2 User Connected External Safeguard Output SF11 SI2 1 SI2 2 User Connected External Safeguard Input for Human Machine Safety Settings SF9 SO2 1 SO2 2 User Connected External Safeguard Output for Human Machine Safety Settings SF12 SI3 1 SI3 2 User Connected Enabling Device Input SF15 SO3 1 SO3 2 Robot Internal Protective Stop Output SF13 SI4 1 SI4 2 User Connected ESTOP Input without Rob...

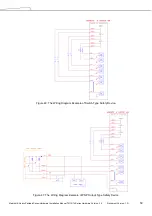
Page 49: ...ort is OPEN the robot enters the Protective Stop state 3 User Connected External Safeguard Input Port for Human Machine Safety Settings is a N C contact Normally closed When User Connected External Safeguard Input Port for Human Machine Safety Settings is OPEN the robot decrease the limits to which is set in Human Machine Safety Settings 4 User Connected Enabling Device Input Port is an N C contac...

Page 50: ...s Hardware Installation Manual TM12 14 Series Hardware Version 3 2 Document Version 1 01 50 Figure 40 The Wiring Diagram Example of Switch Type Safety Device Figure 41 The Wiring Diagram Example of PNP Output Type Safety Device ...

Page 51: ...iggers the User Connected External Safeguard Input the output will be LOW 3 User Connected External Safeguard Output Port for Human Machine Safety Settings When the robot triggers the User Connected External Safeguard Input for Human Machine Safety Settings the output will be LOW 4 Robot Internal Protective Stop Output Port When the robot triggers the internal Protective Stop the output will be LO...

Page 52: ...ulfilled safety level Failure to do so may result in injury or death due to a malfunction of the safety stop 2 All safety I Os come with dual redundant channel connectors Maintain both redundant channels while pairing and connecting to make sure that single fault on either one of the single channel will not result in failure of safety functions 3 Before putting to use the robot be sure to check th...

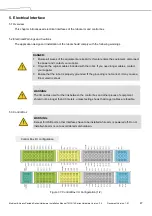
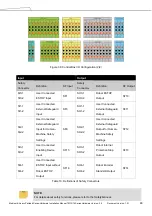
Page 53: ...lf offers a 24V 2A output 24_EX If the 24V load exceeds 2A it enters Safe Mode and disables the 24V output 3 EX24V provides an external 24V input port If the load exceeds 2A an external power supply can be used instead The load on EX24V must not exceed 3 5A Figure 45 Power Connector 5 3 3 Digital In Out Digital input output each has 16 channels and its application is connected to the following sec...

Page 54: ...ual TM12 14 Series Hardware Version 3 2 Document Version 1 01 54 Figure 46 Digital Input Set to sink input type When a device such as a transistor output sensor is connected NPN open collector transistor output can be used Figure 47 Set to Sink Input Type ...

Page 55: ...such as a transistor output sensor is connected PNP open collector transistor output can be used Figure 48 Set to Source Input Type 5 3 3 2 Digital Output Outputs can be set to either sink output or source output by selection The maximum drive current is 300mA per channel If the load exceeds 300mA a relay should be used to drive it Figure 49 Digital Output ...

Page 56: ... 14 Series Hardware Version 3 2 Document Version 1 01 56 Set to sink output type Connect DO_COM terminal to the minus side of the power supply Figure 50 Set to Sink Output Type Set to source output type Connect DO_COM terminal to the plus side of the power supply ...

Page 57: ...Medium Heavy Payload Series Hardware Installation Manual TM12 14 Series Hardware Version 3 2 Document Version 1 01 57 Figure 51 Set to Source Output Type 5 3 4 Analog In Figure 52 Analog In ...

Page 58: ... Figure 53 Analog Out Range Resolution Accuracy Conversion Time Analog In 10 00V 10 00V 11bit 0 2 1 ms Analog Out 10 00V 10 00V 11bit 0 07 1 ms Table 11 Analog In Analog Out 5 3 6 System Remote Power ON OFF The function of Remote ON OFF shares the same functionality of the Robot Stick Power Button Figure 54 System Remote Power ON OFF ...

Page 59: ...rnal storage devices External storage devices should only be used for the import export functions of TMflow No other device than those listed above should be connected Be noted that the external storage device should be labelled TMROBOT 5 4 Tool End I O Interface There are two small connectors on the tool end of the robot the 8 pin connector is for digital I O and the 5 pin connector is for analog...

Page 60: ...ut0 6 Blue DO_1 Digital Output1 7 Purple DO_2 Digital Output2 8 Black 0V 0v The M8 8PIN connector complies with the regulation of IEC 61076 2 104 Table 12 8 pin Digital I O Connectors of Cable Pin Wire Color Pin Define 1 Brown 24v 24V output 2 Red DI_0 Digital intput0 3 Orange DI_1 Digital intput1 4 Yellow DI_2 Digital intput2 5 Green DO_0 Digital outtput0 6 Blue DO_1 Digital outtput1 7 Purple DO_...

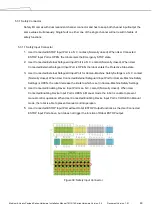
Page 61: ...D The M8 5PIN connector complies with the regulation of IEC 61076 2 104 Table 14 5 pin Analog I O Connector of Cable Pin Wire Color Pin Define 1 Black 24V 24V output 2 Brown DI_3 Digital Input3 3 Red DO_3 Digital Output3 4 Orange AI Analog Input 5 Yellow 0V GND Table 15 5 pin Analog I O connector of Robot 5 4 2 Connecting Tool End Digital Output The following figure shows how to connect the tool e...

Page 62: ...ed directly then they should be NPN Figure 57 Connecting Tool End Digital Input 5 4 4 Connecting Tool End Analog Input Range Resolution Accuracy Conversion Time 10 00V 10 00V 11bit 0 2 1 ms Table 16 Analog Input Range The following figure shows how to connect the tool end Analog input Because AIN_GND is connected to ground when AIN is a dead contact a pressure difference will occur which is a norm...

Page 63: ...ION The ETHERCAT interface can only be used to connect ETHERCAT devices Improper connection may cause the robot to stop Figure 60 Interfaces of the TM12 TM14 TM12X TM14X Series Robot Status Display v USB3 0 2 COM1 Robot Cable Adapter USB 2 0 4 HDMI LAN for GigE Camera 2 EtherCAT Line out Air Filter Screw AC Adapter AC Power Switch Power Remote ON OFF COM2 COM3 LAN Mic in I O Interface PE ...

Page 64: ...Power Switch DC IN for External Power Supply USB 3 0 2 COM1 Robot Cable Adapter USB 2 0 4 HDMI LAN for GigE Camera 2 EtherCAT Line out Air Filter Screw Power Remote ON OFF COM2 COM3 LAN Mic in I O Interface PE PE External Power Supply Remote Control DC IN Power DC Power Switch DC IN for External Power Supply USB 3 0 2 COM1 Robot Cable Adapter USB 2 0 4 HDMI LAN for GigE Camera 2 EtherCAT Line out ...

Page 65: ... must be in OFF state before plugging in or out the power cable TM12M TM14M The power cable of the control box has Hirose HRS DF60 series connector Figure 64 Control Box Power Interfaces The power supply should be equipped with the following AC Adapter AC Adapter IEC plug DC IN Power Connector HRS DF60 3EP 10 16C DC IN for External Power Supply Connector Contact the Corporation for purchasing Exte...

Page 66: ...wer Parameters Minimum Value Typical value Maximum value Unit Input voltage 22 60 V DC Power consumption 300 1500 W Table 18 TM12M TM14M Series Electrical Specifications If using DC22 47V power supply the Robot will automatically limit the total output power Please contact the Corporation to purchase the external power supply if in demand DANGER 1 Ensure that the robot is correctly grounded electr...

Page 67: ...d installation If the applications have the request for flexible or longer cable contact the corporation 5 6 3 SEMI Emergency Off Interfaces SEMI series exclusive Refer below for the SEMI Emergency Off interfaces The SEMI Emergency Off switch is connected with control box through the EMO port Please remove the padlock on the power interface for the power cable or the power switch and secure the pa...

Page 68: ...n 5 6 4 Detachable I O Panel To facilitate the wiring of the detachable I O panel which comes with a 15 cm cable users can loosen the tethered screws to remove the detachable I O panel and install easily in the other place Users are free to change the cable for the placement farther away however it is suggested to use the cable no longer than 3 m The box header connector comes with 40 pins and 44 ...

Page 69: ...diately Inspect each item for external damage as it is removed from its container If any damage is evident contact your corporation support see HOW Can I Get Help on 1 2 Retain all shipping containers and packaging materials These items may be necessary to settle claims or at a later date to relocate equipment WARNING If this is your first time using the TM Robot follow instructions in this chapte...

Page 70: ...SEMI series For TM12 SEMI or TM14 SEMI there will be an additional carton comes with the SEMI Emergency OFF Box Refer below for the ratio of the cartons The actual sizes of the cartons may differ from measurements Figure 69 Robot Arm Carton Figure 70 SEMI Emergency OFF Switch Carton Figure 71 Control Box Carton Figure 72 SEMI Emergency OFF Box Carton 6 3 2 Contents of Each Carton Each carton has t...

Page 71: ...m Table 19 The Robot Arm Carton Contents The control box carton contains One large calibration plate and one small calibration plate Peel the protective wrap off before using The Calibration Plate comes only with TM Robots fitted with the hand eye camera No Calibration Plate includes in the following series TM5X 700 TM5X 900 Robot arm Control box Calibration Plates ...

Page 72: ... using The TM Landmark comes only with TM robots fitted with the hand eye camera No TM Landmark includes in the following series TM5X 700 TM5X 900 1 cable Length 180 cm Exact delivery of power plug will vary from regions to regions 1 cable Length 120 cm 2 wires Length 300 cm Table 20 The Control Box Carton Contents IO cables TM Landmark Power cord of the control box TM12 TM14 TM12X TM14X Power cab...

Page 73: ...d of the SEMI Emergency OFF Box to connect between the control box and the SEMI Emergency OFF Box Table 22 The SEMI Emergency OFF Box Carton Contents 6 4 Installing Your Robot The TM Robot arm cannot stand independently after being removed from the carton Therefore prepare the mounting base with the corresponding holes as described in 4 2 1 6 Robot Arm Installation and follow the instructions belo...

Page 74: ...e the Control Box After checking the contents remove the contents in order and perform installation Control box carton Remove the Calibration Plates and TM Landmark Remove the power cable of the control box Remove the control box At least two people should remove the control box from the carton Refer the figure below for the correct holding positions Connect the power cable to the control box Plac...

Page 75: ...o attach the robot to the base near the robot base in advance If the base is designed with corresponding pinholes mount them to the base 6 4 3 Removal of the Robot Arm and Tightening At least two people should remove the robot arm from the carton For the correct holding positions refer to the figure below Place the robot on the mounting base If it is designed with connection pins align the pinhole...

Page 76: ...d tipping Figure 76 Moving the Robot Arm 2 2 For users of TM12 SEMI or TM14 SEMI please remove the SEMI Emergency OFF Box out of its carton WARNING When the robot is installed to the base make sure two people work together to install it If it is designed with pinholes pay attention to your safety to avoid pinching If you do not have connection parts at hand such as the connecting pins and screws d...

Page 77: ...socket and the power interface of the control box Figure 78 Connecting the Robot and the Control Box For the SEMI series users only connect the SEMI Emergency OFF switch to the EMO interface of the control box 6 4 4 1 Connect the Robot the Control Box and the SEMI Emergency OFF Box For users of TM12 SEMI or TM14 SEMI exclusively 1 Connect the cable from the robot to the robot interface of the cont...

Page 78: ... 79 Connecting the Robot the Control Box and the SEMI Emergency OFF Box WARNING 1 Ensure that all cables are correctly connected before the control box is energized Always use genuine power cables correctly 2 When the robot is turned on do not disconnect cables of the robot When cables of the robot are not connected to the connection interface do not turn on the robot 3 Do not extend or modify the...

Page 79: ... mode will be constantly flashing When the User Connected External Safeguard Input Port for Human Machine Safety Setting is open the purple light will be alternating between the indication light of the current mode When the User Connected Enabling Device Input Port is open the current motion is supposed to stop and the indication light of current mode will be constantly flashing This function is i...

Page 80: ...iring NOTE The filter must be changed regularly to maintain efficiency Please contact the Corporation to purchase the filter if in demand Figure 80 Air Filter Tray Removal method 1 Turn of the power and lay the control box flat 2 Remove the rubber edge trim and loosen the air filter screw 3 Pull out the air filter tray and replace the filter with a new one screw tray rubber edge trim ...

Page 81: ...eplaced or returned items are the property of the Corporation This warranty does not cover other requests directly or indirectly related to equipment No conditions of this warranty shall attempt to limit or exclude customer s statutory rights or manufacturer s responsibility for personal injury or death due to negligence The warranty cannot be extended even if it is the initial warranty The Corpor...

Page 82: ...Medium Heavy Payload Series Hardware Installation Manual TM12 14 Series Hardware Version 3 2 Document Version 1 01 82 9 Declaration of Incorporation ...

Page 83: ...Medium Heavy Payload Series Hardware Installation Manual TM12 14 Series Hardware Version 3 2 Document Version 1 01 83 ...

Page 84: ...Medium Heavy Payload Series Hardware Installation Manual TM12 14 Series Hardware Version 3 2 Document Version 1 01 84 ...

Page 85: ...Medium Heavy Payload Series Hardware Installation Manual TM12 14 Series Hardware Version 3 2 Document Version 1 01 85 ...

Page 86: ...ntrol Box Digital In 16 Digital Out 16 Analog In 2 Analog Out 1 Tool Conn Digital In 4 Digital Out 4 Analog In 1 Analog Out 0 I O power supply 24V 2 0A for control box and 24V 1 5A for tool IP classification IP54 Robot Arm IP32 Control Box Power consumption Typical 300 watts Temperature The robot can work in a temperature range of 0 50 C Power supply 100 240 VAC 50 60 Hz 22 60 VDC I O Interface 3 ...

Page 87: ...Medium Heavy Payload Series Hardware Installation Manual TM12 14 Series Hardware Version 3 2 Document Version 1 01 87 ...

Reviews: