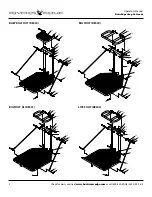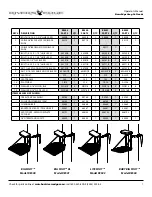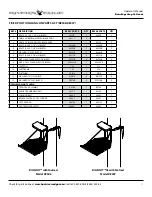
Check for parts online at
www.huntriversedge.com
or call 800-450-EDGE (3343) M-F 8-5
7
Operator's Manual
Rivers Edge Hang-On Stands
sETuP AND usE INsTRuCTIONs (RE504, RE500,
RE501, RE503, RE506, RE507)
During installation and removal of a hang-on treestand, you must
always and properly use the included Full Body Harness (Fall Arrest
System) with climbing belt. Refer to the Full Body Harness and
climbing belt instructions included with this product for proper use.
You must always use the Full Body Harness while using this product.
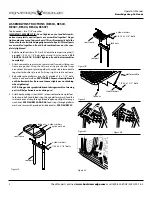
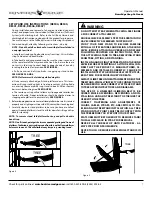
1. At desired height, attach by following instructions - a,b,c,d,e.
nOTE: stand should be attached to tree with platform folded in
an upright position!
a. Lengthen strap by pulling buckle away from strap - this will allow
strap to slide around buckle roller.
b. Take buckle and wrap around tree. Be sure the strap is even and
at the same level all the way around the tree. Also, be sure there are
no twists in the strap. Connect hook to opposite side of stand by
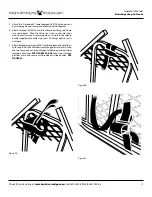
inserting thru hole (slot) provided. sEE fIGuRE 4.
c. Pull on excess end of strap firmly - snugging up stand to tree.
sEE fIGuREs 4 AND 5.
nOTE: Platform must be folded up while doing this.
d. Once securely attached, pull stand platform down. This lever-
action will snug stand up tight to tree to prevent any shifting. Redo
as necessary to accomplish a snug stand-to-tree fit. All four contact
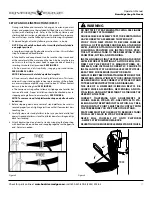
bars must be touching tree! sEE fIGuRE 5.
e. The tension on strap will not allow any slippage due to roller bar
tension of buckle. Proper installation should be checked prior to
stepping onto platform to ensure safety. sEE fIGuRE 5.
2. Before stepping down onto center of stand platform, be sure it is secured
properly and is tight against tree with all (4) contact bars touching tree!
3. Carefully step onto stand platform to be sure you have a solid feel
against tree and platform is level. Seat folds down for sitting and tips
back for standing.
nOTE: To remove stand, fold platform back up and pull on buckle
hand strap.
nOTE: On all stands, paint gets between expanded grating and frame of
platform. To eliminate any creaking sound from this, walk all over platform
before use in woods. This will eliminate any temporary creaking sound.
TREE
TREE
Figure 4
TREE
Figure 5
WARNING
DO NOT TWIsT sTRAP WhEN ATTAChING. sEE fIGuRE
4 fOR CORRECT ATTAChMENT.
DOuBlE ChECK AssEMBlY sTEPs TO BE CERTAIN YOu
hAvE CORRECTlY AssEMBlED ThIs PRODuCT.
sTuDY YOuR NEW sTAND TO BECOME fAMIlIAR
WITh All Of ITs fEATuREs AND DEsIGN. AT GROuND
lEvEl, BEfORE ATTAChING OvERhEAD AND WhIlE
fOllOWING PROvIDED usE INsTRuCTIONs, PRAC-
TICE ATTAChING sTAND TO TREE, REMOvING sTAND
fROM TREE, sITTING, AND sTANDING.
INsTAllING AND usING ThE TREEsTAND AT GROuND
lEvEl BEfORE ATTEMPTING AT AlTITuDE WIll CON-
fIRM ThAT ThE PRODuCT Is MANufACTuRED, As-
sEMBlED, AND INsTAllED CORRECTlY. fAIluRE TO
INsTAll AND TEsT AT GROuND lEvEl fIRsT PuTs us-
ERs AT RIsK fOR sERIOus INJuRY OR DEATh.
AlWAYs ClIMB TREE ON ThE ATTAChMENT sIDE Of ThIs
TREEsTAND. vIsuAllY INsPECT YOuR CONNECTION TO
BE AssuRED YOu hAvE CORRECTlY ATTAChED sTAND
TO TREE As PER INsTRuCTIONs AND DIAGRAMs.
ThE usE Of A lINEMAN's/ClIMBING BElT Is RE-
QuIRED WhIlE AsCENDING, DEsCENDING AND IN-
sTAllING A hANG-ON TREEsTAND TO sTABIlIZE ThE
usER WITh ThE TREE.
CORRECT TIGhTENING AND ADJusTMENTs Of
ChAINs, CABlEs, sTRAPs, ETC. ARE CRITICAl TO sTA-
BlE hANG-ON TREEsTAND INsTAllATION. All TREE-
sTAND CONTACT POINTs MusT BE IN CONTACT WITh
ThE TREE BEfORE YOu sTEP ONTO YOuR sTAND.
PlATfORM MusT BE fOlDED uP TO REMOvE sTAND!
ThIs AllOWs slACK IN sTRAP fOR REMOvAl.
NEvER Pull YOuRsElf uP ONTO PlATfORM - Al-
WAYs sTEP DOWN fROM ABOvE.
NEvER TOuCh OR MOvE BuCKlE WhIlE sTAND Is IN
usE.


