background image

4

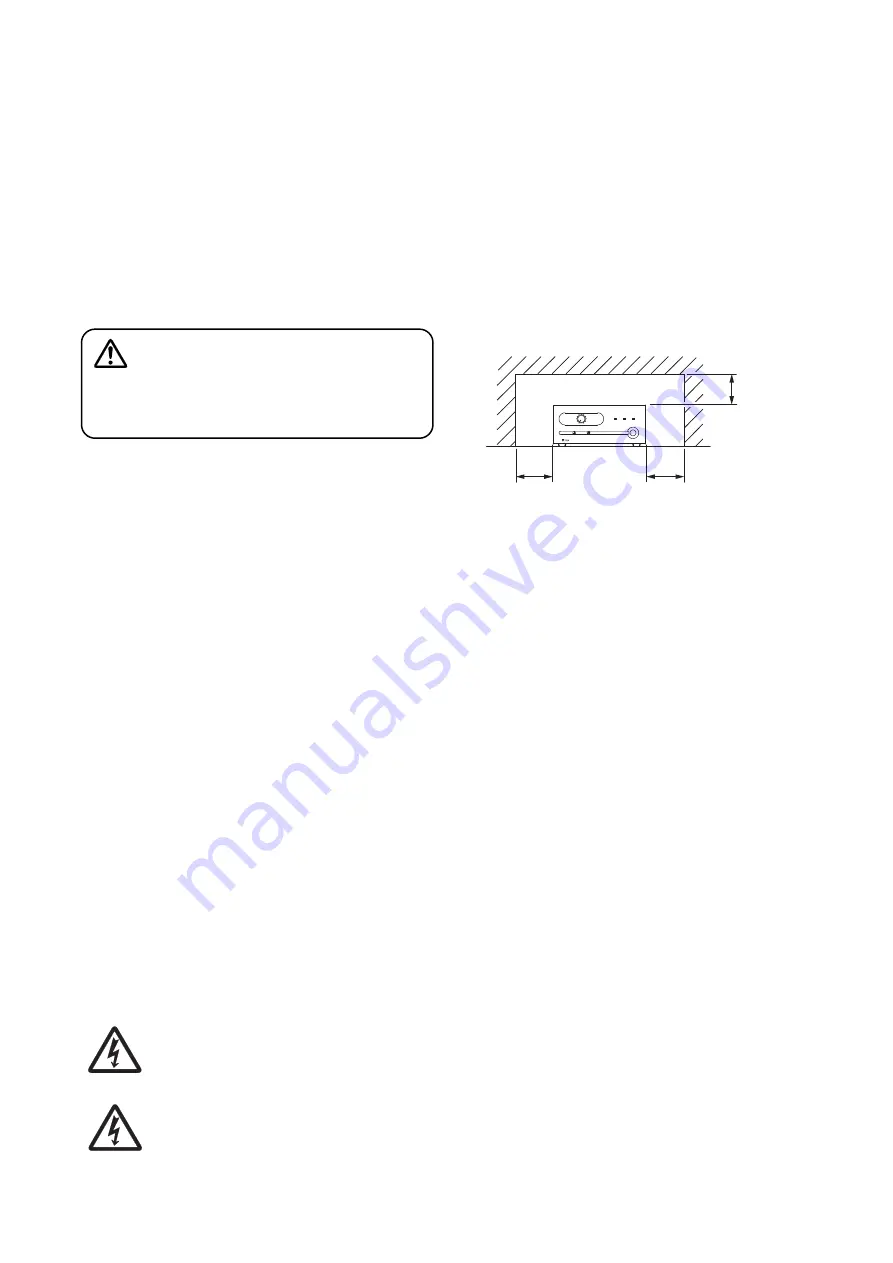
Over 10 cm (3.94")

Over 10 cm (3.94")

Over 10 cm
(3.94")

The lighting flash with arrowhead symbol, within an equilateral triangle, is intended to alert the user
to the presence of uninsulated "dangerous voltage" within the product's enclosure that may be of
sufficient magnitude to constitute a risk of electric shock to persons.

L'éclair accompagné d'un symbole représentant une pointe de flèche à l'intérieur d'un triangle
équilatéral avertit l'utilisateur de la présence d'une "tension dangereuse" à l'intérieur de l'enceinte
du téléviseur, dont la magnitude peut être suffisante pour constituer un risque de choc électrique
pour les personnes.

• Do not place cups, bowls, or other containers of

liquid or metallic objects on top of the unit. If they
accidentally spill into the unit, this may cause a fire
or electric shock. 

• Ne pas placer de tasses, bols ou autres récipients

remplis de liquides ou d'objets métalliques au-
dessus de l'appareil. S'ils se répandent par
accident sur l'appareil, ils peuvent provoquer un
incendie ou une électrocution. 

• Do not insert nor drop metallic objects or

flammable materials in the ventilation slots of the
unit's cover, as this may result in fire or electric
shock. 

When Installing the Unit

• Never plug in nor remove the power supply plug

with wet hands, as doing so may cause electric
shock.

• When unplugging the power supply cord, be sure

to grasp the power supply plug; never pull on the
cord itself. Operating the unit with a damaged
power supply cord may cause a fire or electric
shock.

• When moving the unit, be sure to remove its power

supply cord from the wall outlet. Moving the unit
with the power cord connected to the outlet may
cause damage to the power cord, resulting in fire
or electric shock. When removing the power cord,
be sure to hold its plug to pull. 

• Do not block the ventilation slots in the unit's cover.

Doing so may cause heat to build up inside the unit
and result in fire.

• Avoid installing the unit in humid or dusty locations,

in locations exposed to the direct sunlight, near the
heaters, or in locations generating sooty smoke or
steam as doing otherwise may result in fire or
electric shock. 

• To avoid electric shocks, be sure to unplug the

unit's power supply cord when connecting
speakers.

• Be sure to follow the instructions below when rack-

mounting the unit. Failure to do so may cause a fire
or personal injury.
· Install the equipment rack on a stable, hard floor.

Fix it with anchor bolts or take other
arrangements to prevent it from falling down.

· When connecting the unit's power cord to an AC

outlet, use the AC outlet with current capacity
allowable to the unit.

· No rack-mounting screws are supplied with the

unit. Separately prepare the appropriate screws
for the rack.

• Keep the amplifier over 10 cm (3.94") away from

objects that may obstruct air flow to prevent the
unit's internal temperature rise.

When the Unit is in Use 

• Do not place heavy objects on the unit as this may

cause it to fall or break which may result in
personal injury and/or property damage. In
addition, the object itself may fall off and cause
injury and/or damage.

• Make sure that the volume control is set to

minimum position before power is switched on.
Loud noise produced at high volume when power
is switched on can impair hearing. 

• Do not operate the unit for an extended period of

time with the sound distorting. This is an indication
of a malfunction, which in turn can cause heat to
generate and result in a fire.

• If dust accumulates on the power supply plug or in

the wall AC outlet, a fire may result. Clean it
periodically. In addition, insert the plug in the wall
outlet securely.

• Switch off the power, and unplug the power supply

plug from the AC outlet for safety purposes when
cleaning or leaving the unit unused for 10 days or
more. Doing otherwise may cause a fire or electric
shock. 

CAUTION

Indicates a potentially hazardous situation which,
if mishandled, could result in moderate or minor
personal injury, and/or property damage.

Summary of Contents for BA-235

Page 1: ...8 2 CHANNEL BROADCAST 9 9 OPERATION 9 10 INSTALLATION PRECAUTIONS 9 11 RACK MOUNTING BRACKET ATTACHMENT 10 12 VOLUME SETTING 11 13 VOLUME CONTROL COVER 11 14 BLOCK DIAGRAM 11 15 DIMENSIONAL DIAGRAM 12 16 SPECIFICATIONS 12 Accessories 12 Optional products 12 MASTER SIGNAL PEAK POWER ON OFF BASS TREBLE POWER AMPLIFIER BA 260 0 10 Thank you for purchasing TOA s Power Amplifiers Please carefully follo...

Page 2: ...instructions pour référence ultérieure Respecter tous les avertissements Suivre toutes les instructions Ne pas utiliser cet appareil à proximité d eau Nettoyer uniquement à l aide d un chiffon sec Ne pas obstruer les orifices de ventilation Installer conformément aux instructions du fabricant Ne pas installer à proximité de sources de chaleur telles que des radiateurs des registres thermiques des ...

Page 3: ...nter l unité en bâti Retirez les quatre vis M4 x 8 sur les deux côtés de l appareil et montez la patte à l aide des vis M4 x 16 fournies avec la patte When the Unit is in Use Should the following irregularity be found during use immediately switch off the power disconnect the power supply plug from the AC outlet and contact your nearest TOA dealer Make no further attempt to operate the unit in thi...

Page 4: ... up inside the unit and result in fire Avoid installing the unit in humid or dusty locations in locations exposed to the direct sunlight near the heaters or in locations generating sooty smoke or steam as doing otherwise may result in fire or electric shock To avoid electric shocks be sure to unplug the unit s power supply cord when connecting speakers Be sure to follow the instructions below when...

Page 5: ...or flashes intermittently 3 GENERAL DESCRIPTION The BA 235 35 W and BA 260 60 W are Power Amplifiers for background music and general announcement These units are suited for use in bars retail stores and banquet rooms When used in conjunction with the optional mixer amplifier BG 220 20 W or BG 235 35 W 2 channel broadcast can be made 4 FEATURES Remote master volume control using an external volume...

Page 6: ...ternally connected in parallel to the Line input connectors 14 Connect to the other amplifier s input 13 Input level selector switch Selects either 0 dB or 4 dB for the line input sensitivity level 14 Line input terminals 10 kΩ 0 dB 4 dB selectable see item 13 unbalanced removable terminal block and RCA jacks Upper and lower RCA jacks are internally passively mixed 0 dB 1 V These connectors are in...

Page 7: ...e connection procedure from the start Step 2 Insert the wired terminal plug into the corresponding terminal block in the unit s rear panel Step 3 Tighten the fixing screws Speaker output terminals only Notes Do not reverse Steps 1 and 2 Poor contact may result if force is applied to the unit s internal circuit board pins while the terminal screws are being tightened Use an appropriate type screwdr...

Page 8: ...rol 10 kΩ linear taper REMOTE VOLUME 6 3 2 Bridge output connection BRIDGE OUT 10kΩ H E E H Other power amplifier s Line input 6 3 Output Connections 6 3 1 Speaker connections Each amplifier has 3 speaker outputs 4 Ω 25 V and 70 V Use only one of these outputs for connection Class 2 wiring may be used Note Impedances in the figures below represent total speaker load impedance 70 V LINE Total imped...

Page 9: ...e A Sound source B Sound source C LINE IN SPEAKER OUT BA 235 or BA 260 ZONE 2 Sound source C 9 OPERATION After completing all connections turn on the power switch and check to confirm that the power indicator lights Note When the heat sink temperature exceeds 105 C 221 F the protection circuit begins to operate to disconnect the output from the circuit The disconnected output is automatically rest...

Page 10: ...ws on both sides of the unit These removed screws are not used for rack mounting Notes Rack mounting screws are not supplied with the unit Use the screws that are appropriate for the rack When mounting the unit in an equipment rack the inside of the rack must be sufficiently ventilated To achieve sufficient ventilation also mount the optional PF 511 Perforated Panel 1U 1 at the top and the bottom ...

Page 11: ...ront panel it is recommended to replace its control knob with the supplied YA 920 Volume Control Cover Follow the procedure below for its replacement Step 1 Remove the control knob Step 2 Adjust the Master volume control without knob to an appropriate level Step 3 Attach the YA 920 onto the control 14 BLOCK DIAGRAM POWER AMP SPEAKER OUT AC120 V 60 Hz POWER SUPPLY FOR POWER AMP 70 V LINE LINE IN 10...

Page 12: ...movable terminal block Output Regulation 1 kHz Under 2 dB no load to full load S N Ratio Line input Over 80 dB Band Pass 20 Hz 20 kHz Tone Controls Centered Tone Control Bass 10 dB at 100 Hz Treble 10 dB at 10 kHz Control Master gain control Bass tone control Treble tone control Input level selector switch Remote volume control Power ON OFF switch Indicator Power LED Signal level LED Peak LED Othe...

Reviews: