From the
amplifier
To the next
speaker
COM
5 mm (0.2")
HOT
Earth
COM
HOT
Earth
Screw terminal
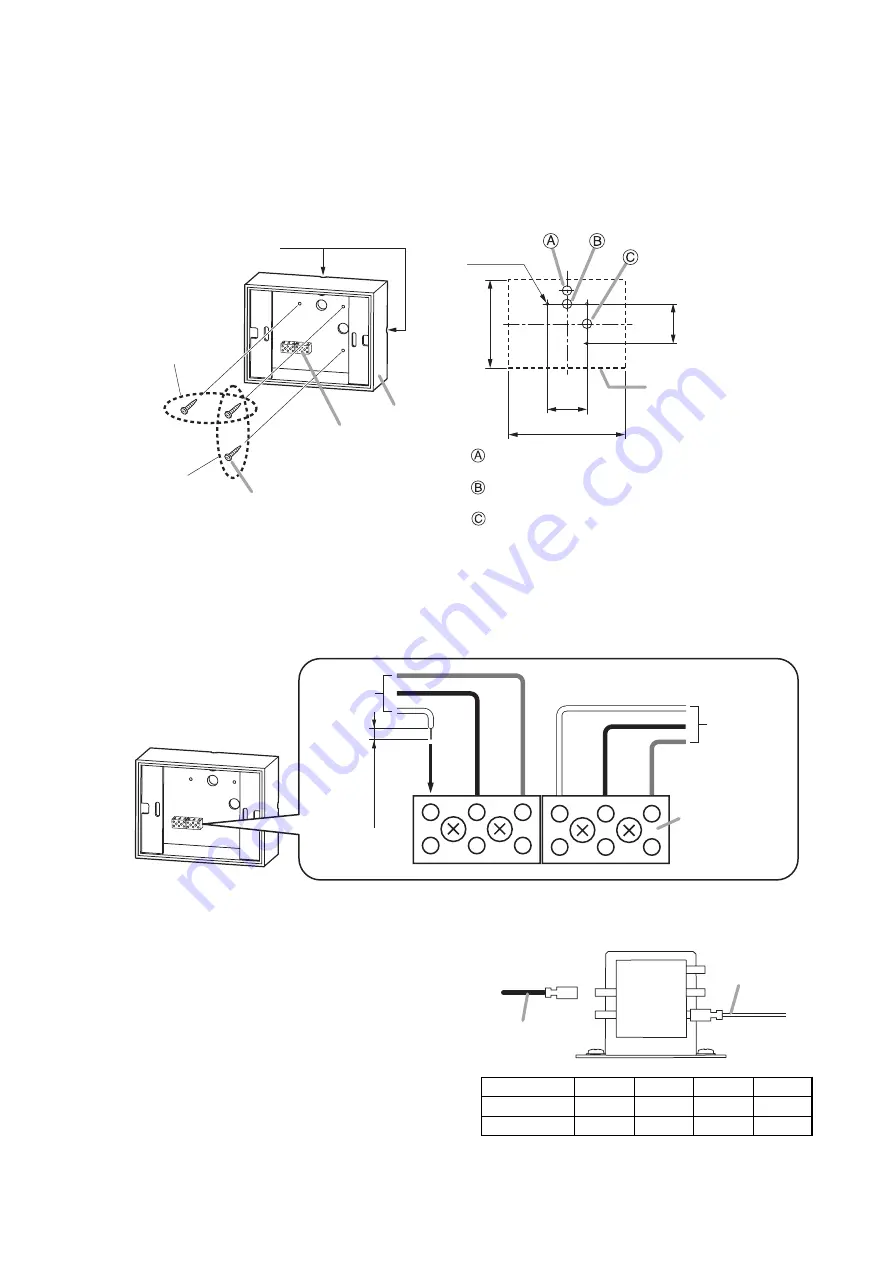
3
Notches for open wiring
Screws for
horizontal mounting
Screws for
vertical mounting
Tapping screws 4 x 35 (accessory)
Cabinet
Screw terminal
Step 2.
Install the cabinet to the wall using the supplied tapping screws 4 x 35. In this case, route the cables
from a cable entry hole.
Notes
• If the supplied tapping screws are not appropriate for the construction of wall, separately prepare
the appropriate screws.
• The speaker can be installed in a vertical or horizontal orientation. Either concealed in-wall wiring or
open wiring is available for speaker cable connection.
[Cabinet mounting dimensions]
3-ø5 (0.2)
Unit: mm (in)
Cabinet outside
dimensions
83.5
(3.29)
250 (9.84)
83.5
(3.29)
190
(7.48)
Cable entry hole
(for open wiring at horizontal mounting)
Cable entry hole
(for concealed wiring at horizontal mounting)
Cable entry hole
(for concealed and open wirings at vertical mounting)
Step 3.
Make wiring.
3-1.
Insert the lead-in cables (cables from the amplifier) and lead-out cables (cables to other speakers)
into the screw terminals attached to the cabinet.
3-2.
Insert the fasten s fitted at the ends of the
HOT and COM cables from the screw
terminals on the cabinet into the taps of the
matching transformer on the speaker unit.
Connect the COM cable to the transformer's
COM tap, and the HOT cable to the desired
transformer's input tap (Refer to the figure at
right.)
The table at right shows the relationship
between impedance and input power.
3.3kΩ
1.7kΩ
COM
6.7kΩ
13kΩ
HOT (black)
COM (white)
Matching transformer
Impedance
1.7 k
Ω
3.3 k
Ω
6.7 k
Ω
13 k
Ω
100 V line
6 W
3 W
1.5 W
0.8 W
70 V line
3 W
1.5 W
0.8 W
0.4 W


