background image

49

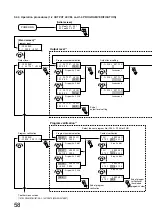
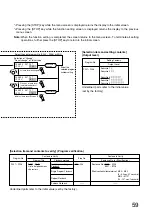
8.6.4. Initializing the digital announcer (6-4 DIGITAL ANNOUNCER INITIALIZATION)

All settings return to the initial values set by the factory.
The setting contents are initialized in the setting menus; "RECORDING SETTING," "4. OUTPUT/VOLUME
SETTING," "5. OPERATION SETTING," "6. ENVIRONMENT SETTING," and "9. AUTO-LEVEL SETTING."
Refer to p. 72 for the operation procedures. 

8.6.5. Key lock setting (6-5 KEY LOCK)

This function allows the keys to be locked. You must set the password when using this function. Setting the
key lock function for ON disables all the keys and dials except the power switch, preventing malfunctions and
tampering. 
Refer to p. 72 for the operation procedures. 

Note:

The key lock function is factory-preset for OFF.

8.6.6. Version indication (6-6 VERSION INDICATION)

Displays the version of the unit's program software. Select the corresponding item with the [SELECT] dial, and
the version is displayed.
Refer to p. 72 for the operation procedures.  

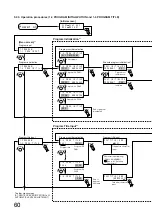
8.7. Setting Functions (7. EDITING THE CARDS)

You can assign a name to the card or re-format the card.

8.7.1. Entering or editing the card name (7-1 CARD NAME INPUT)

You can assign a name to the recorded card or modify the registered card name.
Refer to p. 74 for the operation procedures.  

8.7.2. Reformatting the memory card (7-2 CARD REFORMATTING)

Cards can be re-formatted. Note that the whole of the recorded content is erased if the card is re-formatted.
Refer to p. 74 for the operation procedures.  

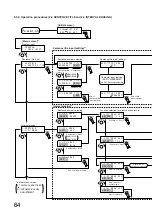
8.7.3. Optimization of the cards (7-3 CARD OPTIMIZATION)

Erasing the sentences in the card may shorten the card's remaining recording time. This, however, can be
avoided by optimizing the card. Be sure to optimize the card after erasing the sentences.
Refer to p. 76 for the operation procedures.  

8.7.4. Software-operated write protection (7-4 SOFTWARE WRITE PROTECT)

Recorded or set contents of the card can be protected. Protecting the card makes it impossible to register,
erase or edit sentences, and to change programs. It is highly recommended that the finished card be
protected to avoid the accidental erasure of the card's contents. Programs can be played back or verified, and
sentences verified even if the card is protected.

Note:

The software-operated write protection function is factory-preset for OFF for both cards A and B.

When the SRAM card is used, it is protected as follows depending on the card's write protect (WP) switch
setting and the on-off status of the software-operated write protection.

WP switch: WP position, software write protection: ON

Protection ON

WP switch: WP position, software write protection: OFF

Protection ON

WP switch: Opposite position of WP, software write protection: ON

Protection ON

WP switch: Opposite position of WP, software write protection: OFF

Protection OFF

Note that the software-operated write protection cannot be set if the WP switch is already set to WP position.
To disable the protection of the card with the WP switch in WP position after setting the software-operated
write protection for ON, set the WP switch to WP position first, then set the software-operated protection for
OFF.

Refer to p. 76 for the operation procedures. 

Summary of Contents for EV-350R

Page 1: ...TING INSTRUCTIONS DIGITAL ANNOUNCER EV 350R Please follow the instructions in this manual to obtain the optimum results from this unit We also recommend that you keep this manual handy for future refe...

Page 2: ...ation 12 4 1 2 About the screen display 12 4 2 Whole Operation Flow Playback Recording and Setting 13 4 3 Summarized Operational Functions Recording Playback and Setting 14 5 THE SENTENCE AND PROGRAM...

Page 3: ...1 6 Program initialization 1 4 PROGRAM INITIALIZATION 38 8 1 7 Entering and editing the program title 1 5 PROGRAM TITLE 38 8 2 Setting Functions 2 EDITING THE SENTENCES 8 2 1 Verifying the sentence 2...

Page 4: ...tting Functions 8 COPYING THE PROGRAM SENTENCE AND CARD 8 8 1 Copying a program 8 1 PROGRAM COPYING 50 8 8 2 Copying a sentence 8 2 SENTENCE COPYING 50 8 8 3 Copying the memory card 8 3 CARD COPYING 5...

Page 5: ...d CARD 9 9 1 Operation procedures 8 1 PROGRAM COPYING 77 9 9 2 Operation procedures 8 2 SENTENCE COPYING and 8 3 CARD COPYING 78 9 10 Setting Operation 9 AUTO LEVEL SETTING 9 10 1 Operation procedures...

Page 6: ...keep this instruction manual handy for future reference When Installing the Unit Do not expose the unit to rain or an environment where it may be splashed by water or other liquids as doing so may re...

Page 7: ...asure and stop can be remotely controlled by external equipment Detachable front cover protects the memory cards from tampering Key lock function prevents accidental key setting changes and tampering...

Page 8: ...lock the holder 4 Release the write protect switch to enable writing Caution If the write protect switch is set to the WP position the card cannot be used for recording Use the WP position to avoid t...

Page 9: ...ry replacement When replacing the backup battery be sure to insert the auxiliary battery into this unit energized state for 30 minutes or more to keep the auxiliary battery fully charged before replac...

Page 10: ...display the unit falls into recording standby See p 12 Selection dial Selects the operation at recording playback or setting screen display See p 12 Display screen LCD Displays recording playback stat...

Page 11: ...ee p 32 Activation control inputs 1 8 Short these inputs when playing back programs or when recording or erasing sentences See p 40 Erasure control input Short this input when erasing recorded sentenc...

Page 12: ...also used to display playback program information in playback standby status or during playback 4 OUTLINE OF OPERATIONAL FUNCTIONS 4 1 Operation and Screen Display 4 1 1 Keys and dial to be used in ea...

Page 13: ...REC PLAY PLAY STOP STOP STOP STOP STOP REC SELECT SELECT SELECT SELECT SELECT SELECT F ORMA T C A R D A P R L E A C Y P R L E A C Y K K E E Y Y P P 0 0 0 0 1 2 A A N N N N O O U U N N C C 1 2 M A A 0...

Page 14: ...phone program playback etc 1 PROGRAM SETTING 1 1 1 PROGRAM INPUT p 33 54 Sets sentence numbers playback methods and playback outputs for each program 1 2 OUTPUT LEVEL p 38 58 Sets the output level for...

Page 15: ...values 6 5 KEY LOCK p 49 72 If the Key Lock function is enabled ON the keys and dial other than the power switch cannot be used 6 6 VERSION INDICATION p 49 72 Displays the equipment program software v...

Page 16: ...of sentences that can be recorded 5 2 Program The program is playback data consisting of Playback Sound Data 1 and Control Data 2 The program is written into a card 1 Combined data of Sentence and Si...

Page 17: ...Sentence A004 Sentence A128 A512 P001 P002 P003 P256 Sentence B001 Sentence B002 Sentence B003 Sentence B004 Sentence B128 B512 B003 A002 Step 1 Step 2 Step 3 Step 4 Step 128 M015 Silent interval 15...

Page 18: ...ed whenever recording on the new card 6 1 2 Connections Connect the microphones for recording or external musical equipment to be used as a recording sound source Note Simultaneously recording multipl...

Page 19: ...ard A nor Card B is formatted the formatting instructions of Card A are first displayed as shown above followed by the instructions of Card B The maximum number of sentences that can be recorded is 12...

Page 20: ...Because the recording sound quality best suited to each sentence can be selected individually the card can be efficiently used for recording It is possible to combine sentences recorded using differen...

Page 21: ...rge General level for automatic start Recording starts at a large signal input Recording starts at a small signal input 6 4 Recording the Emergency Sentence Card slot for the emergency sentence record...

Page 22: ...6 4 0 M E M T A H N O U D A L 4 4 S 1 T k A R E T H Card remaining time P o w e r o n Press the Recording key Step 1 Select sentence numbers Step 2 Viewing the level meter indication adjust the recor...

Page 23: ...C A Y K E K Y E Y When continuing to record Sentence title input See p 81 Entering Characters In this example the title A002 is not changed Press the Stop key to stop the recording The sentence title...

Page 24: ...tep 2 Press the Recording key The recording standby mode changes to input waiting status Step 3 Level meter indication Card remaining time Elapsed recording time Recording is now available P o w e r o...

Page 25: ...p 5 Note The title and recording time are displayed for recorded sentences When continuing to record Initial screen Recording time STOP SELECT SELECT SELECT STOP SELECT EME T I T L E E M E R E G ND P...

Page 26: ...ack mode Card A Card B Decoder Output 1 Output 2 Output 1 Output 2 Dual source playback mode Decoder Card A Card B P 0 0 1 P 0 0 2 18 9 6 3 0 3 6dB Display changes to level meter readings during playb...

Page 27: ...2 2 Playback method Here the method to play back programs already input will be explained Step 1 Check the unit for proper connection then remove the front cover to insert the memory card For about th...

Page 28: ...0 0 0 2 3 A A N N N N O O U U N N C C 2 3 POWER ON Initial screen Step 1 Press the Playback key PLAY P R L E A C Y P R L E A C Y K K E E Y Y Playback standby status Output 1 P P 0 0 0 0 1 3 A A N N N...

Page 29: ...0 0 1 4 A A N N N N O O U U N N C C 1 4 PLAY STOP Playback Output 2 P P 0 0 0 0 1 4 A N N O UN C 1 SELECT Program No 4 STOP or end of playback Step 5 PresstheStopkeytoreturnto the playback standby mod...

Page 30: ...ent playback output P 0 0 2 A N NO U N C 2 Playback standby status Output1 OUTPUT 1 OUTPUT 2 P 0 0 2 Playback Output1 P 0 0 2 0 0 0 0 4 5 Ends automatically or manually Volume indication Remaining tim...

Page 31: ...or V O L UME Step No after changed Change NO into YES Played back in changed Step No sequence Sequence can be changed only once Volume can be changed 1 Step No Normal sequence Changed sequence P 0 0...

Page 32: ...cannot be accomplished when the card containing no emergency sentence is inserted into slot A For recording the emergency sentence refer to p 21 7 4 Playing Back the Emergency Sentence The emergency s...

Page 33: ...p 58 1 2 OUTPUT LEVEL Can be set for individual programs Output Program title Program output level Program interval Number of plays Play interval Busy output Control data section 128 steps max includ...

Page 34: ...s used for program playback unless other method is especially selected To stop playback manually press the STOP key or short the Stop terminal Single program playback One each of sentences silent inte...

Page 35: ...program are repeatedly played back in order of step number at the preset repetition interval i e the duration from the last sentence playback till the first sentence playback and by the preset number...

Page 36: ...p terminal Designating the beginning sentence for the endless playback By selecting and playing back the program number example P002 set for the endless playback the endless playback begins with the s...

Page 37: ...evasare and insertion Step input Example when the Sentence No A003 is input in the Step No 002 001 002 003 004 005 006 006 A002 M010 B003 A128 001 002 003 004 005 A002 A003 B003 A128 Input overwritin...

Page 38: ...ENCE VERIFICATION You can verify the recording sound quality title and recording time of the recorded sentence Refer to p 62 for the operation procedures 8 2 2 Erasing the sentence 2 2 SENTENCE ERASUR...

Page 39: ...back for either single source output or dual source output Single source playback mode Individual output settings for each program are ignored and broadcast is always made only from Output 1 Output 2...

Page 40: ...es Direct mode and binary mode Short the activation control input terminals when selecting the sentence number in remote recording and remote erasure and when selecting the program number in remote pl...

Page 41: ...0 P065 A065 1 0 0 0 0 0 1 0 P066 A066 0 1 0 0 0 0 1 0 P067 A067 1 1 0 0 0 0 1 0 P068 A068 0 0 1 0 0 0 1 0 P069 A069 1 0 1 0 0 0 1 0 P070 A070 0 1 1 0 0 0 1 0 P071 A071 1 1 1 0 0 0 1 0 P072 A072 0 0 0...

Page 42: ...op 1 Stop Activation Mode 1 stop during playback 2 Stop Activation Mode 2 stop after sentence playback completion Factory preset mode 8 5 3 Direct mode Remote recording Sentences cannot be recorded ov...

Page 43: ...can be remotely played back Shorting the Activation Control input enables playback Note This assumes that program Nos P001 and P002 are set for Output 1 All front panel keys are disabled during erasu...

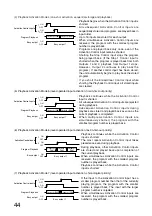
Page 44: ...the Stop 1 Control input is shorted when the program is played back from both Outputs 1 and 2 playback from Output 1 stops However Output 2 continues to play back the program If another control input...

Page 45: ...01 B128 can be remotely recorded Sentences A001 128 are recorded on the Slot A memory card and sentences B001 B128 on the Slot memory card To start recording short the Recording Control input after th...

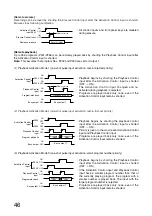
Page 46: ...ams P001 P256 can be remotely played back by shorting the Playback Control input after the Activation Control input is shorted Note This assumes that program Nos P002 and P003 are set for Output 1 All...

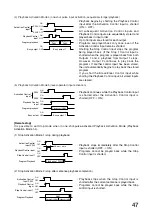
Page 47: ...the Playback Control input after the Activation Control input is shorted ON OFF All subsequent Activation Control inputs and Playback Control inputs are sequentially stored and played back in input or...

Page 48: ...8 2 SENTENCE COPYING and its monitoring 2 8 3 CARD COPYING 3 1 SENTENCE MONITORING 2 9 1 AUTOMATIC LEVEL ADJUSTMENT 3 2 PROGRAM MONITORING 2 2 Note that the busy output is not enabled even if the play...

Page 49: ...n of the cards 7 3 CARD OPTIMIZATION Erasing the sentences in the card may shorten the card s remaining recording time This however can be avoided by optimizing the card Be sure to optimize the card a...

Page 50: ...splayed when the sentence is copied and the memory capacity remaining time to be copied is insufficient 2 In such cases first increase the capacity as shown below and then copy the sentence again 1 Op...

Page 51: ...n for ON allows the sentences recorded at different recording signal levels to be played back at the uniform level when playing back a program Depending on the programs the playback sound may not be s...

Page 52: ...displayed Step 12 Press the Selection dial and Step 002 will flash Step 13 Turn the Selection dial to choose END Step 8 Turn the Selection dial to choose Step 002 Step 1 Press the Mode key How to make...

Page 53: ...rmation message for the change in program will be displayed Step 11 Turn the Selection dial to choose Sentence A005 Step 19 Press the Selection dial to return to the menu screen Step 10 Press the Sele...

Page 54: ...ove SELECT SELECT SELECT SELECT SELECT SELECT SELECT SELECT SELECT SELECT SELECT SELECT SELECT SELECT SELECT SELECT P R L E A C Y P R L E A C Y K K E E Y Y 1 1 P 1 R O P G R R O A G M I N P U T 1 P 1...

Page 55: ...O V F A F L P 0 0 1 I N T E R 1 V 0 A s L e c P 0 0 1 I N T E R 9 V 9 A m L i n P I N 0 0 T 1 E R R E V P A L NO 0 E 0 D s L e S c P I N 0 0 T 1 E R R E V P A L NO 0 0 0 0 s 1 e c P I N 0 0 T 1 E R R...

Page 56: ...P 0 T 1 S T 0 0 E 1 P B 1 2 8 I P N 0 P 0 T 1 S T 0 0 E 1 P M0 0 I P N 0 P 0 T 1 S T 0 0 E 1 P M1 2 7 I P N 0 P 0 T 1 S T 0 0 E 1 P A 0 0 1 E P R 0 A 0 S 1 S T 0 0 E 1 P A 0 0 1 I P N 0 S 0 T 1 S T 0...

Page 57: ...ECT SELECT SELECT SELECT SELECT SELECT SELECT SELECT P 0 0 1 O U T P A U L T L C A H N G E P ROG R Y A E M S C A H N G E P ROG R N A O M C A H N G E P ROG R I A N M I T P 0 0 1 O U T P O U U T T P U T...

Page 58: ...2 MODE P R L E A C Y P R L E A C Y K K E E Y Y SELECT SELECT SELECT SELECT SELECT SELECT SELECT SELECT SELECT SELECT SELECT SELECT SELECT SELECT SELECT SELECT SELECT SELECT SELECT SELECT SELECT SELECT...

Page 59: ...is completed the screen returns to the menu screen To terminate all setting operations further press the STOP key to return to the initial screen Continuous Program Playback Single Program Playback P...

Page 60: ...rs End of program title input SELECT SELECT SELECT SELECT SELECT SELECT SELECT SELECT SELECT SELECT SELECT SELECT SELECT SELECT SELECT SELECT SELECT SELECT SELECT MODE 1 1 P 1 R O P G R R O A G M I N...

Page 61: ...M 1 P 4 0 P 0 R 1 OG I P N 0 I 0 T 1 I L Z Execution of Register Execution Initialization Program No P001 P256 Program Title P001 P256 same as program numbers Selection items and setting contents Play...

Page 62: ...P R L E A C Y R P E L C A Y K E K Y E Y 1 1 P 1 RO P G R R O A G M I N P U T 2 2 S 1 E N S T E E N N T C E E N V E R I F E E M M E E R R G G V E R 0 I F 0 3 0 2 N 1 0 N B O 1 T 2 8 RE C V O E R R D I...

Page 63: ...as Emergency while the sentence not recorded is displayed as not recorded 2 Underline parts refer to the initial value set by the factory Selection items and contents to verify Sentence verification S...

Page 64: ...CT SELECT SELECT SELECT SELECT SELECT SELECT SELECT SELECT SELECT SELECT SELECT SELECT SELECT SELECT SELECT SELECT SELECT SELECT MODE 1 1 P 1 R O P G R R O A G M I N P U T P R L E A C Y P R L E A C Y...

Page 65: ...1 B128 Character entry insertion and erasure up to 8 alphanumeric characters Selection item Sentence title input Note Underlined parts refer to the initial value set by the factory Silent section Reco...

Page 66: ...l meter Recording sound quality indication p 62 P o w e r o n STOP STOP SELECT SELECT SELECT SELECT SELECT SELECT SELECT SELECT SELECT SELECT SELECT MODE P R L E A C Y R P E L C A Y K E K Y E Y 1 1 P...

Page 67: ...8 Original playback mode is maintained Master volume 2 Graduation 1 Graduation 2 Graduation 7 Graduation 8 Setting Contents Master volume Setting Item Setting contents Note Underlined part refers to t...

Page 68: ...screen 1 SELECT SELECT SELECT SELECT SELECT 1 1 P 1 R O P G R R O A G M I N P U T SELECT SELECT SELECT SELECT SELECT SELECT SELECT SELECT SELECT SELECT SELECT SELECT SELECT SELECT SELECT SELECT SELECT...

Page 69: ...tion sequential storage playback Mode 5 Level operated activation first in first out priority This priority applies to the direct mode only Mode 6 Level operated activation last in first out priority...

Page 70: ...LECT SELECT SELECT SELECT MODE 5 5 C 3 ON B T Z R Y O L OU T S E T 5 3 B Z Y P O L U A T Y S B E Z T Y 5 3 B Z Y E O R U A T S S B E Z T Y 5 3 B Z Y R O E U C T B S Z E Y T 5 3 B Z Y S O Y U S T B S Z...

Page 71: ...Y DE L A O Y F F 0 s R E C C H B 1 Z Y ON R E C C H B 1 Z Y O F F P L C A H Y 1 B Z Y DE L A O Y N 0 s P L C A H Y 1 B Z Y DE L A O Y N 9 9 s C H C A H NG 1 E B Z Y S N E O T C H C A H NG 1 E B Z Y S...

Page 72: ...SELECT SELECT SELECT SELECT SELECT SELECT SELECT SELECT MODE P R L E A C Y R P E L C A Y K E K Y E Y 1 1 P 1 RO P G R R O A G M I N P U T 6 1 OP B E E P ON 6 1 OP B E E P O F F 6 6 U 1 N I O T P B E...

Page 73: ...OFF Display after password entry Initial screen Character input editing See p 81 Entering characters Initialized Not initialized A p r 2 5 2 0 0 0 SELECT SELECT SELECT SELECT SELECT SELECT SELECT SEL...

Page 74: ...Characters P o w e r o n To other menu screen 7 3 CARD OPTIMIZATION to 9 1 AUTOMATIC LEVEL ADJUSTMENT MODE SELECT SELECT SELECT SELECT SELECT SELECT SELECT SELECT SELECT SELECT SELECT SELECT SELECT S...

Page 75: ...O A K M E S T O Y R E E S 1 N O A K M E S T O N R O E 1 N O A K M E S T O I R N E I 1 T M A X 5 1 S 2 E N S T E E N N T C E E N C N E B S R M A X 1 2 S 8 E N S T E E N N T C E E N C N E B S R F ORM A...

Page 76: ...optimization Execution of change 7 7 C 3 A C R A D R D O P T I M I Z 7 3 C A R D O P T I M I A Z 7 3 C A R D O P T I M I B Z 7 3 C A R D O P T I M A I L Z L O P T I M I Z E C A R N D O A O P T I M I Z...

Page 77: ...A G M I N P U T 8 8 C 1 O P P Y R I O N G G CO P Y 8 P 1 0 0 P 1 R O G C O P Y 8 P 1 2 5 P 6 R O G C O P Y 8 E 1 ND P R O G C O P Y 8 P 1 0 0 P 1 R O G C P O 0 P 0 Y 2 8 P 1 0 0 P 1 R O G C P O 2 P 5...

Page 78: ...of copying To menu screen 9 1 AUTOMATIC LEVEL ADJUSTMENT P o w e r o n Sentence copying 2 Card copying Card copying 2 P R L E A C Y R P E L C A Y K E K Y E Y 1 1 P 1 RO P G R R O A G M I N P U T 8 8...

Page 79: ...A 0 0 2 8 3 C A R D CO P Y A B 8 C O 3 P C I A E R D D CO P Y A B SELECT SELECT SELECT 1 Pressing the STOP key while the menu screen is displayed returns the display to the initial screen 2 Pressing...

Page 80: ...T L L P E R V OG A R J A U M S S T 9 1 A U T L E V A J O U F S F T 9 1 A U T L E V A J O U N S T 9 A D 1 J A U U S T T L E V A Y J E U S S T 9 A D 1 J A U U S T T L E V A N J O U S T 9 A D 1 J A U U...

Page 81: ...acter input screen FORWD Moves the cursor right one character BACK Moves the cursor left one character INS Inserts a space into the cursor position and shifts text right one character DEL Erases the c...

Page 82: ...A Register A Select END Character input is terminated Move the cursor left two characters Select DEL Input of character Removal of the cursor Removal of the cursor Erasure of character Insertion of ch...

Page 83: ...ing recording 10 1 Making Microphone Announcements Preset the microphone volume control to the minimum position 0 1 Connect the microphone to the microphone input on the front panel 2 Making announcem...

Page 84: ...th the microphone input and auxiliary input are internally mixed during recording permitting simultaneous recording of announcements and background music Signals to two auxiliary input terminals on th...

Page 85: ...ontact with enough capacity when directly controlling the amplifier power Lower row 11 1 4 Error detection output terminal This terminal normally closes It breaks when the unit falls into the followin...

Page 86: ...ng screw accessory Digital Announcer 11 2 Mounting the Unit in an Equipment Rack 11 3 Attaching Rubber Feet When installing the unit on the desk attach the supplied rubber feet to the unit s bottom su...

Page 87: ...cedence over the above programs and is played back Activation 1 8 playback pause 1 pause 2 emergency recording erasure No voltage make contact 50 ms or more open voltage 30 V DC short circuit current...

Page 88: ...Printed in Japan 133 12 681 3A...

Reviews: