4-15
Chapter 4: SYSTEM SETTINGS (SETTING USING BROWSER)
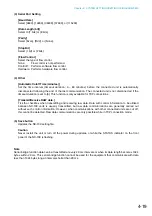
(3) Broadcast Pattern
The NX-100/100S unit's list of programmed broadcast patterns is displayed. Select the pattern to be
started.
Patterns which cannot be broadcast due to the Broadcast Spec settings are highlighted in red with a "NO"
displayed in the corresponding "Enable" column. Disabled broadcasts are usually caused by incorrect
multicast or transmission sampling frequency settings (for instance, local broadcasts cannot be made at
32 kHz).
[Select]
Select the pattern to be started. When cancelling the selection, click on the same checkbox again to
remove the tick.
[Pattern name]
Displays the programmed broadcast pattern name.
[Direction]
Displays the type of broadcasting.
Transmission (Multicast): Transmits a single stream broadcast to multiple units. Multicast must be set to
"Yes" in the Broadcast Spec Setting.
Transmission (Unicast):
Transmits a single stream broadcast to a single unit.
Reception:
Receives broadcasts from the target unit.
Local:
Broadcast from the original unit's input to its own output.
[Enable]
Indicates whether or not the programmed broadcast pattern can be broadcast. If "NO" is displayed for a
pattern, review the Broadcast Spec settings.
[Bandwidth]
Indicates the total bandwidth used by the set pattern.
Caution
Broadcasts cannot be made if the setting exceeds the available bandwidth.
(4) Contact Bridge
The Contact Bridge refers to the function that enables the contact outputs of other connected unit or
original unit when the original unit's contact input is activated. Here, select NX-100/100S contact outputs
to be activated when the original unit's contact input is activated.
[Programmed Target Output]
Tick on the appropriate boxes when wishing to change only the programmed target unit's contact output
channel. Tick the corresponding rightmost checkbox to select programmed target units to be deleted, then
click on the Delete button to remove from the list.
[New Connect Point]
When performing initial programming, enter the new target unit's IP address, contact control port number
and select the channel number, then click on the Add button.
Entering the original unit's IP address and port number as a new connecting point permits the original
unit's contact output to be activated.
(5) Save button
Updates the NX-100/100S setting file.
Caution
Never restart the unit or turn off the power during updates, or while the STATUS indicator on the front
panel of the NX-100/100S is flashing.
Summary of Contents for NX-100
Page 6: ...Chapter 1 BEFORE INSTALLATIONS AND SETTINGS ...
Page 12: ...Chapter 2 UNIT AND SOFTWARE INSTALLATIONS ...
Page 27: ...Chapter 3 SYSTEM SETTINGS NX 100 SETUP PROGRAM ...
Page 58: ...Chapter 4 SYSTEM SETTINGS SETTING USING BROWSER ...
Page 89: ...Chapter 5 OPERATION SETTINGS NX 100 OPERATION PROGRAM ...
Page 104: ...Chapter 6 APPENDIX ...
Page 114: ...200708 URL http www toa jp ...


