background image

O W N E R’ S
M A N U A L

トーハツ船外機 オーナーズマニュアル 

MFS 15E 

Original instructions 

MFS 9.9E 

MFS 20E 

 OB No.003-11144-2AH1 

Summary of Contents for MFS 15E EF

Page 1: ...O W N E R S M A N U A L MFS 15E Original instructions MFS 9 9E MFS 20E OB No 003 11144 2AH1...

Page 2: ...ONS IN THIS MANUAL CAN RESULT IN SERIOUS INJURY OR DEATH KEEP THIS MANUAL IN A SAFE LOCATION FOR FUTURE REFERENCE Copyright 2018 Tohatsu Corporation All rights reserved No part of this manual may be r...

Page 3: ...ence to everyone who uses the outboard motor If the outboard motor is resold make sure the manual is passed on to the next owner We hope you will enjoy your outboard motor and wish you good luck in yo...

Page 4: ...ry ENOM00005 A Serial Number In the space below please record the outboard motor s serial number indicated both on the swivel bracket and on the cylinder block The serial number will be needed when or...

Page 5: ...ion to such information to ensure safe operation of the outboard motor at all times ENOW00001 0 Failure to observe will result in severe personal injury or death and possibly property damage ENOW00002...

Page 6: ......

Page 7: ...ine 38 4 Forward reverse and acceleration 38 5 Stopping the engine 41 6 Steering 43 7 Trim angle 43 8 Tilt up and tilt down 45 9 Shallow water operation 48 8 REMOVING AND CARRYING THE OUTBOARD MOTOR 5...

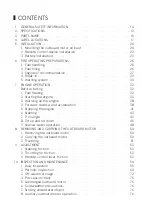
Page 8: ...11 TROUBLESHOOTING 77 12 ACCESSORIES KIT 79 13 PROPELLER TABLE 80...

Page 9: ...LABEL LOCATIONS 5 INSTALLATION 6 PRE OPERATING PREPARATIONS 7 ENGINE OPERATION 8 REMOVING AND CARRYING THE OUTBOARD MOTOR 9 ADJUSTMENT 10 INSPECTION AND MAINTENANCE 11 TROUBLESHOOTING 12 ACCESSORIES...

Page 10: ...R ANY SOLID DEVICE RIGIDLY ATTACHED TO A BOAT OR GEAR HOUSING ENOM0008 A EMERGENCY STOP SWITCH The Emergency Stop Switch will stall the outboard motor when the stop switch lanyard is pulled off This s...

Page 11: ...e operation Please comply with all instructions concerning lubrication and maintenance You should take the engine to an authorized dealer or service shop for periodic inspection at the prescribed inte...

Page 12: ...iller Handle z z z z z z Remote Control z z z z z Power Tilt z z z Manual Tilt z z z z z z z z F 20 E E P T L Model description Horse power Product generation Starter system Steering system Tilt syste...

Page 13: ...le Speed in Forward Gear min 1 rpm 950 Idle Speed in Neutral Gear min 1 rpm 950 Engine Type 4 Stroke FI Number of Cylinder 2 Bore Stroke mm in 61 57 2 40 2 24 Piston Displacement cm3 Cu in 333 20 32 E...

Page 14: ...in Forward Gear min 1 rpm 950 Idle Speed in Neutral Gear min 1 rpm 950 Engine Type 4 Stroke FI Number of Cylinder 2 Bore Stroke mm in 61 57 2 40 2 24 Piston Displacement cm3 Cu in 333 20 32 Exhaust Sy...

Page 15: ...ug Lower Fill 11 Oil Plug Upper Level 12 Thrust Rod 13 Clamp Bracket 14 Clamp Screw 15 Stop Switch 1 16 Throttle Friction Screw 1 17 Throttle Grip 1 18 Warning Lamp 19 Starter Switch 2 20 Reverse Lock...

Page 16: ...Screw 35 Fuel Connector 36 Fuel Pick up Elbow 37 Fuel Tank 38 Manual Release Valve 3 39 Clamp Screw 4 40 Power Tilt 3 41 Power Tilt Switch 5 42 Remote Control Box 5 43 Main Switch 5 44 Stop Switch 5...

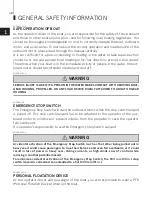
Page 17: ...17 4 LABEL LOCATIONS ENOM00019 A Warning label locations 1 2 8 7 5 6 3 4 ENOF01204 4...

Page 18: ...Warning label regarding engine fail ure malfunction See page 30 4 Warning label regarding stop switch See page 34 35 42 5 Warning label regarding position of outboard motor when setting down For RC mo...

Page 19: ...me 6 Manufacturer address CE label locations r e w o P d e t a R r o t o M d r a o b t u O o N l a i r e S s s a M n a p a J n i e d a M 0123 CAN ICES 2 NMB 2 ENOF01237 3 2 3 4 5 6 1 Description of se...

Page 20: ...z Loose clamp screws and or mounting bolts can lead to the release or displace ment of the outboard motor possibly resulting in lost of control and or serious personal injury Be sure that fasteners a...

Page 21: ...erwater object s such as hull bottom design bottom surface conditions or underwater accessories can cause water spray possi bly reaching the engine through an open ing of the bottom cowling during cru...

Page 22: ...cone sealed between the bolts and the tran som board holes before tightening the bolts 2 Be sure to tighten the mounting bolt nuts to the specified torque 30 N m 3 0 kgf m 13 ft lb 3 For EP EFT type d...

Page 23: ...re with steering ENOM00029 A ENOW00012 A Battery electrolyte contains sulfuric acid and thus is hazardous causing a burn if it comes in contact with your skin or poison ous if swallowed Keep battery a...

Page 24: ...can lead to poor performance of and or damage to the electrical system ENON00006 A Note Recommended battery 12V 40Ah 5HR 350 Cold Cranking Amps CCA In case of cold whether 12V70Ah 5HR 650CCA Specific...

Page 25: ...are caused because the ethanol in the gasoline can absorb moisture from the air resulting in a separation of the water ethanol from the gasoline in the fuel tank These may cause increased z Corrosion...

Page 26: ...remove the static electricity charged in your body before refueling z The sparks due to static electricity may cause explosion of flammable gasoline z Stop the engine and do not start the engine duri...

Page 27: ...arting engine To properly fill the engine with oil follow the instructions See page 61 1 Filler port 2 Dipstick 1 Upper level 2 Lower level Use only high quality 4 stroke engine oil to insure performa...

Page 28: ...IONS 28 6 ENOW0002A A Use of engine oils that do not meet these requirements will result in reduced engine life and other engine problems CAUTION 10W 40 10W 30 C F 40 96 30 86 20 68 10 50 0 32 10 14 2...

Page 29: ...peration of the outboard motor z Keep peripheral area well ventilated z Always attempt to stay on the windward side of emission ENOW00023 1 Operating the outboard motor without break in can shorten se...

Page 30: ...d EP type on the motor See next page for conditions which will lead to an abnormal condition or fault ENOM00040 1 Location of warning buzzer and lamp Warning buzzer RC model Located inside the remote...

Page 31: ...al system test when start up Continuous ON ON Engine speed exceeds maximum allowable RPM 1 Continuous 2 ON 2 ON 2 Low oil pressure 1 2 Continuous ON ON Water over temperature 3 Intermittent short beep...

Page 32: ...ol low the procedure described below Fuel could blast out through the fuel tank cap in case the cap is loosened by using another procedure when internal pressure of fuel tank is raised by heat from so...

Page 33: ...oling water check port is not discharging water and check if cooling water intake is blocked Operating engine could lead to overheating potentially leading to engine damage Con sult an authorized deal...

Page 34: ...switch lock 2 Set the control lever in the Neutral position 1 Shift lever 3 Set the throttle grip to START posi tion 1 Throttle grip For manual starter type This engine is equipped with a compres sion...

Page 35: ...erator or to the operator s PFD Personal Flotation Device 1 Stop switch lock 2 Insert the main switch key 3 Set the control lever in the Neutral position ENON00504 1 Note The free accel lever can not...

Page 36: ...shift is at neutral position Other wise the engine will move the boat imme diately and cause personal injury z Be careful that your clothes or other items do not get caught in the rotating engine part...

Page 37: ...wrench that is included in the tool kit ENOW00860 0 Be sure to keep the harness away from the rotation parts 7 Be sure to install the stop switch lock to the stop switch and attach the stop switch la...

Page 38: ...ver fully closed position when start the engine z The free throttle lever is inoperative unless the control lever is in neutral z Also the control lever is inoperative unless the free throttle lever i...

Page 39: ...or shifting mechanism may be damaged ENOW00861 0 Do not shift at high boat speed or control may be lost falling down or causing passen ger s to be thrown overboard Leading to serious personal injury...

Page 40: ...Sudden acceleration and deceleration may cause passenger s to be thrown overboard or falling down 1 Forward F 2 Neutral N 3 Reverse R 4 Fully opened Forward 5 Fully opened Reverse 6 Free throttle lev...

Page 41: ...ts on the boat to be thrown forward due to inertial force Tiller handle type 1 Turn the throttle grip to the slow position 1 Throttle grip 2 Put the shift lever in the Neutral position Run the engine...

Page 42: ...op switch 2 Stop switch lock 1 Stop switch 2 Stop switch lock ENOM00910 0 Spare emergency stop switch lock A spare emergency stop switch lock is provided in the tool bag When used as described the eme...

Page 43: ...ngle to prevent injury in case the outboard motor body falls z Unsuitable trim position can cause loss of control of boat When testing a trim posi tion run boat slow initially to see if it can be cont...

Page 44: ...during operation 1 Perpendicular to the water surface ENOM00053 0 Improper trim angle bow rises too high Set the thrust rod lower if the bow of the boat rises above horizontal ENOM00054 0 Improper tr...

Page 45: ...lt stopper 4 Change the trim lock pin position as following picture 1 Trim lock pin 2 Higher 3 Lower 5 Reinstall the trim lock pin securely 6 Operate the Power Tilt switch and lower the outboard ENOM0...

Page 46: ...ck lever down until it stops This is the tilt up position Now tilt the outboard motor all the way up until it is locked in place 1 Reverse lock lever 2 Tilt down position 3 Tilt up position ENOM00063...

Page 47: ...open the man ual valve completely in the Manual direc tion This will allow manual tilting of the outboard motor ENOW00872 0 Make sure the manual relief valve is closed before operating the outboard m...

Page 48: ...board motor when driving shallow water or air may be sucked through water inlet potentially leading to engine overheating 1 Water inlet Manual tilt type 1 Shallow water running position Put the revers...

Page 49: ...lever 2 Tilt down position 3 Tilt up position ENOM00069 A Power Tilt type 1 Operate the Power Tilt switch and tilt the outboard motor up into desired shallow water running position 1 2 3 ENOF00059 0...

Page 50: ...trol cables and the bat tery cords from the outboard motor 4 Attach the hoist hooks to the engine hanger 5 Remove the outboard motor from boat and completely drain the water from the gear case ENOM000...

Page 51: ...uel then the port side faces down as shown in the following drawing z Elevate power unit 2 inches to 4 inches if traveling to avoid oil spillage ENOM00072 A ENOW00072 0 Trailering in the tilted positi...

Page 52: ...motor beforehand and keep the outboard motor in the normal running position or on a transom saver bar Tiller handle type To prevent the outboard motor from moving when it is attached on a boat during...

Page 53: ...lead to severe injury Friction adjustment of the throttle grip can be made with the throttle adjust ment screw 1 Throttle friction adjustment screw 2 Decrease 3 Increase ENOM00075 0 ENOW00074 C Do no...

Page 54: ...and mainte nance procedures described in this sec tion z The maintenance intervals shown in the checklist apply to an outboard motor in normal use If you use your outboard motor under severe conditio...

Page 55: ...stop switch functions normally and make sure the stop switch lock is there Remedy or replace if necessary Check cords for loose connections and damage Correct or replace if necessary Check the spark...

Page 56: ...when the engine is cold ENON00025 0 Note Consult with an authorized dealer if the engine oil is milky color or appears con taminated ENOM00082 A Engine oil replenishing ENOW00079 A z Do not add engin...

Page 57: ...monoxide a colorless and odorless gas which can be fatal if inhaled for any length of time ENOW00920 0 When washing the outboard motor be care ful not to spray the water inside of the top cowl especia...

Page 58: ...least 10 cm 4 in above the anti ventilation plate And be sure to remove the propeller when starting the engine in the test tank See page 66 Run the engine only at idling 1 Test tank 2 Water 3 Over 10...

Page 59: ...the battery nega tive terminal 2 Remove the engine cover 3 Remove the fuse box lid 4 Remove the fuse and check it If the fuse is blown replace it with a fuse of the same specified rating The outboard...

Page 60: ...ose 2 z z Check Replace if necessary Ignition System Spark plug z Check and clean Replace if necessary Gap 0 80 0 9mm Refer to P67 Spark plug cap High tension cord 1 Check Replace if necessary Startin...

Page 61: ...lit or oil leak is found or engine could be severely damaged Consult dealer z Wipe off engine oil well immediately if spilled and dispose of it in accordance with local fire prevention and environ me...

Page 62: ...ew with applying oil on the sealing surface of screw Use new oil drain washer Oil drain screw specified torque 24N m 17 ft lb 2 4 kgf m ENON00028 A Note If a torque wrench is not available when you ar...

Page 63: ...e while engine is operating or hot even after stopping it z Place fuel filter away from every source of ignition such as sparks or open flames z Wipe off gasoline well immediately if spilled and dispo...

Page 64: ...om the fuel filter body 3 Check the wear and clogging for each parts and replace if necessary 4 Remove fuel and any water or debris from the cup filter and hoses 5 Reassemble all parts 1 Body 2 O ring...

Page 65: ...ked or accidental fall of outboard motor could lead to severe personal injury 1 Tilt down the outboard motor 2 Remove the oil plugs lower and upper and completely drain the gear oil into a pan 3 Inser...

Page 66: ...plug caps attached shift in forward or reverse main switch at other than OFF engine stop switch lock attached to the switch and starter key attached or engine could accidentally start leading to seri...

Page 67: ...ng split pin spread the pin apart to prevent it from falling out which could lead to the propeller coming off during operation ENOM00087 A Spark plugs replacement ENOW00087 0 z Do not reuse spark plug...

Page 68: ...the gap is different replace the spark plug with a new one Use spark plug NGK DCPR 6E 1 Electrode 2 Spark gap 0 8 0 9 mm 0 031 0 035 in 7 Install the spark plug by hand and turn it carefully to avoid...

Page 69: ...than 1 3 of original size replace it ENON00029 A Notes z Never grease or paint the anode z At each inspection re tighten the anode attaching bolt As it is likely to be subjected to elec trolytic corro...

Page 70: ...evel in the reservoir tank while the tank is kept in a vertical posi tion 1 Tilt the outboard motor up and lock the tilt with the tilt stopper 2 Remove the oil cap by turning counter clockwise then ch...

Page 71: ...INSPECTION AND MAINTENANCE 71 10 ENOM00960 0 Grease point Apply water proof grease to the parts shown below 1 Other side 1 ENOF01232 1...

Page 72: ...th fresh water Drain the water completely Wipe off any surface water with an oily rag 2 Remove the fuel hose from the out board motor 3 Drain all fuel from the fuel hoses fuel pump and vapor separator...

Page 73: ...when adding the fuel stabilizer addi tive 3 After adding the additive let the out board motor run in the water for 10 minutes to make sure any old fuel in the fuel system has been completely replaced...

Page 74: ...ghten the drain screw securely 8 Check the drained fuel for the pres ence of water or other contaminants If either is present reassemble the outboard motor refill the vapor sep arator with fuel and th...

Page 75: ...er motor Electric start model in order to prime the oil pump 6 Fill fuel tank completely 7 Start the engine and warm up the engine for 3 minutes in the NEU TRAL position 8 Run the engine for 5 minutes...

Page 76: ...mp which may damage the pump impeller etc To avoid this problem submerge the lower half of the outboard motor into the water ENOM00107 A ENOW00935 0 Striking the sea bottom or an underwater object may...

Page 77: ...jector is clogged Low quality gasoline is used Primer bulb is clogged Fuel feed pump FFP malfunctions or is clogged Water temperature sensor or MAP Manifold Pressure sensor is defective or the sensor...

Page 78: ...e of mismatched propeller Propeller is damaged or deformed Thrust rod position is not correct Boat is unbalanced by load position Transom installation height is too high or too low Throttle link adjus...

Page 79: ...ss and straight point Screwdriver handle 1 Spare parts Emergency starter rope 1 Spark plug 1 NGK DCPR6E Split pin 1 Stop switch lock 1 Parts Packaged with Engine Fuel tank 1 12 L Primer bulb 1 set Rem...

Page 80: ...wide open throttle while cruising is within the recommended range 5400 6100 min 1 rpm Propeller Mark Propeller Size Blades diameter pitch in mm Light boats 11 5 3 9 25 11 5 3 235 292 10 3 9 25 10 3 23...

Page 81: ...O W N E R S M A N U A L 5 4 Azusawa 3 Chome Itabashi Ku Tokyo 174 0051 Japan Tel 81 3 3966 3117 Fax 81 3 3966 0090 www tohatsu com MFS 9 9E MFS 15E MFS 20E...

Reviews: