background image

• Do not pull the cord and/or appliance to remove the plug from 

the wall socket. Never touch the appliance with wet or damp hands.

• Never connect the appliance to an external timer or a separate 

remote control system, in order to prevent hazardous situations.

• Keep the appliance out of reach of children. Children do not 

see the dangers associated with handling electrical appliances. 

Therefore, never allow children to operate electrical appliances 

without supervision. Keep the appliance and cord out of reach 

of children younger than 8 years of age.

• The appliance can be used by children of 8 years and older 

and persons with a limited physical, sensory or mental 

capacity or lack of experience or knowledge, provided they 

use the appliance under supervision or have been instructed 

about its safe use and understand the hazards involved.

• Children must not play with the appliance.

• The appliance may not be cleaned or maintained by children, 

unless this is done under supervision.

• If the appliance is not being used or is being cleaned, fully switch 

off the appliance by removing the plug from the socket.

• Extension cords may only be used if the mains voltage 

(see the information plate) and capacity are identical to or higher 

than that of the appliance. Always use an approved extension cord.

• Never submerge the appliance, cord or plug in water.

• This appliance is intended for household and similar use, such as:

  - in staff kitchens, shops, offices and other work environments;

  - by guests of hotels, motels and other residential environments;

  - in Bed&Breakfast type environments;

  - farms.

• If the appliance is not used as intended, no compensation can be 

claimed in case of defects or accidents and the warranty will be 

invalidated.

• If you decide to stop using the appliance due to a defect, 

we recommend cutting the cord after removing the plug 

from the wall socket. 

EN - 11

Summary of Contents for TFS4006B

Page 1: ...nstrucciones de uso IT Istruzioni per l uso DK Instruktioner til brug PL Instrukcje u ytkowania CS N vod k pou it SK N vod na pou itie Statiefventilator Pedestal fan Standventilator Ventilateur sur pi...

Page 2: ...2...

Page 3: ...ebrauchsanleitung Seite 15 20 FR Mode d emploi page 21 26 ES Instrucciones de uso p gina 27 32 IT Istruzioni per l uso pagine 33 38 DA Instruktioner til brug side 39 43 PL Instrukcje u ytkowania stron...

Page 4: ...Het apparaat op afstand houden van muren of andere objecten die vlam kunnen vatten zoals gordijnen handdoeken katoen of papier etc Zorg er altijd voor dat het apparaat op een effen vlakke ondergrond...

Page 5: ...oit zonder toezicht met elektrische apparaten werken Houd het apparaat en het snoer buiten bereik van kinderen jonger dan 8 jaar Het apparaat kan worden gebruikt door kinderen van 8 jaar en ouder en d...

Page 6: ...mgevingen in Bed Breakfast type omgevingen boerderijen Wanneer het apparaat oneigenlijk gebruikt wordt kan er bij eventuele defecten geen aanspraak op schadevergoeding worden gemaakt en vervalt het re...

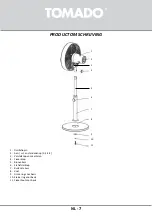
Page 7: ...CHRIJVING NL 7 1 Oscillatiepin 2 Aan uit en standenknop 0 1 2 3 3 Verstelknop voor kantelen 4 Fixeerknop 5 Binnenbuis 6 Statiefstelknop 7 Buitenste buis 8 Voet 9 Grote ring voor basis 10 Kleine ring v...

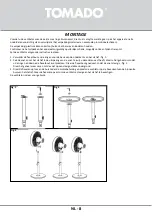
Page 8: ...1 Verwijder de fixeerbout en de ringen voor de basis van de onderkant van het statief fig 1 2 Pak de voet en zet het statief in de uitsparing van de voet Terwijl u deze delen vast heeft draait u het...

Page 9: ...zodra de ventilator op de gewenste hoogte staat De hoogte kan ingesteld worden van 90 tot 120 cm Waarschuwing zorg ervoor dat de ventilator uitgeschakeld is als u de hoogte wilt wijzigen REINIGING EN...

Page 10: ...curtains towels cotton or paper etc Always make sure the appliance is placed on an even flat surface Only use the appliance indoors Do not leave the appliance unsupervised if the appliance is operati...

Page 11: ...s involved Children must not play with the appliance The appliance may not be cleaned or maintained by children unless this is done under supervision If the appliance is not being used or is being cle...

Page 12: ...PTION EN 12 1 Oscillation pen 2 On Off and position button 0 1 2 3 3 Adjustment knob for tilting 4 Fixing knob 5 Inner tube 6 Pedestal adjustment knob 7 Out tube 8 Foot 9 Large ring for base 10 Small...

Page 13: ...1 Remove the fixing bolt and rings for the base from the bottom of the pedestal fig 1 2 Grab the foot and place the pedestal in the recess of the foot While holding these parts turn everything around...

Page 14: ...ten the pedestal adjustment knob when the fan is at the required height The height can be adjusted from 90 to 120 cm Warning make sure the fan is switched off when you want to change the height CLEANI...

Page 15: ...n usw Halten Sie mit dem Ger t immer einen sicheren Abstand zu W nden oder anderen Gegenst nden ein die in Brand geraten k nnen z B zu Gardinen Baumwoll oder Papierhandt chern usw Sorgen Sie immer daf...

Page 16: ...alb nie ohne Aufsicht mit elektrischen Ger ten hantieren Sorgen Sie daf r dass das Ger t und das Kabel f r Kinder unter 8 Jahren unzug nglich sind Das Ger t darf nur dann von Kindern ab 8 Jahren und v...

Page 17: ...Hotels Motels und anderen Unterkunftsbereichen in Bed and Breakfast Unterk nften auf b uerlichen Anwesen Bei unsachgem er Verwendung des Ger ts besteht bei eventuellen Defekten kein Anspruch auf Schad...

Page 18: ...1 Oszillationsstift 2 Ein Aus und Modus Wahlschalter 0 1 2 3 3 Neigungseinstellknopf 4 Feststellknopf 5 Innenrohr 6 Stativeinstellknopf 7 u eres Rohr 8 Fu 9 Gro er Ring f r die Basis 10 Kleiner Ring...

Page 19: ...tstellschraube und die Ringe von der Basis an der Unterseite des Stativs Abb 1 2 Nehmen Sie den Fu und stellen Sie das Stativ in die Aussparung des Fu es W hrend Sie diese Teile halten drehen Sie das...

Page 20: ...er pl tzlich herunterf llt Ziehen Sie den Feststellknopf des Stativs wieder fest wenn der Ventilator in der gew nschten H he steht Die H he kann zwischen 90 und 120 cm eingestellt werden Warnung Achte...

Page 21: ...nt de la chaleur comme les fours cuisini res gaz plaques de cuisson etc Maintenez l appareil loign des murs ou d autres objets susceptibles de s enflammer tels que les rideaux serviettes coton ou papi...

Page 22: ...ppareils lectriques sans surveillance Tenez l appareil et le c ble d alimentation hors de port e des enfants de moins de 8 ans L appareil peut tre utilis par les enfants partir de 8 ans et par des per...

Page 23: ...tels et autres environnements r sidentiels dans les environnements de type chambre d h te dans les fermes Une utilisation inappropri e de l appareil annule tout droit une indemnisation en cas d ventue...

Page 24: ...2 Bouton de marche arr t et positions 0 1 2 3 3 Bouton de r glage pour l inclinaison 4 Bouton de fixation 5 Tube int rieur 6 Bouton de r glage du support 7 Tube ext rieur 8 Pied 9 Grosse rondelle pour...

Page 25: ...z du dessous du support le boulon de fixation et les rondelles pour la base fig 1 2 Attrapez le pied et placez le support dans l encoche du pied Tandis que vous tenez ces l ments retournez l ensemble...

Page 26: ...lateur ne chute pas subitement Resserrez le boulon de r glage du support d s que le ventilateur se trouve la hauteur souhait e La hauteur peut tre r gl e de 90 120 cm Avertissement assurez vous que le...

Page 27: ...aratos que emitan calor como hornos cocinas de gas placas de cocina etc Mantenga el aparato alejado de paredes y otros objetos inflamables como cortinas pa os de algod n o papel etc Aseg rese siempre...

Page 28: ...tilizar aparatos el ctricos Por esa raz n no deje nunca a los ni os que usen aparatos el ctricos sin supervisi n Mantenga el aparato y el cable fuera del alcance de menores de 8 a os El aparato lo pod...

Page 29: ...es de hoteles moteles y otros entornos residenciales en alojamientos tipo pensi n en granjas Si el aparato se usa de forma indebida en caso de aver a no se podr n reclamar da os y perjuicios y la gara...

Page 30: ...ci n 2 Selector de encendido y de posici n 0 1 2 3 3 Bot n de ajuste de la inclinaci n 4 Bot n de fijaci n 5 Tubo interior 6 Bot n de ajuste de la columna 7 Tubo exterior 8 Pie 9 Arandela grande para...

Page 31: ...umna el perno de fijaci n y las arandelas para la base figura 1 2 Tome el pie y coloque la columna en el orificio del pie Mientras fija estas piezas d la vuelta al conjunto para poder colocar las aran...

Page 32: ...golpe Apriete el bot n otra vez cuando el ventilador est a la altura deseada La altura se puede ajustar entre 90 y 120 cent metros Advertencia Aseg rese de que el ventilador est apagado cuando vaya a...

Page 33: ...me forni fornelli a gas piastre di cottura eccetera L apparecchio deve essere tenuto a distanza da muri o altri oggetti infiammabili come tende fazzoletti in cotone o carta eccetera Assicurarsi sempre...

Page 34: ...o elettrico fuori dalla portata dei bambini di et inferiore agli 8 anni L apparecchio pu essere utilizzato da bambini di et superiore agli 8 anni da persone con capacit fisiche sensoriali o mentali li...

Page 35: ...a disposizione degli ospiti l uso nei bed breakfast e in tipi di alloggio simili l uso nelle fattorie Se il dispositivo viene usato in modo improprio in caso di eventuali guasti non ci si pu appellare...

Page 36: ...oscillazione 2 Selettore velocit e accensione spegnimento 0 1 2 3 3 Regolatore inclinazione 4 Vite di fissaggio 5 Asta telescopica 6 Vite di regolazione asta telescopica 7 Piantana 8 Base 9 Rondella g...

Page 37: ...istruzioni 1 Rimuovere il bullone e le rondelle dalla base della piantana fig 1 2 Posizionare la base della piantana nell apertura della base del ventilatore Tenendole ben salde capovolgere le due co...

Page 38: ...po nella piantana Serrare la vite di regolazione per fissare il ventilatore in posizione L altezza pu variare da 90 a 120 cm Attenzione Prima di procedere alla regolazione dell altezza assicurarsi che...

Page 39: ...vnt underlag Apparatet m kun bruges indend rs Efterlad ikke apparatet uden opsyn n r det er t ndt Hvis apparatet skal flyttes skal det f rst sikres at det er slukket Brug ikke apparatet hvis stikket l...

Page 40: ...ke reng res eller vedligeholdes af b rn medmindre det sker under opsyn N r apparatet ikke skal bruges eller reng res skal det slukkes helt og stikket skal tages ud af stikkontakten Forl ngerledninger...

Page 41: ...llationsknap 2 T nd sluk og indstillingsknap 0 1 2 3 3 Indstillingsknap til vipning 4 Fikseringsknap 5 Indvendigt r r 6 Knap til indstilling af stativ 7 Udvendigt r r 8 Fod 9 Stor sp ndeskive til fod...

Page 42: ...ringsbolten og sp ndeskiverne til foden som sidder p stativets underside se fig 1 2 Tag foden og placer stativet i fodens udsparing Hold godt ved delene og vend det hele om s du kan montere sp ndeskiv...

Page 43: ...indstillingsknappen Sp nd indstillingsknappen igen n r ventilatoren har den nskede h jde H jden kan indstilles fra 90 til 120 cm Advarsel Ventilatoren skal v re slukket n r du indstiller h jden RENG...

Page 44: ...we p yty grzewcze itp Urz dzenie nale y trzyma z dala od cian lub innych obiekt w kt re mog zaj si ogniem np zas ony r czniki bawe niane lub papierowe itd Zawsze dbaj o to aby urz dzenie sta o na r wn...

Page 45: ...Dlatego w adnym wypadku dzieci nie powinny mie kontaktu z urz dzeniami elektrycznymi bez nadzoru W zwi zku z tym trzymaj urz dzenie i kabel poza zasi giem dzieci poni ej 8 roku ycia Urz dzenie mo e b...

Page 46: ...y przez go ci w hotelach motelach i innych obiektach rezydencyjnych w obiektach typu Bed Breakfast w gospodarstwach rolnych Je li urz dzenie jest niew a ciwie u ytkowane w razie ewentualnych defekt w...

Page 47: ...oscylacji 2 Przycisk w wy i wyboru pozycji 0 1 2 3 3 Przycisk nastawy nachylenia 4 Przycisk monta owy 5 Rura wewn trzna 6 Przycisk nastawy statywu 7 Rura zewn trzna 8 Noga 9 Du a podk adka do podstaw...

Page 48: ...ylator zgodnie z instrukcj 1 Zdemontuj wkr t mocuj cy i podk adki do podstawy dolnej cz ci statywu rys 1 2 Chwy nog i umie statyw w otworze nogi Po zmontowaniu tych element w dokr ca o aby m c umie ci...

Page 49: ...ator znajdzie si na odpowiedniej wysoko ci Wysoko mo na ustawi w zakresie od 90 do 120 cm Ostrze enie zadbaj o to aby wentylator by wy czony je li chcesz zmieni wysoko CZYSZCZENIE I KONSERWACJA Przed...

Page 50: ...ny ru n ky bavln n nebo pap rov atd V dy zajist te aby spot ebi st l na pevn m a rovn m povrchu Spot ebi pou vejte pouze uvnit Nenech vejte spot ebi bez dozoru kdy je v provozu Pokud chcete spot ebi p...

Page 51: ...v n a ch pou nebezpe spojen s jeho pou v n m D ti si se spot ebi em nesm hr t i t n ani dr bu spot ebi e nesm prov d t d ti leda e by p itom byly pod dozorem Pokud spot ebi nepou v te nebo ne ist te...

Page 52: ...n kol k 2 Tla tko zapnut vypnut a tla tko stupn 0 1 2 3 3 Regula n knofl k n klonu 4 Fixa n knofl k 5 Vnit n trubka 6 Se izovac knofl k stojanu 7 Vn j trubka 8 Patka 9 Velk krou ek pro z kladnu 10 Mal...

Page 53: ...a te upev ovac roub a krou ky pro z kladnu ze spodn sti stojanu obr 1 2 Uchopte patku a um st te stojan do vybr n patky Zat mco tyto d ly p idr ujete oto te sestavu tak abyste mohli um stit krou ky a...

Page 54: ...ile je ventil tor v po adovan v ce znovu ut hn te se izovac knofl k stojanu V ku lze nastavit od 90 do 120 cm Varov n ujist te se e je ventil tor vypnut pokud chcete zm nit v ku I T N A DR BA P ed i t...

Page 55: ...u ako s z vesy uter ky bavlnen alebo papierov at Spotrebi v dy umiestnite na ploch a rovn povrch Spotrebi pou vajte v lu ne v interi ri Zapnut spotrebi nikdy nenech vajte bez dozoru Ak chcete spotrebi...

Page 56: ...trebi pou va deti od veku 8 rokov a osoby so zn en mi fyzick mi zmyslov mi alebo ment lnymi schopnos ami ako aj osoby bez sk senost alebo potrebn ch znalost Deti sa nesm so spotrebi om hra Deti sm spo...

Page 57: ...pr vnym sp sobom nie je pri pr padn ch poruch ch mo n po adova n hradu kody a zanik platnos z ruky Ak sa rozhodnete spotrebi pre poruchu viac nepou va odpor ame v m aby ste po vytiahnut z str ky z n s...

Page 58: ...iesko zapnutia vypnutia a nastavenia re imu 0 1 2 3 3 Regul tor na nastavenie polohy 4 Zais ovacie koliesko 5 Vn torn ty 6 Nastavovacie koliesko polohy stojana 7 Vonkaj ia ty 8 Noha 9 Ve k kr ok na z...

Page 59: ...ana odoberte upev ovaciu skrutku a kr ky na z klad u obr 1 2 Uchopte nohu a stojan vlo te do otvoru ktor sa v nej nach dza N sledne tieto diely plne prevr te aby ste mohli da na miesto kr ky a upev ov...

Page 60: ...e Po nastaven ventil tora do elanej v ky nastavovacie koliesko op utiahnite V ka sa d nastavi v rozmedz 90 a 120 cm Varovanie ke chcete upravova v ku ventil tora uistite sa e je vypnut ISTENIE A DR BA...

Page 61: ...nstimmung mit den Anweisungen in der Gebrauchsanleitung und f r den Zweck f r den es hergestellt wurde verwendet wird Dar ber hinaus muss der originale Kaufbeleg mit Kaufdatum Namen des Einzelh ndlers...

Page 62: ...mado com support ZAMAWIANIE AKCESORI W Ten produkt jest obj ty 24 miesi czn gwarancj Gwarancja jest wa na kiedy u ytkuje si produkt zgodnie z instrukcj obs ugi oraz zgodnie z przeznaczeniem Opr cz teg...

Page 63: ...63...

Page 64: ...und Druckfehler vorbehalten Sous r serve de modification Modifications and printing errors reserved Sujeto a cambios y errores de impresi n Con riserva di modifiche ed errori di stampa Der tages forb...

Reviews: