background image


Anvil Operator’s Manual                                            Page 6                                                                                                               


PRECAUTION


The Anvil is designed and manufactured as a Low-Speed-Vehicle (LSV). It is important that 
every Operator become familiar with safe operation of the vehicle as described in this 
Operating Manual and also with all applicable State, Local, and Community regulations 
governing the use of an LSV. 
 

SAFETY REGULATIONS 

It is required to read the Owner’s manual completely before operating the vehicle or 
attempting repair work. Any violations of instructions in the manual may lead to property loss, 
serious injury, or even death. 
 
Pay special attention to important statements with the words such as “Danger”, “Warning”, 
“Caution”, “Attention” etc… 
 
If any of the operation/warning decals are damaged, defaced, destroyed, or illegible it is 
important that they be replaced with new decals. Please contact the manufacturer or your 
dealer to obtain new decals. 


DANGER


DANGER indicates an immediate hazard that if ignored, will result in severe personal 

injury or death. 


WARNING


WARNING indicates an immediate hazard that if ignored, could result in severe 

personal injury or death. 


CAUTION 


CAUTION indicates a hazard or unsafe practice that if ignored, could result in minor 

personal injury or product or property damage. 


GENERAL WARNINGS 

The following safety procedures should be followed during vehicle operation, maintenance 

or repair. Other special warning signs are described in this manual. 


DANGER


Summary of Contents for Anvil

Page 1: ... Tomberlin assumes no liability for the content provided in this consumer educational section and it is possible that an error with regard to spelling grammar nomenclature and translation is present Note that the information provided should be treated as live documents meaning they are always in a state of refinement correction and improvement Check back often and if printed check back prior to re...

Page 2: ...Anvil Operator s Manual Page 1 A N V I L OPERATOR S MANUAL Electric Low speed Vehicle LSV ...

Page 3: ...gulations z Avoid roads with regular traffic even if the speed limit is low z Whenever possible stay on roads and lanes limited to low speed vehicle z All passengers should wear safety belts at all times z Avoid operating vehicle at night if possible because your vehicle may be hard for others to see z To reduce the chance of the vehicle tipping over reduce speed when turning and maneuvering throu...

Page 4: ...ld safety seats Do not use or install child safety seat in any seat or position in the vehicle Always obey and follow laws and regulations regarding the transportation of children Children that require the use of a child safety seat in a regular type automobile should not be transported in this vehicle ...

Page 5: ...ING NOTES z ALWAYS OPERATE YOUR ANVIL IN COMPLIANCE WITH YOUR STATE AND LOCAL VEHICLE REGULATIONS INCLUDING REGISTRATION TITLING INSURANCE SEAT BELT USAGE AND OPERATOR S LICENSING z SWITCH VEHICLE TO OFF POSITION REMOVE KEY AND SET PARKING BRAKE PRIOR TO EXITING DRIVER S SEAT z ALWAYS FASTEN YOUR SEAT BELTS z TO EXTEND THE LIFE OF YOUR BATTERIES KEEP BATTERIES FULLY CHARGED WHENEVER POSSIBLE AVOID...

Page 6: ...lations 6 General Warnings 6 Appearance of Control 8 Controls And Operation 9 Pre operation Inspection 14 Driving Instructions 15 Towing 16 Storage 16 Maintenance 17 Scheduled Maintenance 18 Battery Pack 21 Charger 23 Cleaning 26 Vehicle Specifications 27 Warranty 28 ...

Page 7: ...ts with the words such as Danger Warning Caution Attention etc If any of the operation warning decals are damaged defaced destroyed or illegible it is important that they be replaced with new decals Please contact the manufacturer or your dealer to obtain new decals DANGER DANGER indicates an immediate hazard that if ignored will result in severe personal injury or death WARNING WARNING indicates ...

Page 8: ...ld be between 95 105 inch pounds of torque Do not over tighten Loose and or over tightened connections can cause battery failure explosion and or fire Do Not Overfill the Batteries and keep batteries clean and free of moisture If any high heat condition or burning smell is noticed immediately park the vehicle in a safe location place the ignition in the off position move yourself and passengers aw...

Page 9: ...r s warranty APPEARANCE OF THE ANVIL CONTROLS 1 Headlight turn signal stalk 15 Cup holder 2 Brake fluid reservoir 16 FWD REV switch 3 Steering wheel 17 Emergency flasher switch 4 Speedometer Instrument Display 18 Key switch 5 Windshield wiper control and defroster switch 19 Heated Seat switch 6 CD player Stereo reference stereo manual 20 Parking brake handle 7 Defroster vent 21 Boost button 8 12V ...

Page 10: ... the key while driving your car as it will result in sudden power loss and braking to occur z Do not leave the key in the car or leave children in the vehicle unattended Instrument Cluster 1 Amperage display 9 Parking brake indicator 2 Left turn signal indicator 10 Brake fluid low indicator 3 Trip odometer reset 11 High beam indicator 4 Speed display 12 Low beam indicator 5 Odometer display 13 Mot...

Page 11: ...PORTANT NOTE This vehicle is equipped with OIC Operator In Charge Technology For Safety the vehicle must be placed in the neutral position before the ignition switch is turned on it must also be placed in neutral when changing between Economy and High Performance modes again for safety the vehicle will only start in economy mode if the vehicle was left in High Performance mode when shut off it wil...

Page 12: ...to function the same for turn signaling and horn Windshield Wiper Turning the right side stalk to INT LO or HI position the wiper will work as Intermittent low speed or high speed Defroster Switch Pushing up on the right side stalk will activate the front windshield defroster if your vehicle is equipped with this option Boost Button Located on the left side of the steering column When the boost bu...

Page 13: ...itch is in the on position a red P light will illuminate on the Instrument Cluster indicating the parking brake is engaged WARNING The direction switch should be placed in the neutral position the high performance switch placed in the economy position and the parking brake applied with the key removed whenever the operator exits the vehicle Brake Pedal The brake pedal is the larger foot pedal to t...

Page 14: ...y seats or infant carrying seats Children under 12 years of age should be transported in a full size car with appropriate child restraints Pregnant disabled or injured persons should consult their doctor for specific recommendations before operating the Anvil To properly secure the seatbelts pull the metal tab out away from the retractor and insert into one of the two the buckles located near the ...

Page 15: ...nspect the vehicle using the following guidelines The following items should be checked on a daily basis prior to vehicle operation z General check that all parts are securely fastened to the vehicle no parts are missing and all screws or nuts are properly tightened z Review all warning decals and placement on the vehicle z Safety Belts visually inspect and test for safe operation z Tires check fo...

Page 16: ...G INSTRUCTIONS WARNING z All drivers must have a valid driver s license z Always wear seat belts z No more than four occupants at one time on Anvil z Do not carry children on your lap or between the seats z Do not allow anyone to hang onto any part of the vehicle while operating z Obey all traffic regulations z Ensure all persons have read the operator s manual and can properly operate the vehicle...

Page 17: ...the accelerator pedal will reduce the life of the batteries and motor Parking the Anvil z After stopping the Anvil engage the parking brake by pulling up on the hand lever z Turn the key switch off remove the key and place the FWD REV switch in the Neutral position z If the vehicle begins to move while parked motor braking and an alarm should engage if the Run Tow switch is in the Run position If ...

Page 18: ...ater and baking soda 1 gallon of water for 1 cup of baking soda Do not allow this solution to enter the batteries 4 Inspect and clean battery wires Damage or frayed wires should be replaced 5 Store the vehicle in a cool dry location 6 Adjust the tire pressure to the recommended levels 7 Lubricate front suspension and all other periodic lubrication points Returning Car to Service 1 Fully charge the...

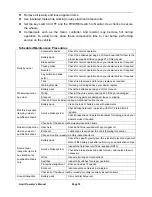
Page 19: ...ire car Check if any parts are damaged loose or missing Weekly inspection by owner Check all items included in above mentioned routine checks Battery pack Clean the tops of battery pack with soda water Check Brake fluid level replenish with DOT 3 rated fluid if required Service brake system Check brake lines and park brake cables for damage have your dealer service if required Monthly inspection i...

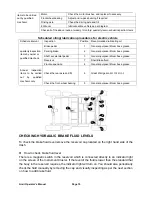
Page 20: ...id quarterly inspection items by owner or qualified mechanic Front suspension 4 General purpose lithium base grease Check the rear axle and fill 6 Great Wall gear oil 85W 90 GL 5 Annual inspection items to be carried out by qualified mechanic only Check the front wheel bearing 5 General purpose lithium base grease CHECKING HYDRAULIC BRAKE FLUID LEVELS To check the brake fluid level remove the rese...

Page 21: ...uipped with 4 wheel Brakes there are actually three systems designed to limit your speed z The main pedal braking is done on all four wheels with a hydraulic brake system which includes front wheel disc brakes and rear wheel drum brakes This system requires periodic inspection for brake pad wear drum rotor wear and hydraulic fluid loss Consult your Tomberlin Dealer or qualified Technician if exces...

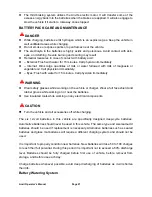
Page 22: ...or 15 minutes Call physician immediately WARNING z Wear safety glasses while working on the vehicle or charger Wear a full face shield and rubber gloves while working on or near the batteries z Use insulated tools while working on any electrical components CAUTION z Turn the vehicle and all accessories off while charging The six 12 volt batteries in this vehicle are specifically designed deep cycl...

Page 23: ...the proper operation of the watering system Battery Care The following maintenance is required 1 Keep batteries clean Ensure the battery cell tops are secure Wash the battery tops and terminals of batteries with a solution of 1 gallon water and 1 cup baking soda Do not allow solution to enter the batteries Rinse off residual solution 2 The electrolyte level in the batteries should be checked weekl...

Page 24: ...ver be left discharged longer than absolutely necessary Battery Charging WARNING z Batteries emit hydrogen which is an explosive gas While charging keep vehicle in well ventilated areas z Do not cover the vehicle while charging as an accumulation of hydrogen gas could result in an explosion CHARGER z Onboard Charger The charger is located behind the front bumper It begins the charge cycle after co...

Page 25: ...current To avoid the risk of electrical shorting the battery charger must be grounded through a properly installed three prong outlet Do not use a two prong adapter Locate all cords and wires in locations that will not be driven over or present a tripping hazard Note The vehicle and charger are equipped with an interlock device the vehicle will not start if AC Power is pressed The AC power source ...

Page 26: ...nd or fire z If an extension cord is used it must also be a three pronged extension cord with 14 AWG wires No longer than 15m 50 feet z Inspect and replace the charger if it has been damaged in any way Inspect the cords and connectors for cracks and fraying If cracks or frays are detected replace immediately z Do not use the charger near volatile liquids such as gasoline paints thinners and other ...

Page 27: ...n and activate within two to ten seconds The charger indicative light will display one by one and then returns to charging state The charger will automatically apply sufficient power to bring the Anvil s batteries to full charge It will also automatically shut itself off when they are full charge If left connected the charger will occasionally check the batteries condition and apply enough power t...

Page 28: ...rrying Capacity 800 pound Front Rear Tire Tubeless tire 225 60R16 98H Min ground clearance 180 mm 6 48 inch Min Turning radius 16 4 feet Max Speed 25MPH 40km h Max Travel Distance 40 miles Drive Type Rear wheel drive electric Brake distance 21 33 feet Slope Climbing Capacity 30 Steering System Rack and Pinion Brake System 4 wheel hydraulic brake front disc rear drum Mechanical parking brake Seatin...

Page 29: ...or s Manual c Damages caused by improper installation of a component d Vehicles charged by systems other than the Tomberlin charger provided with the Anvil e Neglect breakage freezing fire explosion wreckage flooding the addition of any chemical or excessive operation of the battery in an undercharged condition below half charge 1 200 specific gravity f Semiconductor parts such as diodes and fuses...

Page 30: ...y or in any action whether based upon warranty contract negligence strict product liability or otherwise shall be the repair or replacement at Tomberlin Automotive Group s option of the vehicle or component thereof that is deemed to be defective Replacement shall mean furnishing during the applicable limited warranty period a new vehicle or factory reconditioned vehicle or component thereof that i...

Page 31: ...ANTY 7 NO CONSEQUENTIAL DAMAGES IN NO EVENT SHALL THE TOMBERLIN AUTOMOTIVE GROUP BE LIABLE FOR ANY INCIDENTAL OR CONSEQUENTIAL DAMAGES INCLUDING BUT NOT LIMITED TO LOSS RELATING TO PROPERTY OTHER THAN THE VEHICLE LOSS OF USE LOSS OF TIME INCONVENIENCE OR ANY OTHER ECONOMIC LOSS Some states allow neither limitation on the duration of an implied warranty nor exclusions or limitation of incidental of...

Page 32: ...Anvil Operator s Manual Page 31 TOMBERLIN AUTOMOTIVE GROUP INC 3123 WASHINGTON ROAD AUGUSTA GA30907 WWW TOMBERLIN NET 706 860 8880 ...

Reviews: