- 12 -
TR-OP-EN
MACHINE SETUP
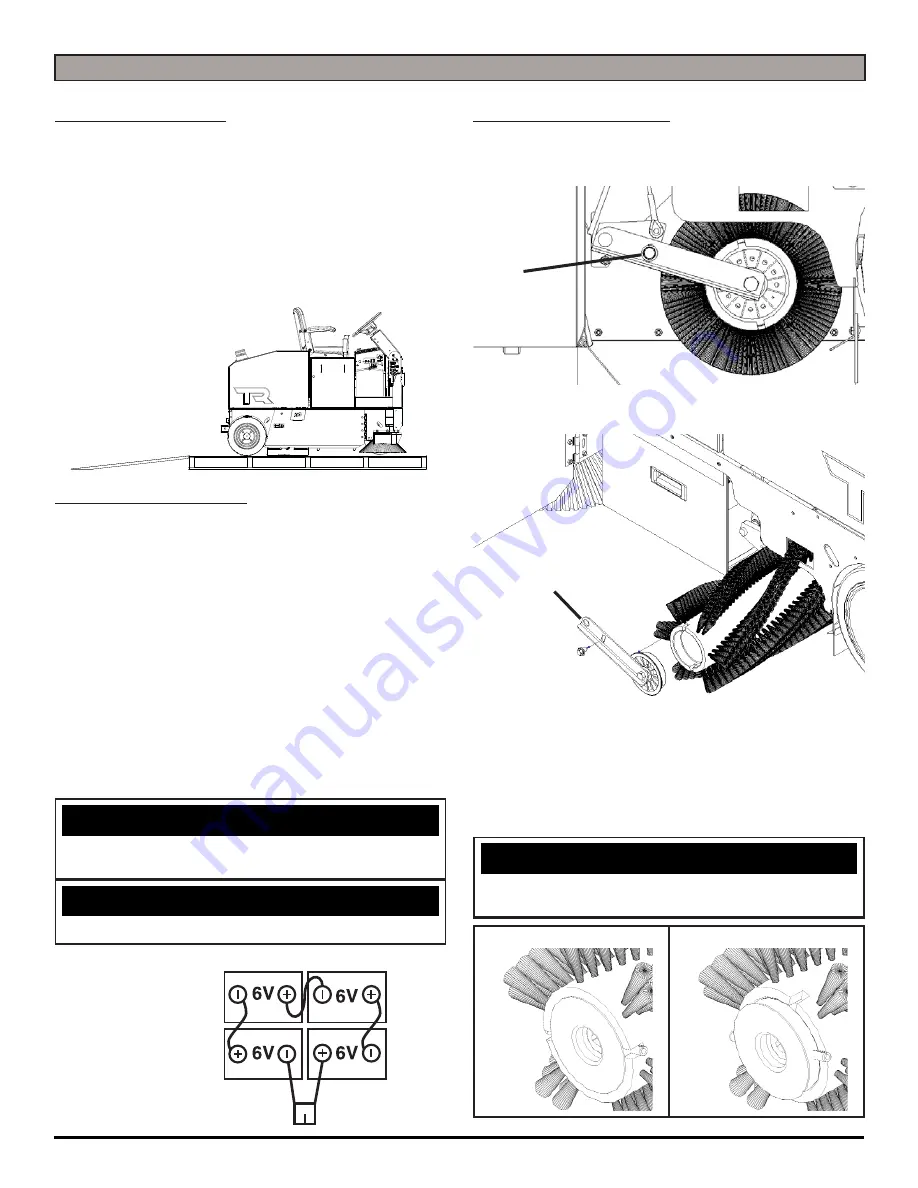
UN-CRATING MACHINE:
Carefully check the crate for any signs of damage and that
the batteries are in the unit.
To un-crate the machine, remove banding strips from
around the crate. Take off the top and sides and dispose
properly. Remove brackets from machine wheels.
Remove bolts from pallet, then remove board. Carefully
roll the machine off of the base. Notify the carrier
immediately if concealed damage is discovered.
CONNECTING BATTERIES:
Your machine is equipped with (4
×
) 6-Volt/ 245 AH, (4
×
)
6-Volt/ 325 AH, or (4
×
) 6-Volt/ 420 AH Wet Lead Acid,
AGM, Industrial, or Deep Cycle Batteries which form a 24
Volt system.
(SEE PICTURE BELOW OR BATTERY DISCONNECT
LABEL FOR CORRECT CABLE CONNECTIONS)
1. Turn all switches to the
OFF
position and remove Key.
2. Tip Tank back. Attach all Battery Cables to Terminals
as shown below.
3. Turn
ON
main power switch and check the Battery
Meter to ensure correct installation. Charge Batteries
if needed
(SEE BATTERY CHARGING)
.
NOTICE
Batteries are a possible environmental hazard. Consult
your Battery supplier for safe disposal methods.
NOTICE
Orientation of Batteries is critical for cables to reach.
INSTALLING MAIN BROOM:
1. Turn Key Switch to the
OFF
position and remove Key.
2. Open Side Access Door and remove bolt holding Idler
Arm in place
(A)
(SEE BELOW)
.
3. Remove Idler Arm and pull out old Broom
(B)
(SEE
BELOW)
.
4. Slide the new Broom in. With new Broom on Driver,
spin until Driver engages Broom.
5. Reinstall Idler Arm and tighten bolt
(B)
(SEE ABOVE)
.
6. If Broom is not level, loosen bolt and run Main Broom
motor for a couple seconds.
7. Retighten bolt and ensure Broom is level.
NOTICE
For correct Main Broom application - Contact your Local
Servicing Dealer.
DRIVER ALIGNED
NOT ALIGNED
24 VOLTS
A
B


