background image

36 


Mobile networks 

Devices that contain a mobile network module are intended for connection to one or more of the 
following mobile network frequencies: 
800/850/900/1800/1900/2100 MHz 


This document 

Great care was taken in preparing this document. Constant product development may mean that 
some information is not entirely up to date. The information in this document is subject to change 
without notice. 
TomTom shall not be liable for technical or editorial errors or omissions contained herein, nor for 
incidental or consequential damages resulting from the performance or use of this document. This 
document contains information protected by copyright. No part of this document may be 
photocopied or reproduced in any form without prior written consent from TomTom N.V. 

Summary of Contents for LINK 510

Page 1: ...TomTom LINK 510 User Manual ...

Page 2: ... the XP Compatibility mode 11 Activating the LINK 510 12 Connection overview 15 Choosing the correct position 16 Connecting to power 17 Mounting the LINK 510 18 Attaching the holder using the adhesive strips 18 Attaching the holder using self tapping screws 19 Attaching the holder using cable ties 19 Testing operation 21 Power or Ignition test 21 Mobile network reception test 21 Connecting to PRO ...

Page 3: ...GPS antenna 28 Mounting the external mobile network antenna 29 Appendix Using the IO cable 31 Connecting a digital tachograph 31 Using the input IN 1 for idle time reporting 32 Using the input IN 1 for changing the logbook mode 32 Wiring digital inputs 32 Wiring the digital output 33 Accessing FMS data 34 Addendum 35 Notices for Australia New Zealand and South Africa 37 ...

Page 4: ...SMB for optional external GSM antenna 4 Service Update Mini USB cable connector 5 Power cable connector 6 Reset button 7 IO Cable connector 8 Connector SMB for optional external GPS antenna Power cable Holder Fixings 2 cable ties 2 adhesive strips 2 self tapping screws and a cleaning tissue What s in the box ...

Page 5: ...g or cornering too fast And you can get information about how much fuel you have used What you need for the installation Before starting the installation of your TomTom LINK 510 read the installation instructions and the safety notices and warnings carefully and make sure you have the following The WEBFLEET Contract Confirmation letter including the Activation Code All parts contained in the box A...

Page 6: ...can cause sparks that can lead to explosions This may endanger human health and life Do not use the unit in areas with high risk of explosion When using a TomTom LINK 510 in a vehicle fuelled by liquefied gas follow the safety regulations of the country in which the vehicle is operated Damage caused through improper installation The installation and initial operation of the unit must be performed ...

Page 7: ...staff of TomTom Telematics are authorised to repair or replace parts Damage to the device Short circuits inside the unit can be caused by contact with water or other liquids The unit may be damaged by contact with water Use and store the unit in an area protected from water Risk of accidents Do not use the digital output to cut the engine power to remotely stop the engine or to otherwise remotely ...

Page 8: ...the Partner Portal under Software and Firmware You must be logged in to the Partner Portal to download the Tool The down loadable ZIP file contains the tool with the firmware update file embedded Unzip the down loaded file to your local hard disk Updating the firmware on your LINK 510 To update the firmware on your LINK 510 using the Firmware Update Tool do the following 1 Connect your LINK 510 to...

Page 9: ...he LINK 510 and which COM Port number was assigned as well as the operating system that will be installed with this update If the version number of the firmware installed on your LINK 510 is lower than the one includ ed in the Firmware Update Tool continue with the next ystep If it is up to date disconnect your LINK 510 and activate your LINK 510 4 Select Start to initiate the firmware update inst...

Page 10: ...firmware is installed on the device During the instal lation process the upper part of the window displays the installation progress 5 When the firmware installation is complete click OK to confirm 6 To close the Firmware Update Tool click Exit ...

Page 11: ...ws Vista or Windows 7 you must run the tool in Windows XP compatibility mode as it is not compatible with newer versions of Microsoft Windows To run the Firmware Update Tool in XP compatibility mode do the following 1 Go to the installation folder of the Firmware Update Tool on your computer and locate the exe file 2 Right click on the exe file and select Properties 3 Select the Compatibility tab ...

Page 12: ...ollowing 1 Install the latest version of the TomTom LINK Activation Tool You can download the Activation Tool from the Partner Portal at http business tomtom com partners Go to Technical Support and select Activation and Diagnostics 2 Connect your LINK 510 to supply voltage 3 Connect your LINK 510 to your computer using the Mini USB cable 4 Start the TomTom LINK Activation Tool by double clicking ...

Page 13: ...onnection to WEBFLEET has been established the Activation Tool asks you to enter your activation code 7 Click Activate 8 Enter the Activation Code which you can find in your WEBFLEET contract confirmation 9 Click OK ...

Page 14: ...14 The progress of the activation is shown You have now successfully activated your TomTom LINK 510 ...

Page 15: ...15 Make sure this wire is fused with max 10A Connection overview ...

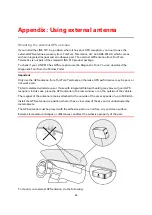
Page 16: ...external GPS antenna from TomTom Telematics To ensure mobile network reception using the integrated mobile network antenna the device must not be placed on or surrounded by metal items such as the vehicle s coachwork closer than 5 cm 2 inches and the top side must not be obstructed by metal items For more flexi bility with regards to installation we recommend using the external GSM antenna from To...

Page 17: ...efore you connect the PWR wire and the IGN wire as described below 1 Connect the GND wire brown to ground clamp 31 2 Connect the PWR wire red to the carry current clamp 30 The connection must be fused with max 10A If not fuse the the PWR wire with one 2A fast blow fuse 3 Connect the IGN wire black to ignition clamp 15 The connection must be fused with max 10A If not fuse the the IGN wire with one ...

Page 18: ...r the safety instructions and choose the correct position The LINK 510 can be attached with the two adhesive strips the two tapping screws or the cable ties Attaching the holder using the adhesive strips You can use the two adhesive strips to fix the LINK 510 to your vehicle Follow the safety instructions in this document 1 Choose a flat surface for accurate positioning of the unit Remember when t...

Page 19: ...metal objects 2 Insert the two screws into the corresponding holes in the holder 3 Tighten the screws 4 Carefully place the LINK 510 in the holder until it clicks into place Attaching the holder using cable ties You can use two cable ties to fix the holder to your vehicle Using cable ties might have an impact on the accuracy of the driving event reporting if the device is not fixed properly Please...

Page 20: ...e corresponding holes of the holder and insert them in the noose at the other end of the cable ties 5 Pull the cable ties tight so that the holder cannot move 6 Insert the LINK 510 into the holder Press gently until it clicks into place ...

Page 21: ...s If the device is already activat ed the green LED should be on all the time If the LED does not perform as described monitor the LEDs for diagnostics Mobile network reception test For this test you may need to move the vehicle to a location with a clear view of the sky to make sure that you have adequate GPS and mobile network reception For this test put your LINK 510 device in the position wher...

Page 22: ...s only one LINK 510 continue with step 6 5 Select your LINK 510 from the list The name starts with LINK followed by the serial number of your LINK 510 or the licence plate number of your vehicle You can find the serial number on the outside of your LINK 510 6 Enter the Activation Code which you can find in your WEBFLEET contract confirmation Select the appropriate subscription from the list if the...

Page 23: ...t activated Activate device ON Application is running device is activated You can monitor the connection of your LINK 510 to the mobile network and to WEBFLEET by looking at the yellow connection LED and referring to the table below For detailed diagnostics always use the TomTom Telematics Diagnostics Tool YELLOW LED mode OFF Not connected No mobile network coverage Check if device is connected to...

Page 24: ...le as you may be in a mobile network dead spot ON Connected Support If you cannot find the answer to your question with the help of the tables above please contact the TomTom Telematics support team at business tomtom com support ...

Page 25: ...t the LINK 510 to factory settings press the reset button with a thin pointed object until it clicks and keep it pressed for 8 seconds The LINK 510 reboots immediately after releasing the reset button You can count the seconds with the help of the flashing of the green LED that flashes once per second Important All information stored on the LINK 510 is deleted during a factory reset If resetting t...

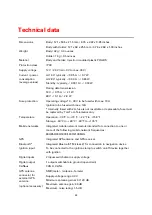
Page 26: ...fuse must be replaced by TomTom Telematics only Temperature Operation 30 C to 70 C 22 F to 158 F Storage 40 C to 80 C 40 F to 176 F Mobile networks Integrated mobile network module intended for connection to one or more of the following mobile network frequencies 800 850 900 1800 1900 2100 MHz GPS Integrated GPS antenna and GPS receiver BluetoothTM Integrated BluetoothTM class 2 for connection to ...

Page 27: ...nnector for external GSM antenna optional accessory SMB male antenna female for use with the GSM antenna from TomTom Telematics only Primary battery 3 V non rechargeable this device cannot be operated with this battery ...

Page 28: ...TomTom Telematics otherwise GPS performance may be poor or not work at all Tinted metallised windscreens or those with integrated filament heating may prevent good GPS reception In this case place the GPS antenna in the rear window or on the outside of the vehicle The magnet of the antenna remains attached to the outside of the car at speeds of up to 180 km h Install the GPS antenna in a position ...

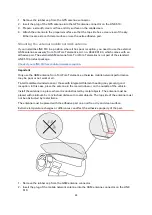
Page 29: ...ackage Check if your LINK 510 has mobile network reception Important Only use the GSM antenna from TomTom Telematics otherwise mobile network performance may be poor or not work at all Tinted metallised windscreens or those with integrated filament heating may prevent good reception In this case place the antenna in the rear window or on the outside of the vehicle Install the antenna in a place wh...

Page 30: ... smooth clean oil free and dry surface on the windscreen 4 Attach the antenna to the prepared surface so that the top side has clear view of the sky Either locate a smooth metal surface or use the extra adhesive pad ...

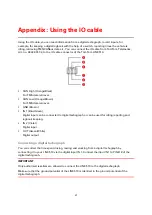
Page 31: ...e Green Digital input can be connected to digital tachograph or can be used for idling reporting and logbook keeping IN 2 Violet Digital input OUT Green White Digital output Connecting a digital tachograph You can collect the time spent driving resting and working from a digital tachograph by connecting it to your LINK 510 via the digital input IN 1 Connect the input IN 1 to PIN D 8 of the digital...

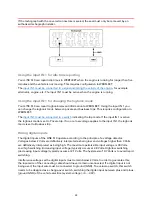
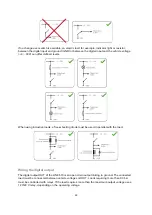
Page 32: ...gbook mode is set to Private trip If no or a low voltage applies to the input IN 1 the logbook mode is set to Business trip Wiring digital inputs The digital inputs of the LINK 510 operate according to the principle of a voltage detector Voltages below 2 Volts are definitively interpreted as being low and voltages higher than 3 Volts are definitively interpreted as being high The maximum permissib...

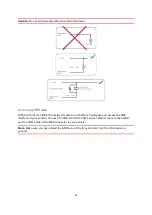
Page 33: ...g inductive loads a free wheeling diode must be used in parallel with the load Wiring the digital output The digital output OUT of the LINK 510 is an open drain output linking to ground The connected load must be connected between vehicle voltage and OUT Loads requiring more than 0 35 A must be controlled with relays If the load requires more than the maximum output voltage use a 12 V 24 V relay d...

Page 34: ...0 and the IO cable from TomTom Telematics you access the FMS interface of your vehicle Connect the CAN H and the CAN L wires of the IO cable to the CAN H and the CAN L pins of the FMS connector in your vehicle Note Make sure you have linked the GND wire of the IO cable from TomTom Telematics to ground ...

Page 35: ...LINK500 S4LLINK500 S4LLINK500 S4LLINK500 IC ID 5767A LINK500 5767A LINK500 WEEE directive The wheelie bin symbol on the product or its packaging indicates that this product shall not be treated as household waste In line with EU Directive 2012 19 EU for waste electrical and electronic equipment WEEE this electrical product must not be disposed of as unsorted municipal waste Please dispose of this ...

Page 36: ... that some information is not entirely up to date The information in this document is subject to change without notice TomTom shall not be liable for technical or editorial errors or omissions contained herein nor for incidental or consequential damages resulting from the performance or use of this document This document contains information protected by copyright No part of this document may be p...

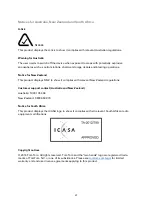
Page 37: ...is product displays R NZ to show it complies with relevant New Zealand regulations Customer support contact Australia and New Zealand Australia 1300 135 604 New Zealand 0800 450 973 Notice for South Africa This product displays the ICASA logo to show it complies with all relevant South African radio equipment certifications Copyright notices 2016 TomTom All rights reserved TomTom and the two hands...

Reviews: