background image

12 

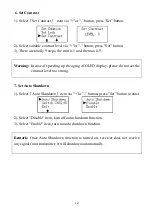
6. Set Contrast       


1). Select

Set Contrast

  item via "+"or "-" button, press "Set" button.   


2). Select suitable contrast level via "+"or "-" button, press "Set" button. 

3). There are totally 9 steps, the min is 1 and the max is 9. 


Warning:

 In case of speeding up the aging of OLED display, please do not set the 

contrast level too strong.   


7. Set Auto Shutdown                                                   


1). Select

Auto Shutdown

item via "+"or "-" button, press "Set" button to enter.     


2). Select "Disable" item, turn off auto shutdown function. 

3). Select "Enable" item, turn on auto shutdown function. 


Remark: 

Once  Auto  Shutdown  function  is  turned  on,  receiver  does  not  receive 

any signal from transmitter, it will shutdown automatically.


Summary of Contents for Soolai SPL-1600R

Page 1: ......

Page 2: ...ating menu 14 VI SPL 1600R Monitoring Mode 15 VII SPL 1600R Updating Mode 15 VIII SPL 1600T Parts Instruction 16 IX SPL 1600T Operation Control 17 X SPL 1600T How to enter setting mode 19 XI SPL 1600T Parameter setting 20 1 Set Channel group Channel Frequency 20 2 Set Microphone Gain 21 3 Set Name 22 4 Set RF Power Output 22 5 Set Locking Unlocking 23 6 Set Contrast 23 7 Set Language channel switc...

Page 3: ...ing menu 36 XVI WI 1600 Special Features 37 XVII WI 1600 Parts Instruction 38 XVIII WI 1600 Operation Control 41 XIX WI 1600 How to enter setting mode 46 XX WI 1600 Parameter setting 47 1 Set Channel group Channel Frequency 47 2 Set Pilotone 48 3 Set Name 48 4 Set Noise Lock SQ 49 5 Set Locking Unlocking 49 6 Set Contrast 50 7 Set Language channel switch 50 XXI Application Sample 51 XXII Main Spec...

Page 4: ...e interference High performance double IF circuit design RF Track tuning Filtering technique with SAW RF filters to get high anti interference 128 64 dot matrix double color OLED display Name channel group channel frequency volume battery RF level Audio level RF power and lock Mode at OLED display Digital 16 step volume control of receiver Digital 21 step SQ adjusting of receiver Panel lock with p...

Page 5: ... updating contacts 9 Display of channel group Channel group 1 7 User Group U 10 Channel display 11 Frequency display frequency of 32 channels in User Group can be user defined 12 Name display combined by 12 characters 13 Earphone output volume display 14 Received signal strength indicator 15 Changing channel display 16 Lock mode icon lock mode is activated 17 Battery status display 18 Audio level ...

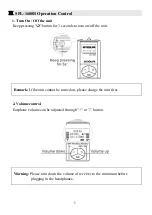
Page 6: ...ton for 3 seconds to turn on off the unit Remark If the unit cannot be turned on please charge the unit first 2 Volume control Earphone volume can be adjusted through or button Warning Please turn down the volume of receiver to the minimum before plugging in the headphones ...

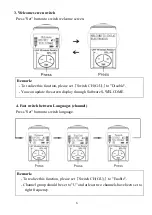
Page 7: ...ch CH G U to Disable You can update the screen display through Software S WELCOME 4 Fast switch between Languages channel Press Set button to switch language Remark To realize this function please set Switch CH G U to Enable Channel group should be set to U and at least two channels have been set to right frequency ...

Page 8: ...ansmitter is off 2 Turn on the receiver and connect the earphone earphone is antenna then check the Received signal strength indicator If there is no RF level display it means no frequency interference You can use this frequency If there is RF level display it means the frequency is interfered The stronger interference is the more the RF level appears Please choose another frequency ...

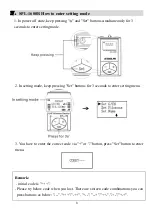
Page 9: ...conds to enter setting mode 2 In setting mode keep pressing Set buttons for 3 seconds to enter setting menu 3 You have to enter the correct code via or button press Set button to enter menu Remark Initial code is Please try below code when you lost There are sixteen code combinations you can press buttons as below ...

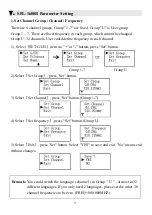
Page 10: ...Select SET G CH item via or button press Set button Group 1 7 Group U 2 Select Set Group press Set button 3 Select Set Channel press Set button Group 1 7 4 Select Set frequency press Set button Group U 5 Select Exit press Set button Select YES to save and exit No means exit without changes Remark You could switch the language channel in Group U at most in 32 different languages If you only need 2 ...

Page 11: ...ame is compose of 12 characters each character with 78 different choices 0 1 2 3 4 5 6 7 8 9 A B C D E F G H I J K L M N O P Q R S T Y V W X Y Z a b c d e f g h i j k l m n o p q r s t u v w x y z _ SPACE 1 Select Set Name item via or button press Set button 2 At first set the first character of the name via or to select it and press Set to confirm Then set the second one until the last one Save a...

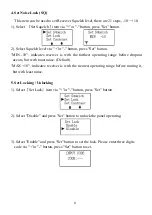
Page 12: ...the farthest operating range before dropout occurs but with most noise Default MAX 10 indicates receiver is with the nearest operating range before muting it but with least noise 5 Set Locking Unlocking 1 Select Set Lock item via or button press Set button 2 Select Disable and press Set button to unlock the panel operating 3 Select Enable and press Set button to set the lock Please enter three dig...

Page 13: ...of speeding up the aging of OLED display please do not set the contrast level too strong 7 Set Auto Shutdown 1 Select Auto Shutdown item via or button press Set button to enter 2 Select Disable item turn off auto shutdown function 3 Select Enable item turn on auto shutdown function Remark Once Auto Shutdown function is turned on receiver does not receive any signal from transmitter it will shutdow...

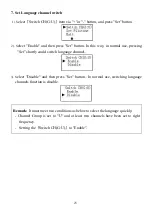
Page 14: ...anguage channel 3 Select Disable and then press Set button In normal use switching language channels function is disable Remark It must meet two conditions as below to switch the language quickly Channel group is set to U and at least two channels have been set to right frequency Setting the Switch CH G U to Enable 9 Exit of operating menu Select Exit via or button press Set button ...

Page 15: ... receiver would auto stop the function of SQ and Pilotone the receiver cannot be mute This mode is only used for test or receiving weak signal Ⅶ SPL 1600R Updating Mode In power off state keep pressing and buttons simultaneously for 3 seconds to turn on and enter updating mode Remark Updating the words at the display should according to software S WELCOME and writer SCW 02A ...

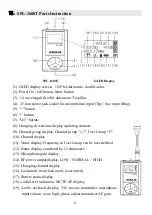
Page 16: ...y updating contacts 9 Channel group display Channel group 1 7 User Group U 10 Channel display 11 Name display Frequency in User Group can be user defined 12 Name display combined by 12 characters 13 Microphone gain display 14 RF power output display LOW NORMAL HIGH 15 Changing channel display 16 Lock mode item lock mode is activated 17 Battery status display 18 Audio level indication MUTE AF displ...

Page 17: ...16 IX SPL 1600T Operation Control 1 Turn On Off the unit Keep pressing button for 3seconds to turn on off the unit 2 Quick mute Press button to mute the transmitter ...

Page 18: ... of Language channel Press via or button to switch from languages Remark Channel group is set to U and at least two channels have been set to right frequency To realize this function please set Switch CH G U to Enable ...

Page 19: ... seconds to enter setting mode 2 In setting mode keep pressing Set button for 3 seconds to enter setting menu 3 You have to enter correct code via or button press Set button to enter menu Remark Initial code is Please try below code when you lost There are sixteen code combinations you can press buttons as below ...

Page 20: ... then press Set button to enter Group 1 7 Group U 2 Select Set Group then press Set button to enter 3 Select Set Channel then press Set button to enter Group 1 7 4 Select Set frequency then press Set button to enter Group U 5 Select Exit then press Set button to exit Select YES to save it and exit No means exit without changes Remark You could switch the language channel in Group U at most in 32 d...

Page 21: ...d to increase the microphone gain When speaking Audio level displays 9 10 steps as below figure it means perfect performance When speaking OL icon appeared as below figure it means the speaker voice is too loud or the MIC gain is too high You have to reduce the microphone gain Remark Please make the microphone close to mouth to get better performance The antenna of transmitter should be placed ver...

Page 22: ...m Then set the second one until the last one Save and exit Remark In Group 1 7 this setting is available to all channels In Group U this setting is only available to current channel The name of 32 channels in Group U can be set separately 4 Set RF Power Output This setting is used to set for RF power output 1 Select Set RF Power item via or button press Set button 2 Select via or button select HIG...

Page 23: ...o set the lock You will need to enter three digits codes via or button then press Set button to set 6 Set Contrast 1 Select Set Contrast item via or button and press Set button to enter 2 Select suitable contrast level via or button and then press Set button There are 9 steps the min is 1 and the max is 9 Warning In case of speeding up the aging of OLED display please do not set the contrast level...

Page 24: ...al use pressing Set shortly could switch language channel 3 Select Disable and then press Set button In normal use switching language channels function is disable Remark It must meet two conditions as below to select the language quickly Channel Group is set to U and at least two channels have been set to right frequency Setting the Switch CH G U to Enable ...

Page 25: ...al Pilotone signal from transmitter 3 Select Constant there is Constant Pilotone signal from transmitter 4 Select OFF no Pilotone signal from transmitter Remark In normal use please set Pilotone of transmitter and receivers be same 9 Exit of operating menu Select EXIT item via or button and then press Set button ...

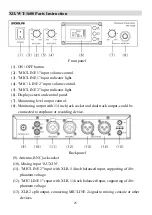
Page 26: ... output control 8 Monitoring output with 1 4 inch jack socket and dual track output could be connected to earphone or recording device Back panel 9 Antenna BNC jack socket 10 Mixing input AUX IN 11 MIC LINE 2 input with XLR 1 4 inch balanced input supporting of 48v phantom voltage 12 MIC LINE 1 input with XLR 1 4 inch balanced input supporting of 48v phantom voltage 13 XLR 2 split output connectin...

Page 27: ...display frequency of 32 channels in User Group can be user defined 19 Name display 20 Transmitting RF power display 21 Changing channel display 22 48V phantom voltage display 23 Lock mode item 24 Audio level indication MUTE AF display 25 Audio overload display OL means transmitter MIC input volume is too high Please decrease the input volume of MIC LINE 1 MIC LINE 2 or AUX IN 26 UP button 27 SET b...

Page 28: ...0 Operation Control 1 Setup antenna 2 Connect 12V DC power adapter with DC input Remark Please make sure the ON OFF button is on OFF state before you connect power adapter 3 Press ON OFF button to turn on the device ...

Page 29: ...ice via MIC LINE1 MIC LINE2 or AUXIN 5 Adjust input volume Low input level Normal input level High input level Remark Only volume of input MIC LINE1 MIC LINE2 can be adjusted The input volume of AUXIN cannot be adjusted here ...

Page 30: ...29 6 Quick mute function Turning off and turn on quickly would make the transmitter turn to mute ...

Page 31: ...n on the device firstly 2 Press button for 3 seconds to enter setting menu 3 If former user has set locking code as shown in the figure below You have to enter the correct code via or button then press to enter menu Remark There are eight password combinations you can press buttons as below ...

Page 32: ...r button then press button to enter Group 1 7 Group U 2 Select Set Group then press button to enter 3 Select Set Channel then press button to enter Group 1 7 4 Select Set frequency then press button to enter Group U 5 Select Exit then press button to exit Select YES to save it and exit No means exit without changes Remark You could switch the language channel in Group U at most in 32 different lan...

Page 33: ...is compose of 12 characters each character with 78 different choices 0 1 2 3 4 5 6 7 8 9 A B C D E F G H I J K L M N O P Q R S T Y V W X Y Z a b c d e f g h i j k l m n o p q r s t u v w x y z _ SPACE 1 Via or button select Set Name item press button to enter 2 At first set the first character of the name via or to select it and via to confirm Then set the second one until the last one And then sa...

Page 34: ...ormal transmitting power If you select HIGH item it means you select higher transmitting power Remark Please select RF power the lower the better if operating range is enough 5 Set Locking Unlocking 1 Select Set Lock item via or button and press button to enter 2 Select Disable and then press button to unlock the panel operating 3 Select Enable and then press button to set the lock You will need t...

Page 35: ... strong 7 Set Language channel switch 1 Select Switch CH G U item via or button and press button 2 Select Enable and then press button In this way in normal use pressing shortly could switch language channel 3 Select Disable and then press button In this way switching language channel function is disable Remark It must meet two conditions as below to select the language quickly Channel group is se...

Page 36: ...al Pilotone signal from transmitter 3 Select Constant there is Constant Pilotone signal from transmitter 4 Select OFF no Pilotone signal from transmitter Remark In normal use please set Pilotone of transmitter and receivers be same 9 Exit of operating menu Select Exit item via or button and then press button ...

Page 37: ...port wireless receiving and Aux input which could also adjust separately 3 5 mm mini XLR jack socket of microphone for interpreter Special design LOOP IN and LOOP OUT can make wireless interpreters works hand in hand easily Balanced output XLR of microphone is easily to connect to wireless transmitter UHF professional frequency PLL synthesized design Switching 32 language channels quickly displayi...

Page 38: ... connecting with receiver and AUX input 6 Toggle switch of DIRECT INDIRECT DIRECT is original INDIRECT is transliteration 7 Microphone indicator light microphone is available if it is on 8 3 5 mm jack socket for microphone 9 XLR mini jack socket of microphone 10 MUTE button would make the volume of the MIC mute 11 Microphone ON OFF button is used to turn on the microphone and turn off the other mi...

Page 39: ...witch Switching SINGLE to interlock interpreter unit only one microphone is useful the others is mute While Switching MULTIPLE to stop interlocking all microphones are available now 16 Adjusting the microphone gain to make the same volume of every interpreter when they work in hand in hand ways 17 Antenna BNC type jack socket 18 AUX input RCA type dual track jack socket 19 Unbalanced output of rec...

Page 40: ...roup can be user defined 25 Name display 26 10 step RF display 27 Changing channel display 28 Lock mode icon lock mode is activated 29 Audio level indication 30 Audio overloads display OL means transmitter microphone input volume is too high Adjusting transmitter AF gain until there is no OL on display 31 UP button 32 SET button 33 DOWN button ...

Page 41: ...40 XVIII WI 1600 Operation Control 1 Setup antenna 2 Connect 12V DC power adapter with DC input 3 Press ON OFF button to turn on the device ...

Page 42: ...eck and adjust the frequency used by wireless interpreter Original receiving WI 1600 Original transmitting WT 1600 2 Plugged in earphone through EAR jack socket 3 Adjust the volume through wireless receiving volume control knob RX VOL ...

Page 43: ...RECT INDIRECT to INDIRECT 2 Plugged in gooselike MIC through MIC jack socket 3 Connect MIC output BALANCE OUT of wireless interpreter with MIC line input MIC LINE 1 or MIC LINE 2 of wireless transmitter Wireless interpreter WI 1600 Wireless transmitter WT 1600 ...

Page 44: ...nterpreter has been transmitted Press the red button MUTE the MIC channel closed Now the indicator of MIC is off the voice of interpreter cannot be transmitted 5 Adjust microphone gain through the MIC GAIN knob in the back panel Remark It will make the output volume same when interpreter works in turn ...

Page 45: ...on to language transmitter 2 When Toggle switch of DIRECT INDIRECT is on DIRECT it will directly transmit the original to language transmitter Warning When the interpreter can monitor his transliteration that is the frequency of his wireless interpreter is same with his transliteration wireless transmitter please do not set Toggle switch of DIRECT INDIRECT on DIRECT If not it will make noise even ...

Page 46: ...n on the device firstly 2 Press button for 3 seconds to enter setting menu 3 If former user has set locking code as shown in the figure below You have to enter the correct code via or button then press to enter menu Remark There are eight password combinations you can press buttons as below ...

Page 47: ... or button press button to enter Group 1 7 Group U 2 Select Set Group then press button to enter 3 Select Set Channel then press button to enter Group 1 7 4 Select Set frequency then press button to enter Group U 5 Select Exit then press button to exit Select YES to save it and exit No means exit without changes Remark You could switch the language channel in Group U at most in 32 different langua...

Page 48: ... compose of 12 characters each character with 78 different choices 0 1 2 3 4 5 6 7 8 9 A B C D E F G H I J K L M N O P Q R S T Y V W X Y Z a b c d e f g h i j k l m n o p q r s t u v w x y z _ SPACE 1 Select Set Name item via or button then press button to enter 2 At first set first character of the name via or to select it and via to confirm Then set the second one until the last one And then sav...

Page 49: ...thest operating range before dropout occurs but with most noise Default MAX 10 indicates receiver is with the nearest operating range before muting it but with least noise 5 Set Locking Unlocking 1 Select Set Lock item via or button and press button to enter 2 Select Disable and then press button to unlock the panel operating 3 Select Enable and then press button to set the lock You will need to e...

Page 50: ...e channel switch 1 Select Switch CH G U via or button item and press button 2 Select Enable and then press button In this way in normal use pressing shortly could switch language channel 3 Select Disable and then press button In this way in normal use switching language channel function is turned off Remark It must meet two conditions as below to select the language quickly Channel group is set to...

Page 51: ... A and speak B Figure Ⅱ Y type connector Optional Connecting with transmitter it can input external audio MP3 player when speaking LINE Line input connecting to wireless receiver MP3 CD and so on MIC to Head microphone or Lavalier microphone Connecting with receiver it can split output of left and right tracks with receiver R is right track L is left track ...

Page 52: ...a wireless transmitter Interpreters can monitor the spokesman by wireless receivers and then their transliterations were emitted by other wireless transmitters While visitors can hear different languages by taking wireless receivers on different channels ...

Page 53: ...OPEN for interpreter B is pressed MIC of interpreter A will be mute automatically Remark When Interlocking switch is switched SINGLE now two microphones is interlocking only one Microphone is useful When microphone of interpreter A is turned on the other is mute And vice versa When Interlocking switch is switched MULTIPLE then interlocking stop all microphones are available now When all the microp...

Page 54: ...53 4 Interpretation Teaching ...

Page 55: ...uency Response 50 16 000Hz 3dB Earphone dependent Operating Temperature 20 70 Operation Range 300ft Environment dependent Wireless Transmitter Specification Portable transmitter SPL 1600T Stationary transmitter WT 1600 RF Power output 1mw 10mw 20mw country depending 1mw 10mw 100mw country depending Antenna 1 4 wave flexible antenna or uses microphone cable External antenna 50Ω BNC jacket socket Ha...

Page 56: ... selected Metal Wireless receiver specification Portable receiver SPL 1600R Interpreter unit WI 1600 RF Sensitivity 0 7uV 12dB SINAD 2uV 30dB SINAD 0 7uV 12dB SINAD 2uV 30dB SINAD Squelch threshold SQ 2uV 21 step 2uV 21 step Antenna Uses earphone cable External antenna BNC AF Output 3 5mm connector 3 5mm connector AF Output control 16 step digital volume RX AUX IN potentiometer control Minimun Loa...

Page 57: ...r unit MIC specification MIC Input 3 5mm unbalanced Tip hot Ring cold Sleeve ground XLR mini unbalanced pin2 hot pin3 cold pin1 ground MIC Output XLR balanced output pin2 hot pin3 cold pin1 ground MIC Loop Input 1 4 unbalanced input LOOP IN Tip hot Ring sync data Sleeve ground MIC Loop Output 1 4 unbalanced input LOOP OUT Tip hot Ring sync data Sleeve ground MIC Gain Adjusting Range 0 10dB ...

Reviews: