background image

- 14 - 


CAUTION 

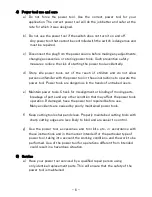
●  Secure work area. 

■  Keep body stance balanced and firm. 

■  Never wrap the electric cord around something. 

■  Keep work area well it. 

●  Use suitable model for each application. 

■  Do not use the wrench beyond its rated specifications. 

■  Do not use the wrench for unintended purposes. 

●  Dress properly.   

■  Always wear gloves and non-skid shoes when operating. 

■  Always wear safety helmet. 

●  Use genuine accessories and attachments manufactured by TONE 

CO., Ltd. 

■  Use the genuine accessories mentioned in this instruction manual 

or TONE’s general catalog. 

Failure to follow these instructions may result in malfunction or accidents. 

●  Do not connect multiple plugs to a single outlet by using a multiple 

outlet adaptors. 

  Over current may cause fire, accidents or malfunction.   

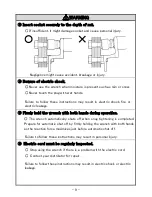
● Do not abuse the electric cord. 

■ Never use the electric cord for carrying, pulling or unplugging the power. 

■ Keep the electric cord away from heat, oil, sharp edges or moving parts.   

● Keep electric motor well ventilated.   

■ Do not put any foreign materials into the vent. 

■ Do not block exhaust vent. 

Summary of Contents for GNR121E-UC

Page 1: ...le Insulation CAUTION Read and fully understand all the instructions before use Keep this manual in designated place for easy and quick reference The models mentioned in this manual are designed for u...

Page 2: ...tributor Read this instruction manual carefully before use Full understanding of manual is essential to prevent personal injury or malfunction Keep this manual in the metal case for reference If the m...

Page 3: ...personal injury or death in the worst case Warning is used to indicate hazardous or unsafe practices which could result in severe personal injury or death in the worst case Caution is used to indicat...

Page 4: ...7 3 PRECAUTIONS FOR USE 7 4 PART NAME ACCESSORIES 16 5 BEFORE USE 18 6 CHANGING ACCESSORIES 20 7 OPERATING PROCEDURE 22 8 TIGHTENING TORQUE 25 9 EXPLANATION LED INDICATION 27 10 INSPECTION MAINTENANC...

Page 5: ...y while operating a power tool Distractions can cause you to lose control 2 Electrical safety a Power tool plugs must match the outlet Never modify the plug in any way Do not use any adapter plugs wit...

Page 6: ...idental starting Ensure the switch is in the off position before plugging in Carrying power tools with your finger on the switch or plugging in power tools that have the switch on invites accidents d...

Page 7: ...ous in the hands of untrained users e Maintain power tools Check for misalignment or binding of moving parts breakage of parts and any other condition that may affect the power tools operation If dama...

Page 8: ...operating at elevated heights Failure to follow these instructions may result in fall down accidents About Double Insulation This electric wrench has a double insulation structure An electric conduct...

Page 9: ...ry WARNING Do not use attachments Do not connect attachments such as extension bar joint and adapter between output drive and socket Fall down of wrench and breakage of attachments might cause injury...

Page 10: ...ctric leakage Firmly hold the wrench with both hands during operation The wrench automatically shuts off when snug tightening is completed Prepare for automatic shut off by firmly holding the wrench w...

Page 11: ...tired Failure to follow these instructions may result in accidents Avoid overloading Use the wrench and its accessories within the rated specifications An overloaded wrench and its accessories may re...

Page 12: ...shes Reaction Bar and Spirolox for Reaction Bar Store the wrench in the metal case and place it in protected storage when not in use Store the wrench in a secure dry location to keep any unauthorized...

Page 13: ...y problems are found on the items listed above Failure to follow these instructions may result in electric shock fire or burn accidents Use appropriate power source as indicated on the rating plate Fa...

Page 14: ...to the wattage being pulled from the generator Failure to follow these instructions may cause malfunction or breakage of the wrench Do not use welder generators Welder generators may cause malfunction...

Page 15: ...factured by TONE CO Ltd Use the genuine accessories mentioned in this instruction manual or TONE s general catalog Failure to follow these instructions may result in malfunction or accidents Do not co...

Page 16: ...extension cord make sure that voltage remains within 10 of the rated voltage at all times When using an extension cord select shorter extension units than specified below depending on the cross sectio...

Page 17: ...cessory Internal Gear Set Screw Output Drive Change Lever Trigger Switch Motor Carbon Brushes Rating Plate Torque Setting Dial Green LED Red LED Graduation Cord Plug Driver for Socket Driver for Contr...

Page 18: ...UC AD8H 120KLHA FRS 50 GNR211E UC GNR212E UC AD8V 210KLHA FRS 56 Optional Accessories Model GNR31E UC GNR32E UC Impact Socket 6NV Series Digitorqon DTM5EN GNR51E UC GNR52E UC Impact Socket 6NV Series...

Page 19: ...d above Make sure that set screws are securely fastened Loose installation may result in accidents and personal injury See CHANGING ACCESSORIES on page P 20 Make sure to use adequate power supply Use...

Page 20: ...is used at low torque setting under low temperature 0 10 the warm up procedure with no load must be carried out at least 5 minutes In this case the torque setting dial should be set at Maximum After t...

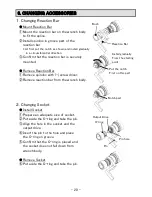
Page 21: ...ox with screw driver Remove reaction bar from the wrench body Changing Socket Install Socket Prepare an adequate size of socket Put aside the O ring and take the pin Align the hole in the socket and t...

Page 22: ...firm if there is no deformation with O ring and bend or crack with pin If something wrong with pin or O ring replace them to new one Personal injury might be invited if the socket falls down Confirm i...

Page 23: ...tting dial to target torque with a screw driver Slide the socket over nut completely by turning the internal gear When the wrench starts reaction bar turns in the direction opposite to the rotation of...

Page 24: ...the wrench starts reaction bar turns in the direction opposite to the rotation of nut Squeeze the trigger switch to start The reaction bar stops at adjacent material and loosening starts When looseni...

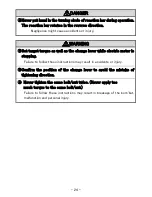
Page 25: ...l as the change lever while electric motor is stopping Failure to follow these instructions may result in accidents or injury Confirm the position of the change lever to avoid the mistake of tightenin...

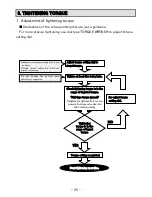
Page 26: ...f target torque Torque setting completed Start tightening operation YES Tighten at least five bolts nuts Check tightening torque is in the range of targeted torque Dial type torque wrench Retighten th...

Page 27: ...tion is soft gasket rubber glass etc in between the steels When bolt length is extremely long When bolt diameter is small When bolt grades are under 8 8 or 10 9 When friction coefficient of the bolt i...

Page 28: ...mplete Tightening No load operation Tightening operation Tightening Finished Trouble Detected Indication LED Meaning Remedy Tightening was not completed correctly Check the bolt and nut to be tightene...

Page 29: ...clude benzene thinner gasoline etc Never put solvents into the exhaust vent Store the wrench in the metal case after operation and keep it dry Carbon brushes must be regularly inspected and replaced w...

Page 30: ...every 6 months or 10 000 tightening whichever comes first Contact your distributor for overhaul 11 FEATURE Double Insulated Electric Wrench Torque Control Box Installed Enable to control torque in bot...

Page 31: ...5kg 5 0kg 5 4kg 7 3kg 8 8kg Repeated accuracy is the percentage of variation of tightening torque under the same torque setting and operational condition The weight excludes the socket reaction bar an...

Page 32: ...IMKA068...

Reviews: