background image

TOOBOM VOICE RECORDER

E:

support@toobomworld.com

W:

http://toobomworld.com

Page 4 of 14

Chapter 2

The Basics Operation of R63 Voice Recorder

1. Check the voice recorder

Once you open the box, push up the ON/OFF (power button) to ON position, switch
on your voice recorder. Try to playback the test file in the music folder or press hold
REC button to recording a test file to check everything is OK

If you cannot boot on your voice recorder, it maybe the recorder was low battery, go
to next step, charging the voice recorder

2. Charging the voice recorder

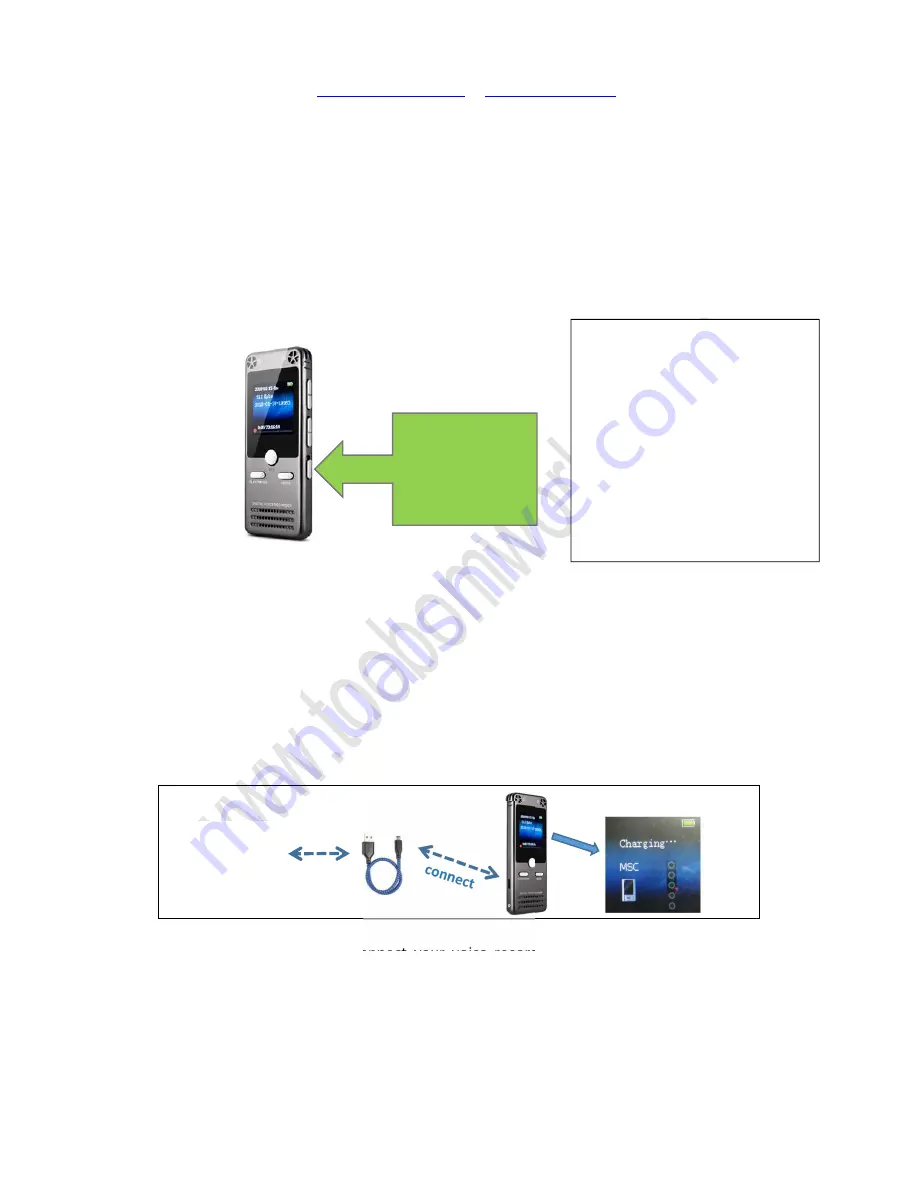
Use the Micro USB cable connect your voice recorder to Computer USB socket to
charging it and transfer data. When full charged, the battery icon will be full.

Caution:

We highly suggest you charge the recorder via USB cable, connect it to computer. The
recommend charging power current is 5V 400 ~ 600mAh, otherwise it will not

①Push up the

ON/OFF button

NOTICE:

Keep the ON/OFF at ON position

So you could press and hold PLAY
button to boot on / shut the recorder

We highly suggest you use the PLAY
button to boot on / shut down the
recorder

Computer

USB Adapter

Successfully connected to computer, and it

is charging, ready to transfer data

Summary of Contents for R63

Page 1: ...ECORDER Enjoy Recording No cumbersome recorder Simple Tutorials Happy recording Still have unexpected issues with the voice recorder No worry Phone support at your available time Happy Recording with...

Page 2: ...ow to record 5 4 How to pause resume a recording 5 5 How to playback recording 6 Press PLAY to pause or resume playing 7 6 How to delete a recording 7 7 How to download recordings to computer 7 8 Tran...

Page 3: ...kage details of the voice recorder R63 Micro USB cable for transfer data to computer or charging with the cable Voice Recorder of R63 in the metal box Metal box be wrapped with film Register VIP Card...
Page 4: ...charging the voice recorder 2 Charging the voice recorder Use the Micro USB cable connect your voice recorder to Computer USB socket to charging it and transfer data When full charged the battery ico...

Page 5: ...ess and hold PLAY button to switch on off the device keep the power button at ON position always 3 Only to push the ON OFF power button to OFF position for long time storage Switch on the voice record...

Page 6: ...ording If you want to pause the recording press PLAY it will pause recording Press PLAY again it will resume to record 5 How to playback recording 1 Press and Hold PLAY button the recorder will boot o...

Page 7: ...Press PLAY button enter it select Recordings Library by the UP DOWN button Press PLAY button enter it It will show all Recordings Select desired recording and press and hold A B button to delete the...

Page 8: ...1 because of the recorder support to record while charging so do not press any buttons when connect to computer or it will exit connection mode 2 Switch off your voice recorder by press PLAY before c...

Page 9: ...ng to play Do not create too many folders or copy files to the recorder that cannot support When too many folders on the R63 recorder drive it will cause error to the recorder If this happened please...

Page 10: ...t the speed rate 8 the slowest speed 8 the fastest speed 5 After select the playback speed rate press PLAY to confirm setting or it will keep the change 11 The Buttons Function Explain REC recording s...

Page 11: ...ased on your requirement Select the format in need and then press PLAY button confirm it NOTE 1 Recordings at MP3 format it could directly playback on MAC computer 2 Recordings at WAV format for MAC u...

Page 12: ...t at 32kpbs the 16GB storage could hold around 1173 hours recordings file 14 Format the recorder Switch on your voice recorder it will show recordings Press UP DWON button to select Set press PLAY ent...

Page 13: ...for the recorder Switch on your voice recorder it will show recordings if at other menu press MODE button return to First Level Menu Press UP DWON button to select Set press PLAY enter setting menu F...

Page 14: ...to next set Minute 4 After set correct hour press VOL button move to next set PM AM Set Date The similar procedure like setting time Select Set date press PLAY enter it It could set Set date format an...

Reviews: