background image

1

1.

1.

1.

1. IMPORTANT

IMPORTANT

IMPORTANT

IMPORTANT SAFETY

SAFETY

SAFETY

SAFETY INSTRUCTIONS

INSTRUCTIONS

INSTRUCTIONS

INSTRUCTIONS

WARNING:

WARNING:

WARNING:

WARNING: To

To

To

To reduce

reduce

reduce

reduce the

the

the

the risk

risk

risk

risk of

of

of

of serious

serious

serious

serious injury,

injury,

injury,

injury, read

read

read

read all

all

all

all important

important

important

important precautions

precautions

precautions

precautions and

and

and

and instructions

instructions

instructions

instructions in

in

in

in this

this

this

this manual

manual

manual

manual and

and

and

and

all

all

all

all warnings

warnings

warnings

warnings on

on

on

on your

your

your

your treadmill

treadmill

treadmill

treadmill before

before

before

before using

using

using

using your

your

your

your treadmill.

treadmill.

treadmill.

treadmill. We

We

We

We assume

assume

assume

assume no

no

no

no responsibility

responsibility

responsibility

responsibility for

for

for

for personal

personal

personal

personal injury

injury

injury

injury or

or

or

or

property

property

property

property damage

damage

damage

damage sustained

sustained

sustained

sustained by

by

by

by or

or

or

or through

through

through

through the

the

the

the use

use

use

use of

of

of

of this

this

this

this product.

product.

product.

product.

1

111....

Before beginning this or any exercise program, consult your physician. This is especially important for persons

over age 45 or persons with pre-existing health problems.

2.

2.

2.

2.

It is the responsibility of the owner to ensure that all users of this treadmill are adequately informed of all

warnings and precautions.

3.

3.

3.

3.

Use the treadmill only as described in this manual.

4.

4.

4.

4.

Place the treadmill on a level surface, with at least 8 ft. (2.4 m) of clearance behind it and 2 ft. (0.6 m) on each
side. Do not place the treadmill on a surface that blocks any air openings. To protect the floor or carpet from
damage, place a mat under the treadmill.

5.

5.

5.

5.

Keep the treadmill indoors, away from moisture and dust. Do not put the treadmill in a garage or covered patio,

or near water.

6.

6.

6.

6.

Do not operate the treadmill where aerosol products are used or where oxygen is being administered.

7.

7.

7.

7.

Keep children under age 12 and pets away from the treadmill at all times.

8

888....

Never allow more than one person on the treadmill at a time.

9

999....

Wear appropriate exercise clothes while using the treadmill. Do not wear loose clothes that could become
caught in the treadmill. Athletic support clothes are recommended for both men and women. Always wear
athletic shoes; never use the treadmill with bare feet, wearing only stockings, or in sandals.

1

1110000....

When connecting the power cord, plug the power cord into an earthed circuit. No other appliance should be on
the same circuit. A 10 amp fuse should be used.

1

1111111....

If an extension cord is needed, use only a 3- conductor, 14-gauge (1 mm2) cord that is no longer than 6.5 ft.
(2.0m)

1

1112222....

Keep the power cord away from heated surfaces.

1

1113333....

Never move the walking belt while the power is turned off. Do not operate the treadmill if the power cord or
plug is damaged, or if the treadmill is not working properly.

1

1114444....

Read, understand, and test the emergency stop procedure before using the treadmill.

1

1115555....

Never start the treadmill while you are standing on the walking belt. Always hold the handrails while using the
treadmill.

1

1116666....

The treadmill is capable of high speeds. Adjust the speed in small increments to avoid sudden jumps in speed.

1

1117777....

Never leave the treadmill unattended while it is running. Always remove the key, unplug the power cord, and
switch the reset/off circuit breaker to the off position when the treadmill is not in use.

1

1118888....

The pulse sensor is not a medical device. Various factors, including your movement, may affect the accuracy of
heart rate readings. The pulse sensor is intended only as an exercise aid in determining heart rate trends in
general.

19.

19.

19.

19.

Do not attempt to rise, lower, or move the treadmill until it is properly assembled. You must be able to safely lift
45 lbs. (20 kg) to raise, lower, or move the treadmill.

2

2220000....

When folding or moving the treadmill, make sure that the storage latch is holding the frame securely in the
storage position.

2

2221111....

Do not change the incline of the treadmill by placing objects under the treadmill.

2

2222222....

Inspect and properly tighten all parts of the treadmill regularly.

2

2223333....

Never drop or insert any object into any opening on the treadmill.

Summary of Contents for Homeform20

Page 1: ...e due due due to to to to model model model model upgrades upgrades upgrades upgrades H H H HOMEFORM OMEFORM OMEFORM OMEFORM20 20 20 20 USER USER USER USER S S S S MANUAL MANUAL MANUAL MANUAL This is...

Page 2: ...7 7 Keep children under age 12 and pets away from the treadmill at all times 8 8 8 8 Never allow more than one person on the treadmill at a time 9 9 9 9 Wear appropriate exercise clothes while using t...

Page 3: ...TANT IMPORTANT IMPORTANT IMPORTANT ELECTRICAL ELECTRICAL ELECTRICAL ELECTRICAL INFORMATION INFORMATION INFORMATION INFORMATION WARNING WARNING WARNING WARNING 1 1 1 1 NEVER use a ground fault circuit...

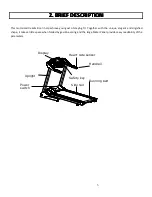
Page 4: ...can help achieve your goal of staying fit Together with the unique elegant and dignified shape it takes a little space when folded by gasoline spring and the large Meter Panel provides easy readabilit...

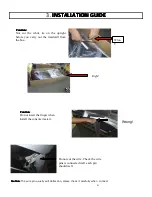
Page 5: ...ght before you carry out the treadmill from the box Right Wron g Caution Caution Caution Caution Do not insert the finger when install the console meter Wrong Do not cut the wire Check the wire pins i...

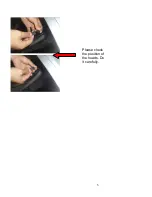
Page 6: ...5 Please check the position of the heads Do it carefully...

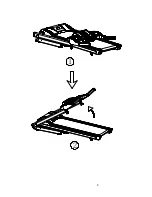
Page 7: ...6 1 2...

Page 8: ...hex bolt M10 60 2pcs flat washer D10 2pcs cross screw M5 10 4pcs hex bolt M10 120 2pcs saddle washer D10 2pcs pan hex screw M8 16 2pcs flat washer D8 2pcs left upright cover right cover console cable...

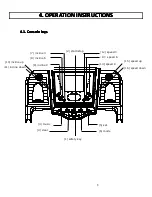
Page 9: ...INSTRUCTIONS INSTRUCTIONS 4 4 4 4 1 1 1 1 C C C Console onsole onsole onsole keys keys keys keys 9 incline 9 8 incline 6 2 start stop 13 speed 6 12 speed 3 7 incline 3 3 music 4 clear 14 speed 9 5 set...

Page 10: ...CLINE INCLINE INCLINE INCLINE DOWN DOWN DOWN DOWN When running press it incline will be decreased by 1 12 12 12 12 SPEED SPEED SPEED SPEED 3 3 3 3 When running press it speed turns to 3km h 13 13 13 1...

Page 11: ...ng SPEED SPEED The machine stops when calorie shows 0 4 4 4 4 3 3 3 3 Getting Getting Getting Getting Started Started Started Started Power the treadmill on by plugging it into an appropriate wall out...

Page 12: ...s the cumulative calories burned at any given time during your workout Note This is only a rough guide used for comparison of different exercise sessions which cannot be used for medical purposes 4 10...

Page 13: ...m h P1 speed km h P1 speed km h 5 5 6 6 6 6 7 7 8 8 P2 speed km h P2 speed km h P2 speed km h P2 speed km h 5 5 8 8 7 7 6 6 5 5 P3 speed km h P3 speed km h P3 speed km h P3 speed km h 5 6 8 6 8 10 7 1...

Page 14: ...h incline levels 6 8 12 12 12 12 10 8 8 8 3 3 3 3 6 8 11 10 10 8 P27 speed km h incline levels P27 speed km h incline levels P27 speed km h incline levels P27 speed km h incline levels 6 6 8 8 8 10 1...

Page 15: ...6 8 10 13 13 8 P35 speed km h incline levels P35 speed km h incline levels P35 speed km h incline levels P35 speed km h incline levels 6 6 5 8 8 6 10 10 7 5 6 6 12 9 9 10 10 10 10 8 P36 speed km h in...

Page 16: ...ORE BEFORE BEFORE FOLDING FOLDING FOLDING FOLDING 6 6 6 6 1 1 1 1 General General General General Cleaning Cleaning Cleaning Cleaning Use a soft damp cloth to wipe the edge of the belt and the area be...

Page 17: ...ocal sports sports sports sports Retailer Retailer Retailer Retailer or or or or a a a a local local local local hardware hardware hardware hardware store store store store 6 5 6 5 6 5 6 5 Belt Belt B...

Page 18: ...ifts to right tighten the right bolt and loosen the left bolt by using 6mm Hexagonal Wrench until the belt is centered itself If belt shifts to left tighten the left bolt and loosen the right bolt by...

Page 19: ...he the the plug plug plug plug is is is is removed removed removed removed from from from from the the the the power power power power point point point point Do Do Do Do not not not not use use use u...

Page 20: ...matically When starting the treadmill after seconds show E1 main problem is speed sensor please check speed sensor magnet on roller and connect wire Speed sensor is a receiver for speed from roller an...

Page 21: ...s s s movement movement movement movement may may may may affect affect affect affect the the the the accuracy accuracy accuracy accuracy of of of of heart heart heart heart rate rate rate rate readi...

Page 22: ...0 1 6mm 1 12 Console lower plastic cover 430 438 4 35 5mm 1 13 Cross head screw ST4 2 13mm 23 14 Console bracket 1 15 Cross head screw 3 10mm 4 16 INCLINE key 1 17 Handrail rubber 30 60mm 2 18 SPEED k...

Page 23: ...5 2 63 Cup head hex stage screw M10 28 2 64 Motor cover 1 65 Motor 1 66 Motor shock plate 1 1 67 Motor bracket 1 68 Screw M8 16 4 69 Hex screw M8 40 1 70 Screw M8 12 2 71 Motor shock plate 2 1 72 V b...

Page 24: ...100 Left endcap 1 101 Right endcap 1 102 Cross screw ST4 2 13 32 103 Rear roller 46 605mm 1 104 Motor lower cover 660 375 T2 3 1 105 Cross screw ST4 2 13 16 106 Safety key 1 107 Safety key board 1 108...

Page 25: ...24 10 10 10 10 EXPLODED EXPLODED EXPLODED EXPLODED DRAWING DRAWING DRAWING DRAWING...

Page 26: ...hing wrong in printing please kindly consider it If the pictures are different from the product please take the product as the final and correct one Please note If there are changes in function and sp...

Page 27: ...cations modifications modifications modifications du du du du mod mod mod mod le le le le H H H HOMEFORM OMEFORM OMEFORM OMEFORM20 20 20 20 MODE MODE MODE MODE D D D D EMPLOI EMPLOI EMPLOI EMPLOI Ce p...

Page 28: ...tes pas fonctionner le tapis de course dans une pi ce o des produits a rosols sont utilis s et o de l oxyg ne est administr 7 7 7 7 Gardez les enfants de moins de 12 ans et les animaux domestiques loi...

Page 29: ...ou d autres composants lectriques 1 1 1 1 1 1 1 1 INFORMATIONS INFORMATIONS INFORMATIONS INFORMATIONS IMPORTANTES IMPORTANTES IMPORTANTES IMPORTANTES SUR SUR SUR SUR L L L L ALIMENTATION ALIMENTATION...

Page 30: ...atteindre vos objectifs de remise en forme Sa forme unique et l gante et son syst me de pliage lui permettent de prendre peu d espace Quant sa console son large cran fournit une excellente lisibilit...

Page 31: ...Attention Ne coupez pas l adh sif blanc avant d avoir sorti le tapis de son emballage right wrong Attention Attention Attention Attention Ne coincez pas vos doigts dans les tubes quand vous connectez...

Page 32: ...on Attention Attention Attention NE forcez pas en branchant les c bles ils doivent s embo ter parfaitement sans forcer V rifiez la position des c bles avant de brancher Ne forcez pas ils s embo tent f...

Page 33: ...32 1 2...

Page 34: ...3 hex bolt M10 60 2pcs flat washer D10 2pcs cross screw M5 10 4pcs hex bolt M10 120 2pcs saddle washer D10 2pcs pan hex screw M8 16 2pcs flat washer D8 2pcs left upright cover right cover console cabl...

Page 35: ...a machine est branch e appuyez sur ce bouton pour commencer courir Pendant l entrainement appuyez sur ce m me bouton pour arr ter et enregistrer la course Appuyer sur CLEAR pour effacer les donn es en...

Page 36: ...Pendant l entrainement appuyez sur ce bouton pour augmenter la vitesse de 0 5km h 1 1 1 16 6 6 6 SPEED SPEED SPEED SPEED Pendant l entrainement appuyez sur ce bouton pour diminuer la vitesse de 0 5km...

Page 37: ...l interrupteur situ l avant de la machine Assurez vous que la cl de s curit est bien plac e sinon le tapis ne d marrera pas Votre tapis est maintenant pr t 4 4 4 4 4 4 4 4 Autocontr Autocontr Autocon...

Page 38: ...ffichage des des des des calories calories calories calories L cran affiche en continue le nombre cumul des calories br l es pendant l exercice NOTE Cet indicateur vous permet de comparer votre effort...

Page 39: ...speed km h P1 speed km h P1 speed km h 5 5 6 6 6 6 7 7 8 8 P2 speed km h P2 speed km h P2 speed km h P2 speed km h 5 5 8 8 7 7 6 6 5 5 P3 speed km h P3 speed km h P3 speed km h P3 speed km h 5 6 8 6 8...

Page 40: ...h incline levels 6 8 12 12 12 12 10 8 8 8 3 3 3 3 6 8 11 10 10 8 P27 speed km h incline levels P27 speed km h incline levels P27 speed km h incline levels P27 speed km h incline levels 6 6 8 8 8 10 1...

Page 41: ...6 8 10 13 13 8 P35 speed km h incline levels P35 speed km h incline levels P35 speed km h incline levels P35 speed km h incline levels 6 6 5 8 8 6 10 10 7 5 6 6 12 9 9 10 10 10 10 8 P36 speed km h in...

Page 42: ...ATTENTION ATTENTION ATTENTION ARRETEZ ARRETEZ ARRETEZ ARRETEZ ET ET ET ET DEBRANCHEZ DEBRANCHEZ DEBRANCHEZ DEBRANCHEZ LE LE LE LE TAPIS TAPIS TAPIS TAPIS AVANT AVANT AVANT AVANT DE DE DE DE LE LE LE...

Page 43: ...apis tapis tapis tapis disponible disponible disponible disponible dans dans dans dans les les les les boutiques boutiques boutiques boutiques de de de de sport sport sport sport ou ou ou ou de de de...

Page 44: ...es d utilisation la ceinture devrait se recentrer toute seule Si pendant le fonctionnement la bande continue se d caler vous devrez alors faire des ajustements Les tapes suivre sont les suivantes R gl...

Page 45: ...ue lectrique lectrique lectrique CODE CODE CODE CODE ERREUR ERREUR ERREUR ERREUR PROBLEME PROBLEME PROBLEME PROBLEME SOLUTION SOLUTION SOLUTION SOLUTION E0 1 Absence de cl s curit 1 Remettre la cl de...

Page 46: ...sse baisse baisse automatiquement automatiquement automatiquement automatiquement En vitesse inf rieure l utilisateur va ressentir une baisse d intensit Tournez l g rement les parties bleues du couple...

Page 47: ...isation m m m m dicale dicale dicale dicale Ils Ils Ils Ils ne ne ne ne servent servent servent servent que que que que d d d d indicateur indicateur indicateur indicateur de de de de performance perf...

Page 48: ...console 308 2 160 1 6mm 1 12 Cache inf rieur plastique console 430 438 4 35 5mm 1 13 Vis cruciforme ST4 2 13mm 23 14 Crochet console 1 15 Vis cruciforme 3 10mm 4 16 Touche INCLINE 1 17 Poign e en gom...

Page 49: ...n 1 62 Vis hexagonale M10 30 5 2 63 Vis hexagonale M10 28 2 64 Cache moteur 1 65 Moteur 1 66 Plaque moteur 1 1 67 Crochet moteur 1 68 Vis M8 16 4 69 Vis hexagonale M8 40 1 70 Vis M8 12 2 71 Plaque mot...

Page 50: ...gauche 1 101 Cache droit 1 102 Vis cruciforme ST4 2 13 32 103 Rouleau avant 46 605mm 1 104 Cache moteur inf rieur 660 375 T2 3 1 105 Vis cruciforme ST4 2 13 16 106 Cl s curit 1 107 Tableau de cl de s...

Page 51: ...50 10 10 10 10 VUE VUE VUE VUE ECLATEE ECLATEE ECLATEE ECLATEE...

Page 52: ...t pu s y glisser Si les photos ne sont pas conformes ou que vous remarquez une erreur d impression merci de bien vouloir nous en faire part N B Les photos ne sont pas contractuelles Le mod le a pu avo...

Page 53: ...el el el modelo modelo modelo modelo la la la la m m m m s s s s actual actual actual actual H H H HOMEFORM OMEFORM OMEFORM OMEFORM20 20 20 20 MANUAL MANUAL MANUAL MANUAL DEL DEL DEL DEL USUARIO USUAR...

Page 54: ...jo de la m quina para correr 5 5 5 5 Guarde la m quina para correr en un lugar cerrado lejos del polvo y la humedad No guarde la m quina para correr en el garaje o en un patio cubierto o cerca de agua...

Page 55: ...con una tensi n que corresponde a las especificaciones voltio Hz inscritas en la etiqueta y unida a una toma a tierra 28 28 28 28 La temperatura de utilizaci n se sit a entre 5 y 40 grados cent grado...

Page 56: ...la m quina Si usted retira la llave de seguridad la cinta de correr se para autom ticamente Inserte la llave de seguridad permite restablecer la visualizaci n 6 6 6 6 Utilice los botones de control de...

Page 57: ...objetivos de puesta en forma Su concepci n nica y elegante as como su sistema de plegado le permiten ocupar poco espacio En lo que toca a la consola su larga pantalla permite una excelente legibilidad...

Page 58: ...Advertencia Advertencia Advertencia No corte el adhesivo blanco antes de sacar la cinta de su embalaje SI NO Advertencia Advertencia Advertencia Advertencia No ponga sus dedos en el tubo al conectar l...

Page 59: ...a Advertencia Advertencia Haga mucha atenci n al conectar los cables NO FUERCE deben encajarse perfectamente sin necesidad de forzarlos Verifique la posici n de los cables antes de conectarlos No fuer...

Page 60: ...59 1 2...

Page 61: ...0 hex bolt M10 60 2pcs flat washer D10 2pcs cross screw M5 10 4pcs hex bolt M10 120 2pcs saddle washer D10 2pcs pan hex screw M8 16 2pcs flat washer D8 2pcs left upright cover right cover console cabl...

Page 62: ...nte 2 2 2 2 START STOP START STOP START STOP START STOP Cuando la maquina esta enchufada pulse la tecla START STOP y la m quina se pondr en funcionamiento Durante la carrera pulse esta misma tecla par...

Page 63: ...rime SPEED 6 la velocidad se ajusta a 6 km h 1 1 1 14 4 4 4 SPEED SPEED SPEED SPEED 9 9 9 9 Durante la carrera si oprime SPEED 9 la velocidad se ajusta a 9 km h 15 15 15 15 SPEED SPEED SPEED SPEED Par...

Page 64: ...ntra 10 y 990CAL Pulse START STOP para empezar a la velocidad de la 1KM H Ajuste su velocidad con la tecla SPEED o La cinta se para cuando las calor as llegaron a 0 4 4 4 4 3 3 3 3 Puesta Puesta Puest...

Page 65: ...as las las las calor calor calor calor as as as as Indica el n mero de calor as quemadas acumuladas en cualquier momento durante su entrenamiento NOTA Este indicador le permite comparar su esfuerzo de...

Page 66: ...5 6 6 6 6 7 7 8 8 P2 speed km h P2 speed km h P2 speed km h P2 speed km h 5 5 8 8 7 7 6 6 5 5 P3 speed km h P3 speed km h P3 speed km h P3 speed km h 5 6 8 6 8 10 7 12 10 6 P4 speed km h P4 speed km...

Page 67: ...h incline levels 6 8 12 12 12 12 10 8 8 8 3 3 3 3 6 8 11 10 10 8 P27 speed km h incline levels P27 speed km h incline levels P27 speed km h incline levels P27 speed km h incline levels 6 6 8 8 8 10 1...

Page 68: ...6 8 10 13 13 8 P35 speed km h incline levels P35 speed km h incline levels P35 speed km h incline levels P35 speed km h incline levels 6 6 5 8 8 6 10 10 7 5 6 6 12 9 9 10 10 10 10 8 P36 speed km h in...

Page 69: ...LO PLEGARLO PLEGARLO PLEGARLO 6 6 6 6 1 1 1 1 Limpieza Limpieza Limpieza Limpieza general general general general Utilice un tejido dulce y ligeramente h medo para limpiar la banda de carrera y la par...

Page 70: ...izador lubrificante lubrificante lubrificante lubrificante para para para para su su su su cinta cinta cinta cinta disponible disponible disponible disponible en en en en las las las las tiendas tiend...

Page 71: ...lizaci n el cintur n deber a reajustarse solo Si durante el funcionamiento la banda contin a movi ndose usted debe entonces hacer ajustes Las etapas que hay que seguir son las siguientes Ajuste la cin...

Page 72: ...No No No utilice utilice utilice utilice ning ning ning ning n n n n alargador alargador alargador alargador CODE CODE CODE CODE ERREUR ERREUR ERREUR ERREUR PROBLEME PROBLEME PROBLEME PROBLEME SOLUTIO...

Page 73: ...tom autom autom ticamente ticamente ticamente ticamente La alfombra se pone en marcha Despu s de algunos segundos el mensaje E1 se exhibe El captador de velocidad debe ser verificado descongelo si es...

Page 74: ...os est est est est n n n n dise dise dise dise ados ados ados ados nicamente nicamente nicamente nicamente como como como como ayuda ayuda ayuda ayuda para para para para el el el el ejercicio ejercic...

Page 75: ...inferior en pl stico de la consola 308 2 160 1 6mm 1 12 Cubierta inferior en pl stico de la consola 430 438 4 35 5mm 1 13 Tornillo de estrella ST4 2 13mm 23 14 Enganche consola 1 15 Tornillo de estrel...

Page 76: ...gn tico 1 60 Tornillo hexagonal M10 65 1 61 Enganche de inclinacion 1 62 Tornillo hexagonal M10 30 5 2 63 Tornillo hexagonal M10 28 2 64 Cubierta motor 1 65 Motor 1 66 Placa motor 1 1 67 Enganche moto...

Page 77: ...2 100 Cubierta izquierda 1 101 Cubierta derecha 1 102 Tornillo de estrella ST4 2 13 32 103 Rodillo delantero 46 605mm 1 104 Cubierta motor inferior 660 375 T2 3 1 105 Tornillo de estrella ST4 2 13 16...

Page 78: ...77 10 10 10 10 DIBUJO DIBUJO DIBUJO DIBUJO DE DE DE DE LAS LAS LAS LAS PIEZAS PIEZAS PIEZAS PIEZAS...

Page 79: ...78...

Page 80: ...go algunos errores pudieron deslizarse por all Si nota alg n error gracias por contactarnos para que lo podamos rectificar N B Las fotos no son contractuales El modelo puede conocer algunas evolucione...

Reviews: