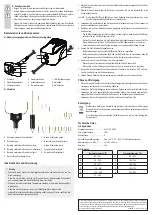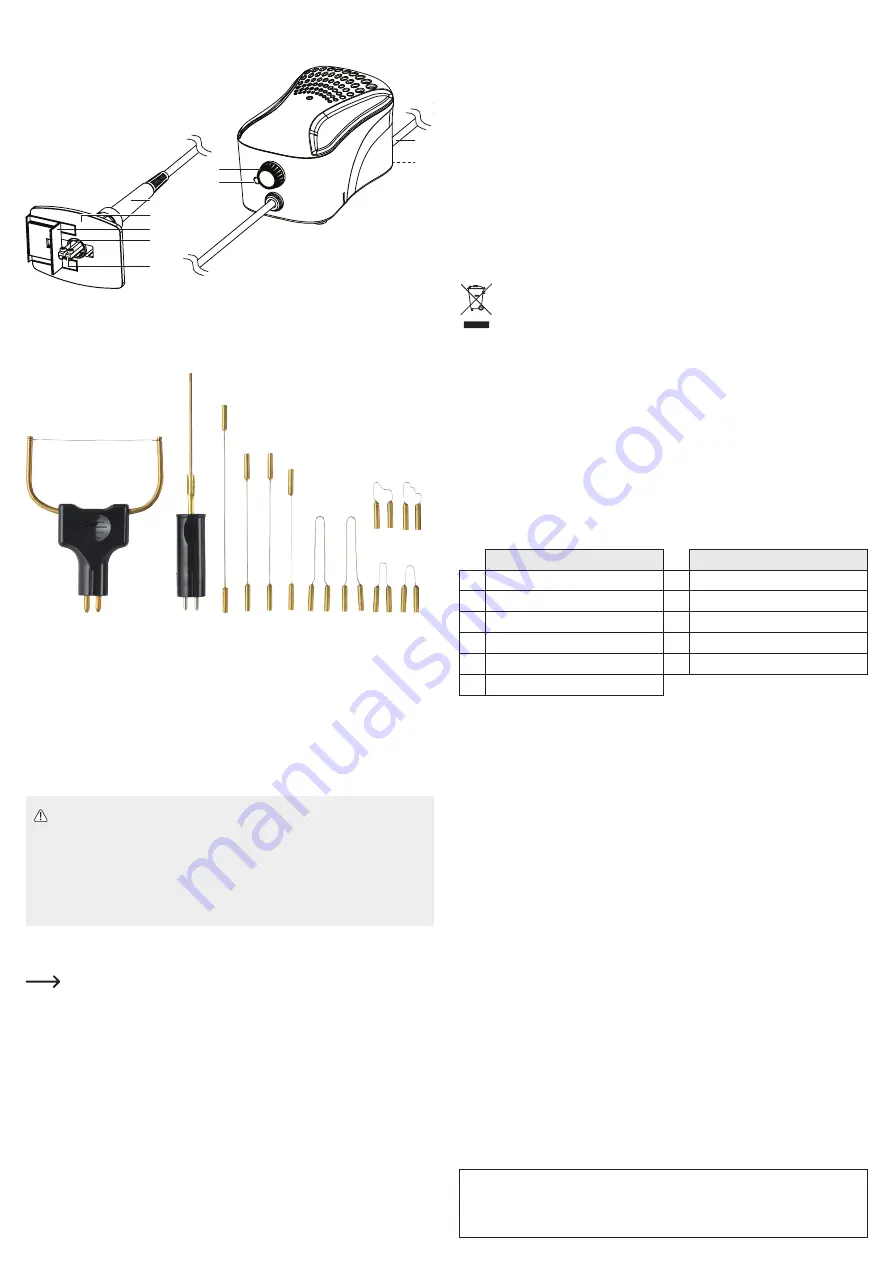
Operating elements
a) Variable temperature station
6
7
8
9
1
3
4
5
2
1 Handle
2 Platform
3 Guide
4 Terminal screws
5 Terminal sockets
6 Temperature control dial
7 Power indicator
8 Power cable
9 Power switch
b) Tips
A
B
C
D
E
F
G
H
J
K
I
A Large cutting wire
G Round tip (long)
B Cutting needle
H Squared tip (short)
C Tip for custom shapes (long)
I Round tip (short)
D Tip for custom shapes (medium)
J Pattern tip 1
E Tip for custom shapes (short)
K Pattern tip 2
F Squared tip (long)
Operation
Important
• Always switch the product off and disconnect from the power supply when not in use.
• Do not use excessive force while working, let the heated tip do the work.
• Use the lowest temperature that will perform the task.
• Practice cutting with sample foam.
• Allow tips to completely cool down before removing or replacing them.
1. Make sure the power switch is OFF and the product is not hot.
2. Select a tip and insert it into the terminal sockets.
Tips
(C)
,
(D)
and
(E)
can be bent into shapes to produce custom cut-outs.
3. Use the included screwdriver to tighten the screws on the terminals.
4. Connect the power cable to a suitable outlet and switch the power ON.
- The power indicator will light to show that the product is switched on and heating up.
- Wait 10 seconds for the wire tips to reach working temperature. The cutting needle
(B)
will take up to 20 seconds to reach working temperature.
- Adjust the temperature control dial as needed.
5. Adjust the platform:
- Extend the platform all the way out when using tips
(A)
and
(B)
.
- When using wire tips
(C)
to
(K)
, slide the platform so that the terminals cannot come into
contact with the foam.
6. Start cutting or etching.
- Slowly push the wire through the foam at a steady pace.
- Use the guide rail to help cut precise strips.
7.
Switch the power OFF and disconnect from the power supply when finished using.
8. Let it coold down to room temperature before storing away.
Care and cleaning
• Disconnect the product from the mains and allow to completely cool down before each
cleaning.
•
Do not use abrasive pads or files to clean the tips.
• Do not use any aggressive cleaning agents, rubbing alcohol or other chemical solutions as
they can cause damage to the housing and malfunctioning.
•
Clean the product with a dry, fibre-free cloth.
Disposal
Electronic devices are recyclable waste and must not be disposed of in the house-
hold waste. At the end of its service life, dispose of the product in accordance with
applicable regulatory guidelines.
You thus fulfill your statutory obligations and contribute to the protection of the envi
-
ronment.
Technical data
a) General
Rated input ................................... 230 V/AC, 50 Hz
Power consumption ...................... 16 W
Protection class ............................ II
Operating/Storage conditions ....... 0 to 40 ºC, 20 – 90 % RH (non-condensing)
Dimensions (L x W x H) ................ 141 x 85 x 83 mm
Weight .......................................... 1 kg
b) Tips
Temperature range (ºC)
Temperature range (ºC)
A
85 - 341
G
88 - 433
B
54 - 228
H
196 - 744
C
78 - 371
I
186 - 780
D
114 - 563
J
162 - 733
E
105 - 496
K
202 - 825
F
87 - 423
This is a publication by Conrad Electronic SE, Klaus-Conrad-Str. 1, D-92240 Hirschau (www.conrad.com). All rights in-
cluding translation reserved. Reproduction by any method, e.g. photocopy, microfilming, or the capture in electronic data
processing systems require the prior written approval by the editor. Reprinting, also in part, is prohibited. This publication
represents the technical status at the time of printing.
Copyright 2020 by Conrad Electronic SE. *2266844_v1_1020_02_dh_m_en


