background image


DTB10003 

V. 01 

 25/03/2020 

©Velleman nv 

10.


Technical Specifications 


battery .......................................................................................... Li-ion 2500 mAh 


voltage........................................................................................................... 12 V 


current .......................................................................................................... 1.6 A 


charger ................................................................................................ 12 V, 1.5 A 


working time.............................................................................................100 min. 


charging time............................................................................................150 min. 


tank material ..................................................................................... PE - PP - ABS 


lance material ................................................................................... stainless steel 


colour ........................................................................................................ orange 


tank dimensions ....................................................................... 345 x 180 x 490 mm 


tank volume ................................................................................................... 12 L 


hose length ................................................................................................ 120 cm 


weight ........................................................................................................ 3.5 kg 


optional spare battery ........................................................... DTB10003SP (not incl.) 


Use this device with original accessories only. Velleman nv cannot be held 
responsible in the event of damage or injury resulting from (incorrect) use of 
this device. For more info concerning this product and the latest version of this 
manual, please visit our website www.velleman.eu. The information in this 
manual is subject to change without prior notice.


© COPYRIGHT NOTICE


The copyright to this manual is owned by Velleman nv. All worldwide rights 
reserved. 

No part of this manual may be copied, reproduced, translated or reduced to 

any electronic medium or otherwise without the prior written consent of the copyright 
holder. 


Summary of Contents for DTB10003

Page 1: ...DTB10003 USER MANUAL 3 HANDLEIDING 10 MODE D EMPLOI 17 MANUAL DEL USUARIO 24 BEDIENUNGSANLEITUNG 31 INSTRUKCJA OBSŁUGI 38 MANUAL DO UTILIZADOR 45 ...

Page 2: ...DTB10003 V 01 25 03 2020 2 Velleman nv ...

Page 3: ...ing agents Date of manufacture This device can be used by children aged from 8 years and above and persons with reduced physical sensory or mental capabilities or lack of experience and knowledge if they have been given supervision or instruction concerning the use of the device in a safe way and understand the hazards involved Children shall not play with the device Cleaning and user maintenance ...

Page 4: ...tion The correct power tool will do the job better and safer at the rate for which it was designed Do not use the power tool if the switch does not turn it on and off Any power tool that cannot be controlled with the switch is dangerous and must be repaired Disconnect the plug from the power source and or remove the battery pack if detachable from the power tool before making any adjustments chang...

Page 5: ...n nv nor its dealers can be held responsible for any damage extraordinary incidental or indirect of any nature financial physical arising from the possession use or failure of this product Keep this manual for future reference 4 Overview Refer to the illustrations on page 2 of this manual 1 cap 20 shock pad 2 cap O ring 21 hose 3 valve 22 lance 4 filter 23 gasket 5 connector 24 back cap 6 O ring f...

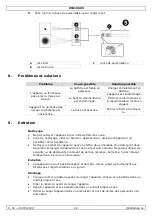
Page 6: ...urn red to indicate the battery is charging 3 When the LED burns green the battery is fully charged Disconnect the charger from the mains to avoid overcharging Install the battery in the battery compartment a battery is charging b battery fully charged 6 Assembly 1 Open the battery compartment install the fully charged battery and close the compartment 2 Screw the lance onto the trigger ...

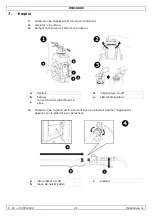
Page 7: ... 2 Open the cap 3 Pour the liquid into the tank and close the cap a hose d on off switch b squab e power indicator c battery compartment cover 4 Make sure the lance is firmly screwed onto the trigger Switch on the pressure sprayer and press the trigger to release the spray a on off switch c trigger b lance ...

Page 8: ...agent from the tank depressurize switch off the appliance and remove the battery Wipe all exterior surfaces of the appliance clean with a soft cloth dampened with a soap and water solution Do not immerse or submerge any part of the appliance in water or any other liquid Never use solvents or cleaning agents containing petroleum petrol kerosene oil paint thinner turpentine alcohol or ammonia Mainte...

Page 9: ... original accessories only Velleman nv cannot be held responsible in the event of damage or injury resulting from incorrect use of this device For more info concerning this product and the latest version of this manual please visit our website www velleman eu The information in this manual is subject to change without prior notice COPYRIGHT NOTICE The copyright to this manual is owned by Velleman ...

Page 10: ...rek aan ervaring en kennis op voorwaarde dat dit onder toezicht gebeurt van een persoon die verantwoordelijk is voor hun veiligheid of hun aanwijzingen heeft gegeven hoe zij het toestel moeten gebruiken en zich bewust zijn van de risico s die het gebruik van het toestel met zich meebrengt Kinderen mogen niet met het toestel spelen De reiniging en het onderhoud van het toestel mogen niet worden uit...

Page 11: ...dschap Oefen geen overmatige kracht uit op elektrisch gereedschap Gebruik het juiste gereedschap voor uw specifieke toepassing Met het juiste gereedschap voert u de taak beter en veiliger uit wanneer dit op de snelheid gebeurt waarvoor het apparaat is ontworpen Gebruik nooit elektrisch gereedschap waarvan de aan uit schakelaar niet werkt Ieder elektrisch gereedschap dat niet kan worden in en uitge...

Page 12: ...erantwoordelijkheid afwijzen voor defecten of problemen die hier rechtstreeks verband mee houden Noch Velleman nv noch zijn verdelers kunnen aansprakelijk gesteld worden voor schade buitengewoon incidenteel of onrechtstreeks van welke aard dan ook financieel fysisch voortvloeiend uit het bezit gebruik of falen van dit product Bewaar deze handleiding voor verdere raadpleging 4 Omschrijving Raadplee...

Page 13: ...eeft aan dat de batterij aan het opladen is 3 De groene led geeft aan dat de batterij volledig opgeladen is Trek de stekker uit het stopcontact om overladen te voorkomen Plaats de batterij in het batterijvak a batterij is aan het opladen b batterij volledig opgeladen 6 Montage 1 Open het batterijvak plaats de batterij en sluit het batterijvak 2 Bevestig de lans aan het sproeipistool ...

Page 14: ... Schroef de sproeidop los 3 Vul het reservoir en sluit de dop a slang d aan uit schakelaar b rugkussen e voedingsled c klep batterijvak 4 Zorg ervoor dat de lans stevig aan het pistool is vastgemaakt Schakel het toestel in en druk op het pistool om te sproeien a aan uit schakelaar c pistool b sproeilans ...

Page 15: ...of uit het reservoir laat de druk af schakel het toestel uit en indien mogelijk verwijder de batterij Reinig de behuizing met een zachte doek die licht bevochtigd is met een milde zeepoplossing Dompel het toestel nooit onder in water of andere vloeistoffen Gebruik nooit oplosmiddelen of reinigingsmiddelen die petroleum benzine kerosine olie verfverdunner wasbenzine alcohol of ammoniak bevatten Ond...

Page 16: ...ele accessoires Velleman nv is niet aansprakelijk voor schade of kwetsuren bij verkeerd gebruik van dit toestel Voor meer informatie over dit product en de laatste versie van deze handleiding zie www velleman eu De informatie in deze handleiding kan te allen tijde worden gewijzigd zonder voorafgaande kennisgeving AUTEURSRECHT Velleman nv heeft het auteursrecht voor deze handleiding Alle wereldwijd...

Page 17: ...s enfants âgés de 8 ans et plus et des personnes manquant d expérience et de connaissances ou dont les capacités physiques sensorielles ou mentales sont réduites si elles ont été formées et encadrées quant à l utilisation de l appareil d une manière sûre et connaissent les risques encourus Ne pas laisser les enfants jouer avec l appareil Le nettoyage et l entretien ne doivent pas être effectués pa...

Page 18: ...forcer l outil Utiliser l outil adapté à votre application Un appareil électrique correctement choisi assurera un meilleur travail et un travail sans danger au rythme auquel il a été conçu Ne pas utiliser l appareil si l interrupteur marche arrêt ne fonctionne pas Un appareil électrique qui ne peut pas être commandé par l interrupteur de contrôle est dangereux et doit être réparé Débrancher la pri...

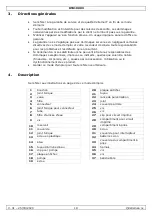
Page 19: ...ptionnels imprévus ou indirects quelles que soient la nature financière corporelle etc causés par la possession l utilisation ou le dysfonctionnement de ce produit Garder ce mode d emploi pour toute référence ultérieure 4 Description Se référer aux illustrations en page 2 de ce mode d emploi 1 bouchon 20 plaque antichoc 2 joint torique 21 tuyau 3 valve 22 lance de pulvérisation 4 filtre 23 joint 5...

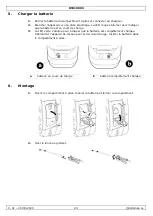
Page 20: ...ndiquer que la batterie est en cours de charge 3 La LED verte s allume pour indiquer que la batterie est complètement chargée Débrancher l appareil du réseau pour éviter la surcharge Insérer la batterie dans le compartiment à piles a batterie en cours de charge b batterie complètement chargée 6 Montage 1 Ouvrir le compartiment à piles Insérer la batterie et fermer le compartiment 2 Fixer la lance ...

Page 21: ... 3 Remplir le réservoir et fermer le bouchon a flexible d interrupteur on off b harnais e LED d alimentation c couvercle du compartiment à piles 4 S assurer que la lance est fermement fixée au pistolet Allumer l appareil et appuyer sur le pistolet pour pulvériser a interrupteur on off c pistolet b lance de pulvérisation ...

Page 22: ...mmes nues Avant le nettoyage vider le réservoir dépressuriser éteindre l appareil et si possible retirer la batterie Nettoyer le boîtier de l appareil avec un chiffon doux imprégné d un détergent doux Ne jamais immerger l appareil dans l eau ou tout autre liquide Ne jamais utiliser de solvants ou de détergents contenant du pétrole essence kérosène huile diluant térébenthine alcool ou ammoniaque En...

Page 23: ... conforme au droit applicable être tenue responsable des dommages ou lésions directs ou indirects pouvant résulter de l utilisation de cet appareil Pour plus d informations concernant cet article et la dernière version de ce mode d emploi consulter notre site www velleman eu Les spécifications et le continu de ce mode d emploi peuvent être modifiés sans notification préalable DROITS D AUTEUR Velle...

Page 24: ...idades físicas sensoriales o mentales reducidas ni para personas con una falta de experiencia y conocimientos del producto salvo si están bajo la vigilancia de una persona que pueda garantizar la seguridad Asegúrese de que los niños no jueguen con este dispositivo Nunca deje que los niños limpien o manipulen el aparato sin supervisión Seguridad en el área de trabajo Mantenga su puesto de trabajo l...

Page 25: ...rce la herramienta eléctrica Utilice la herramienta eléctrica adecuada para su aplicación Con la herramienta eléctrica adecuada podrá trabajar mejor y de forma más segura si se utiliza a la velocidad para la que fue diseñada No utilice la herramienta eléctrica si el interruptor de encendido apagado está defectuoso Cualquier herramienta eléctrica que no puede controlarse con el interruptor es pelig...

Page 26: ...e ningún daño u otros problemas resultantes Ni Velleman nv ni sus distribuidores serán responsables de los daños extraordinarios ocasionales o indirectos sea cual sea la índole financiera física etc causados por la posesión el uso o el fallo de este producto Guarde este manual del usuario para cuando necesite consultarlo 4 Descripción Véase las figuras en la página 2 de este manual del usuario 1 t...

Page 27: ...e está cargando 3 El LED verde se apagará para indicar que la batería está cargada completamente Desenchufe el aparato para evitar una sobrecarga Introduzca la batería en el compartimento de pilas a la batería se está cargando b batería completamente cargada 6 Montaje 1 Abra el compartimento de pilas introduzca la batería completamente cargada y cierre el compartimiento de pilas 2 Fije la lanza al...

Page 28: ...sito 3 Introduzca el líquido en el depósito y cierre la tapa a tubo d interruptor de encendido apagado b almohada amortiguador e LED de alimentación c tapa compartimento de pilas 4 Asegúrese de haber fijado la lanza firmemente Encienda el aparato y apriete el gatillo para empezar a interruptor de encendido apagado c gatillo b lanza ...

Page 29: ...mpiar el aparato saque cualquier líquido del depósito despresurice apague el aparato y quite la batería Limpie todas las superficies exteriores de la unidad con un paño suave con agua y jabón No sumerja ninguna parte de la unidad en agua o cualquier otro líquido No utilice disolventes o productos de limpieza que contienen petróleo gas queroseno aceite disolvente de pintura aguarrás alcohol o amoní...

Page 30: ...rios originales Velleman NV no será responsable de daños ni lesiones causados por un uso indebido de este aparato Para más información sobre este producto y la versión más reciente de este manual del usuario visite nuestra página www velleman eu Se pueden modificar las especificaciones y el contenido de este manual sin previo aviso DERECHOS DE AUTOR Velleman NV dispone de los derechos de autor par...

Page 31: ...ichtsschutz z B Schutzbrille Herstellungsdatum Dieses Gerät kann von Kindern ab 8 Jahren und darüber sowie von Personen mit verringerten physischen sensorischen oder mentalen Fähigkeiten oder Mangel an Erfahrung und Wissen benutzt werden wenn sie beaufsichtigt oder bezüglich des sicheren Gebrauchs des Gerätes unterwiesen wurden und die daraus resultierenden Gefahren verstehen Kinder sollten nicht ...

Page 32: ...ng des Elektrowerkzeugs Überlasten Sie das Elektrowerkzeug nicht Verwenden Sie für Ihre Arbeit das dafür bestimmte Elektrowerkzeug Mit dem passenden Elektrowerkzeug arbeiten Sie besser und sicherer im angegebenen Leistungsbereich Verwenden Sie das Elektrowerkzeug nicht wenn es sich mit dem Schalter nicht korrekt ein bzw ausschalten lässt Ein Gerät das sich nicht mehr ein oder ausschalten lässt ist...

Page 33: ...nspruch Für daraus resultierende Folgeschäden übernimmt der Hersteller keine Haftung Weder Velleman nv noch die Händler können für außergewöhnliche zufällige oder indirekte Schäden irgendwelcher Art finanziell physisch usw die durch Besitz Gebrauch oder Defekt verursacht werden haftbar gemacht werden Bewahren Sie diese Bedienungsanleitung für künftige Einsichtnahme auf 4 Beschreibung Siehe Abbildu...

Page 34: ...uzeigen dass der Akku geladen wird 3 Die LED leuchtet grün wenn der Akku vollständig geladen ist Trennen Sie das Ladegerät vom Netz um ein Überladen zu vermeiden Legen Sie den Akku in das Batteriefach ein a die Batterie wird geladen b Batterie völlig aufgeladen 6 Montage 1 Öffnen Sie das Batteriefach legen Sie den vollständig aufgeladenen Akku ein und schließen Sie das Batteriefach 2 Befestigen Si...

Page 35: ...Behälter 3 Gießen Sie die Flüssigkeit in den Behälter und schließen Sie den Deckel a Schlauch d EIN AUS Schalter b Stoßkissen e Stromversorgungs LED c Abdeckung Batteriefach 4 Stellen Sie sicher dass Sie das Sprührohr fest befestigt haben Schalten Sie das Gerät ein und drücken Sie den Hebel zum Starten a EIN AUS Schalter C Hebel b Sprührohr ...

Page 36: ...Druck ab schalten Sie das Gerät aus und entfernen Sie den Akku Reinigen Sie die Außenseite des Gerätes mit einem leicht mit Wasser und Seife angefeuchteten sanften Tuch mit ein bisschen Seife und Wasser Tauchen Sie das Gerät niemals in Wasser oder eine andere Flüssigkeit ein Verwenden Sie niemals Lösungs oder Reinigungsmittel die Petroleum Benzin Kerosin Öl Verdünner Terpentin Alkohol oder Ammonia...

Page 37: ... nur mit originellen Zubehörteilen Velleman NV übernimmt keine Haftung für Schaden oder Verletzungen bei falscher Anwendung dieses Gerätes Mehr Informationen zu diesem Produkt und die neueste Version dieser Bedienungsanleitung finden Sie hier www velleman eu Alle Änderungen ohne vorherige Ankündigung vorbehalten URHEBERRECHT Velleman NV besitzt das Urheberrecht für diese Bedienungsanleitung Alle w...

Page 38: ...enia mogą korzystać dzieci powyżej 8 roku życia i osoby o ograniczonych zdolnościach fizycznych zmysłowych bądź umysłowych jak również osoby nieposiadające doświadczenia lub znajomości urządzenia jeśli znajdują się one pod nadzorem innych osób lub jeśli zostały pouczone na temat bezpiecznego sposobu użycia urządzenia oraz zdają sobie sprawę ze związanych z nim zagrożeń Dzieci nie mogą używać urząd...

Page 39: ...go elektronarzędzia do danego zastosowania Wybór właściwego elektronarzędzia które zostało przeznaczone do wykonywania danej pracy umożliwi skuteczniejszą i bezpieczniejszą realizację zadania Nie należy używać elektronarzędzia jeżeli przełącznik wł wył jest niesprawny Elektronarzędzie którego nie można kontrolować przełącznikiem jest niebezpieczne i wymaga naprawy Odłączyć wtyczkę od źródła zasila...

Page 40: ...odpowiedzialności za jakiekolwiek szkody nadzwyczajne przypadkowe lub pośrednie dowolnej natury finansowe fizyczne wynikające z posiadania użytkowania lub awarii niniejszego produktu Zachować niniejszą instrukcję na przyszłość 4 Przegląd Patrz ilustracje na stronie 2 niniejszej instrukcji 1 pokrywka pilot podkładka amortyzacyjna 2 O ring nakrętki 21 wąż 3 zawór 22 lanca 4 filtr 23 uszczelka 5 złąc...

Page 41: ...czerwona dioda LED wskazująca że trwa ładowanie 3 Gdy dioda LED świeci się na zielono akumulator jest w pełni naładowany Odłączyć akumulator od sieci aby uniknąć przeładowania Umieścić baterię w gnieździe baterii a trwa ładowanie b akumulator w pełni naładowany 6 Montaż 1 Otworzyć gniazdo baterii włożyć w pełni naładowaną baterię i zamknąć gniazdo 2 Przymocować lancę do spustu ...

Page 42: ...dkręcić pokrywkę 3 Napełnić zbiornik płynem i zamknąć a wąż d przełącznik wł wył b oparcie e wskaźnik zasilania c pokrywa gniazda baterii 4 Upewnić się że lanca jest dokładnie przymocowana do spustu Włączyć opryskiwacz ciśnieniowy i nacisnąć spurt aby uwolnić strumień rozpylonej cieczy a przełącznik wł wył c spust b lanca ...

Page 43: ...iśnienie wyłączyć urządzenie i wyjąć akumulator o ile jest to możliwe Przetrzeć powierzchnie zewnętrzne urządzenia miękką szmatką zwilżoną mydłem i roztworem wodnym Nie zanurzać urządzenia w wodzie ani innej cieczy Nigdy nie używać rozpuszczalników ani środków czyszczących na bazie ropy naftowej benzyna nafta olej rozcieńczalnika do farb terpentyny alkoholu lub amoniaku Konserwacja To urządzenie n...

Page 44: ... za uszkodzenia lub urazy wynikające z niewłaściwego korzystania z niniejszego urządzenia Aby uzyskać więcej informacji dotyczących produktu oraz najnowszą wersję niniejszej instrukcji należy odwiedzić naszą stronę internetową www velleman eu Informacje zawarte w niniejszej instrukcji obsługi mogą ulec zmianie bez wcześniejszego powiadomienia INFORMACJA O PRAWACH AUTORSKICH Właścicielem praw autor...

Page 45: ... igual ou superior a 8 anos e pessoas com capacidades físicas mentais e sensoriais reduzidas ou com falta de experiência e conhecimentos acerca do aparelho desde que sejam supervisionadas e informadas acerca da utilização do aparelho e possíveis acidentes As crianças não devem brincar com o aparelho A limpeza e manutenção não devem ser feitas por crianças sem a devida supervisão Segurança na Área ...

Page 46: ...em conta a finalidade A ferramenta elétrica correta fará um trabalho melhor e com mais segurança se dentro das condições para as quais foi projetada Não utilize a ferramenta se o interruptor de ligar desligar não estiver a funcionar Uma ferramenta que não pode ser controlada através do interruptor pode ser perigosa e tem de ser reparada Desligue a ficha da corrente elétrica e ou retire a bateria s...

Page 47: ...dem ser responsabilizados por quaisquer danos extraordinário incidental ou indireto de qualquer natureza decorrentes financeira física a partir da posse uso ou falha do produto Guarde este manual para posterior consulta 4 Descrição Veja as imagens na página 2 deste manual 1 protecção 20 proteção anti choque 2 tampa anel O 21 mangueira 3 válvula 22 lança 4 filtro 23 junta 5 conector 24 tampa trasei...

Page 48: ...está a carregar 3 Quando o LED passa a verde significa que a bateria está carregada Desligue o carregador da corrente elétrica para evitar sobrecarga Volte a colocar a bateria no respetivo compartimento a a bateria está a carregar b bateria totalmente carregada 6 Montagem 1 Abra o compartimento da bateria coloque a bateria totalmente carregada e feche o compartimento 2 Aparafuse a lança no gatilho...

Page 49: ... Verta o líquido para o tanque e feche a tampa a mangueira D interruptor on off b amortecedor E indicador de corrente c tampa do compartimento da bateria 4 Verifique se a lança está bem aparafusada no gatilho Ligue o pulverizador de pressão e prima o gatiho para libertar o líquido de pulverizaçâo a interruptor on off c gatilho b lança ...

Page 50: ...rize desligue o aparelho e se possível retire a bateria Limpe toda a superfície exterior do aparelho com um pano macio embebido numa solução de água e sabão Não mergulhe qualquer componente do aparelho em água ou em qualquer outro líquido Nunca use solventes ou produtos de limpeza que contenham petróleo gasolina querosene óleo diluente terebintina álcool ou amónia Manutenção Este aparelho não pode...

Page 51: ...nas com acessórios originais A Velleman NV não será responsável por quaisquer danos ou lesões causados pelo uso indevido do aparelho Para mais informação sobre este produto e para aceder à versão mais recente deste manual do utilizador visite a nossa página www velleman eu Podem alterar se as especificações e o conteúdo deste manual sem aviso prévio DIREITOS DE AUTOR A Velleman NV detém os direito...

Page 52: ...DTB10003 V 01 25 03 2020 52 Velleman nv ...

Page 53: ...DTB10003 V 01 25 03 2020 53 Velleman nv ...

Page 54: ...f vervangbaar lampen rubberen onderdelen aandrijfriemen onbeperkte lijst defecten ten gevolge van brand waterschade bliksem ongevallen natuurrampen enz defecten veroorzaakt door opzet nalatigheid of door een onoordeelkundige behandeling slecht onderhoud of abnormaal gebruik of gebruik van het toestel strijdig met de voorschriften van de fabrikant schade ten gevolge van een commercieel professionee...

Page 55: ... Sie bekommen ein Ersatzprodukt im Werte von 50 der Kaufsumme oder eine Rückzahlung im Werte von 50 im Falle eines Defektes im zweiten Jahr Von der Garantie ausgeschlossen sind alle direkten oder indirekten Schäden die nach Lieferung am Gerät und durch das Gerät verursacht werden z B Oxidation Stöße Fall Staub Schmutz Feuchtigkeit sowie auch der Inhalt z B Datenverlust Entschädigung für eventuelle...

Page 56: ...rtigo de substituição pagando o valor de 50 do preço de compra ou devolução de 50 do preço de compra para defeitos depois de 1 a 2 anos estão por consequência excluídos todos os danos directos ou indirectos depois da entrega do artigo p ex danos ligados a oxidação choques quedas poeiras areias impurezas e provocado pelo aparelho como o seu conteúdo p ex perca de dados e uma indemnização eventual p...

Reviews: