background image

Customer Helpline

 1300 889 028

14

Work Hints For Your Sander

If your power tool becomes too hot, run no load for 2-3 minutes to cool the motor. 
Always ensure the work-piece is firmly held or clamped to prevent movement.
Any movement of the material may affect the quality of the sanding finish.
Start your sander before sanding and turn off only after stopping sanding. For best results 
sand wood in the direction of the grit.
Do not start sanding without sandpaper fitted.
Do not allow the sandpaper to wear away, it will damage the base-plate. The guarantee 
does not cover base-plate wear and tear.
Use coarse grit paper to sand rough surfaces, medium grit for smooth surfaces and fine 
grit for the final surfaces. If necessary, first make a test on scrap material.
Use only good quality sandpaper.
The sanding efficiency is controlled by the sandpaper not the amount of force you apply 
to the tool. Excessive force will reduce the sanding efficiency and cause motor overload. 
Replacing the sanding paper regularly will maintain optimum sanding efficiency.

ATTENTION: 

1. At all times, let the sander do the work-do not force it or apply excessive pressure to 
the sander. Preferably, use a light circular motion. Pressing too hard will slow down the 
machine’s movement and affect the quality of the work. 
2. The most common error, however, is applying too much wax. If pad absorbs too much 
wax, it will not last as long, and polishing is more difficult and takes longer. If wax seems 
difficult to buff, you may have used too much wax. 
3. If pad continually comes off base plate, please try with a new pad. 

Maintenance

Remove the battery pack from the socket before carrying out any adjustment, 
servicing or maintenance.

Your power tool requires no additional lubrication or maintenance.  
There are no user serviceable parts in your power tool. Never use water or chemical 
cleaners to clean your power tool. Wipe clean with a dry cloth. Always store your power 
tool in a dry place. Keep the motor ventilation slots clean. Keep all working controls free 
of dust. Occasionally you may see sparks through the ventilation slots. This is normal 
and will not damage your power tool.                                  
If the supply cord is damaged, it must be replaced by the manufacturer, its service agent 
or similarly qualified persons in order to avoid a hazard.

For Battery tools

The ambient temperature range for the use and storage of tool and battery is 0

o

C-45

o

C.

The recommended ambient temperature range for the charging system during charging is 
0

o

C-40

o

C.

Summary of Contents for CPS18LD.9

Page 1: ...instructions contain important information that will help you get the best from your Cordless Palm Sander ensuring it remains safe to operate If you need help or have damaged or missing parts call the...

Page 2: ...Customer Helpline 1300 889 028 2 Contents Safety Information 03 InTheBox 08 Accessories 08 Operating Instructions 09 Working hints for your Sander 14 Maintenance 14 Technical Data 15...

Page 3: ...where facilities exist Check with your local authorities or retailer for recycling advice Li ion battery This product has been marked with a symbol relating to separate collection for all battery pac...

Page 4: ...r grounded c Do not expose power tools to rain or wet conditions Water entering a power tool will increase the risk of electric shock d Do not abuse the cord Never use the cord for carrying pulling or...

Page 5: ...afety measures reduce the risk of starting the power tool accidentally d Store idle power tools out of the reach of children and do not allow persons unfamiliar with the power tool or these instructio...

Page 6: ...instruction and use the correct charging procedure j Do not maintain battery pack on charge when not in use k After extended periods of storage it may be necessary to charge and discharge the battery...

Page 7: ...supply 6 The charging device must be protected from moisture 7 Do not use the charging device in the open 8 Do not short out the contacts of battery or charger 9 Respect the polarity when charging 10...

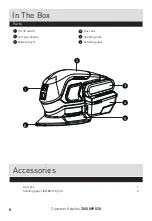
Page 8: ...omer Helpline 1300 889 028 8 In The Box Parts 1 2 3 4 5 6 On off switch Soft grip handle Battery pack Dust box Sanding plate Sanding paper Accessories Dust box 1 Sanding paper 60 80 120 grit 3 2 3 4 5...

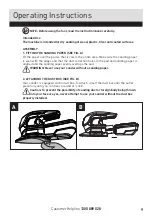
Page 9: ...s and that the dust collection holes in the pad and sanding paper is aligned and the sanding paper evenly overlaps the pad WARNING Never use your sander without a sanding paper 2 ATTACHING THE DUST BO...

Page 10: ...process is conducted when detail sanding attachment is changed to triangular base 5 SELECT THE RIGHT SAND PAPER Selecting the correct grit of sandpaper is an extremely important decision that will al...

Page 11: ...After recharge slide the battery pack into sander s battery port A simple push and slight pressure will be sufficient 3 HOW TO CHARGE YOUR BATTERY PACK See Fig F Charging procedure 1 Plug the charger...

Page 12: ...Customer Helpline 1300 889 028 12 Operating Instructions Light ON OFF flash Status Red on Charging Red flash Defective Battery Green on Fully Charged Green flash Hot Cold Delay F...

Page 13: ...ree sides of the base plate which allows easy access to corners and edges of moulding 3 ORBITAL SANDING Your sander operates in small circular rotations which allows efficient material removal Operate...

Page 14: ...o the sander Preferably use a light circular motion Pressing too hard will slow down the machine s movement and affect the quality of the work 2 The most common error however is applying too much wax...

Page 15: ...for warranty or any other reason please call POSITEC AUSTRALIA PTY LIMITED ABN 14 101 682 357 Unit 15 23 Narabang Way Belrose 2085 NSW Australia FREE CALL 1300 889 028 EMAIL salesau positecgroup com C...

Page 16: ......

Reviews: