background image


11 


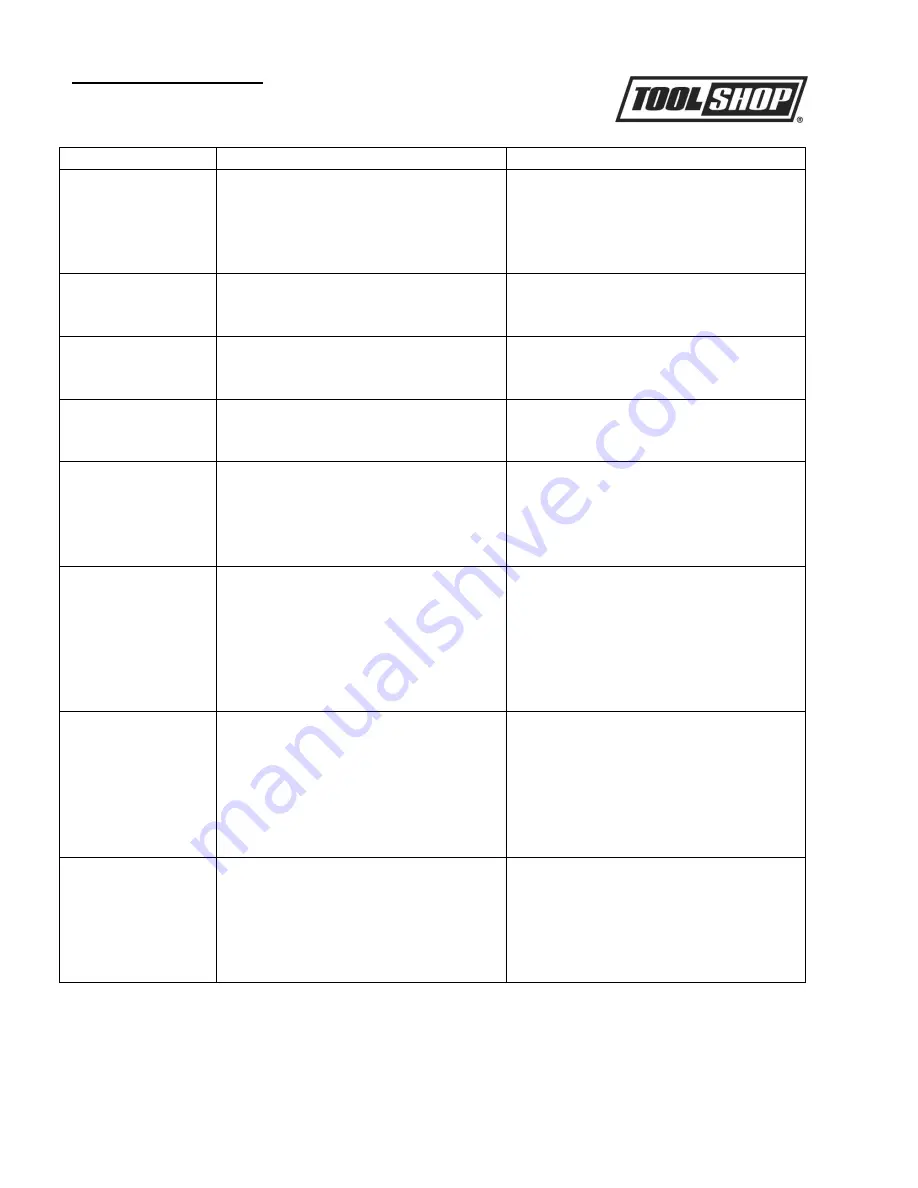
Troubleshooting 


Caution: 

Stop using the tool immediately if any of the following problems 

occur. Serious personal injury could occur.  
Problem 

Cause 

Solution 

Air leaking at 
Trigger area 

1. O-ring in trigger valve is damaged. 
2. Trigger valve head are damaged. 
 
3. Trigger valve stem, seal or O-ring 
are damaged. 

1. Check and replace O-ring. 
2. Check and replace trigger valve 
head. 
3. Check and replace trigger valve 
stem, seal or O-ring. 

Air leaking 
between body and 
drive guide (48) 

Damaged piston O-ring or bumper 

Check and replace O-ring or bumper. 

Air leaking 
between body and 
cylinder cap 

1. Screw loose. 
2. Damaged seal. 

1. Tighten screws.  
2. Check and replace seal. 

Blade driving 
fastener  too 
deeply 

1. Worn bumper. 
2. Air pressure is too higher. 

1. Replace bumper. 
2. Adjust the air pressure. 

Runs slowly or has 
power loss 

1. Insufficient oil. 
2. Insufficient air supply. 
3. Broken spring in cylinder cap. 
4. Exhaust port in cylinder cap is 
blocked. 

1. Lubricate as instructed. 
2. Check air supply. 
3. Replace spring. 
4. Replace damaged internal parts. 

Tool skip  a 
fasteners 
 

1. Worn bumper or damaged spring 
(51). 
2. Dirt in drive guide (48). 
3. Inadequate airflow to tool. 
4. Worn or dry O-ring on piston. 
5. Damaged O-ring on trigger valve. 
6. Cylinder cap seal leaking. 

1. Replace bumper or pusher spring. 
2. Clean drive channel of front plate. 
3. Check hose and compressor fittings. 
4. Replace O-ring or lubricate. 
5. Replace O-ring. 
6. Replace seal. 

Fasteners are jammed 

1. Joint guide is worn. 
2. Fasteners are wrong size or 
damaged. 
3. Magazine or front plate screws are 
loose. 
4. Blade in piston assembly is 
damaged. 

1. Replace joint guide. 
2. Use the recommended and 
undamaged fasteners. 
3. Tighten screws. 
4. Replace piston assembly. 

Tool will not drive 
down tight 

1. Worn blade in piston assembly.  
2. Lack of power. 
 
3. Slow cycling and loss of power. 

1. Replace piston assembly. 
2. Adjust to adequate air pressure. 
3. Check cylinder cap spring for 
broken coils or reduced length. Check 
if exhaust port of cylinder cap is 
restricted. 


Summary of Contents for 208-2136

Page 1: ......

Page 2: ...Exploded view 12 Parts list 13 Warranty 14 Technical Data 1 4 Crown Finish Stapler SKU 208 2136 Operating pressure range 60 psi 100 psi Air inlet 1 4 NPT Fastener range 3 8 1 Fastener gauge 18 Gauge...

Page 3: ...ad and understand this operator s manual and all labels affixed to the tool Safety is a combination of common sense staying alert and knowing how your tool works READ ALL INSTRUCTIONS Failure to follo...

Page 4: ...ovement of trigger and contact trip Uncontrolled discharge could result Inspect tool before use Do not operate a tool if any portion of the tool trigger or contact trip is inoperable disconnected alte...

Page 5: ...that nails are set into the material and not pushed completely through Keep hands and body parts clear of immediate work area Hold workpiece with clamps when necessary to keep hands and body out of po...

Page 6: ...tempt to shoot toward hard or brittle material such as concrete steel or tile 9 WHEN OPERATING TOOL keep the proper footing and balance to avoid damaged resulting from losing balance 10 CHECK DAMAGED...

Page 7: ...move the jammed fasteners out WARNING The warning caution and instructions explained in this instruction manual cannot cover all possible conditions and situations that may occur It must be understood...

Page 8: ...8 Know Your Stapler 1 Latch 2 Contact Tip 3 Magazine 4 Lock 5 Air Plug 6 Trigger...

Page 9: ...he tool so the air inlet is facing up Place 4 5 drops of 30W non detergent oil included into air inlet 3 After adding oil run toll briefly Wipe off any excess oil from the exhaust Recommended Hookup Y...

Page 10: ...lt If a nail becomes jammed in the nosepiece keep the tool pointed away from you and follow these instructions to clear 1 Disconnect air supply from tool 2 Press magazine lock to release movable magaz...

Page 11: ...ap 4 Exhaust port in cylinder cap is blocked 1 Lubricate as instructed 2 Check air supply 3 Replace spring 4 Replace damaged internal parts Tool skip a fasteners 1 Worn bumper or damaged spring 51 2 D...

Page 12: ...12 Exploded View...

Page 13: ...63825 046 Move Cover 15 63825 015 O Ring 28 3x3 47 63825 047 Hex Bolt 16 63825 016 Piston Assembly 48 63825 048 Drive Guide 17 63825 017 O Ring 27 3x2 49 63825 049 Magazine Unit B 18 63825 018 Cylinde...

Page 14: ...osts This warranty does give you specific legal rights and you may have other rights which vary from state to state Be careful tools are dangerous if improperly used or maintained Seller s employees a...

Reviews: