SETUP INSTRUCTIONS
INSTALL BATTERY
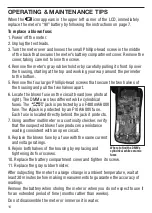
Turn the meter over to gain access to the battery compartment.
To open the compartment:
1) Use a small Phillips-head screwdriver to remove the single screw in the middle
of the one-piece battery compartment cover/flip-up stand.
2) Remove the cover/stand and set it aside.
3) Plug the "9V" battery included in the package into the wired socket inside
the compartment. The terminals of the battery and the socket mate in only
one way, with the smaller male terminal plugging into the larger female
terminal.
4) Secure the battery compartment by replacing the cover/stand and
reinstalling and tightening the Phillips-head screw.
7
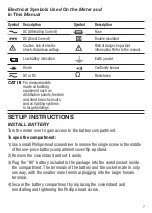
Electrical Symbols Used On the Meter and
In This Manual
Symbol
Description
Symbol
Description
AC (Alternating Current)
Fuse
DC (Direct Current)
Double-insulated
Caution, risk of electric
Risk of danger. Important
shock. Hazardous voltage.
information. Refer to the manual.
Low battery indication
Earth ground
Diode
Continuity beeper
AC or DC
Ω
Resistance
CAT III
For measurements
made on building
equipment such as
distribution panels, feeders
and short branch circuits,
and on lighting systems
in large buildings.


