OPERATING INSTRUCTIONS
GENERAL INSTRUCTIONS
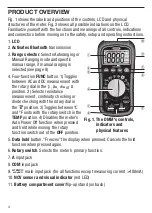
All parameters are measured through the included test leads. Unless you are
measuring currents larger than 400 mA, plug the red test lead into the
jack and the black test lead into the
C
OM
jack. To measure currents larger than
400 mA, plug the red lead into the
A
jack (Fig. 1, Callout 7) and the black lead
into the
COM
jack.
HOLDING READINGS
Pressing the
HOLD
button “freezes” any measurement on the LCD and causes
the symbol
to appear on the top line. Pressing the button again releases the
hold, removes the symbol and resumes real-time measurements.
CHOOSING A MEASUREMENT RANGE
By default, the DMM automatically enters Auto Ranging mode when powered
on. In this mode, it chooses the measurement range that maximizes the
resolution of its current, voltage and resistance measurements. The term
AUTO
on the top line of the LCD indicates operation in Auto Ranging mode.
To switch to Manual Ranging mode
for any parameter, briefly press the
RAN
button. This will make the
AUTO
term disappear and cause the meter to enter
the widest full-scale range available for that parameter (see the Specifications
section beginning on p. 14 for a list of the measurement ranges available for
voltage, current and resistance).
Once the meter is in manual ranging mode, each subsequent brief press of the
RAN
button typically narrows the full-scale range by an order of magnitude (a
factor of 10). For example, briefly pressing the
RAN
button with the meter
operating in the 0 to 40V full-scale manual range reduces the full-scale range
to 0 to 4V (and improves measurement resolution). The next press of the button
reduces the range to 0 to 400mV. When the narrowest full-scale range has
been reached, the next press of the
RAN
button switches the meter back to the
largest full-scale manual range for the selected parameter.
To exit Manual Ranging mode
and return to Auto Ranging mode, press and
hold the
RAN
button.
TEMP
mAµAV
Ω
8


