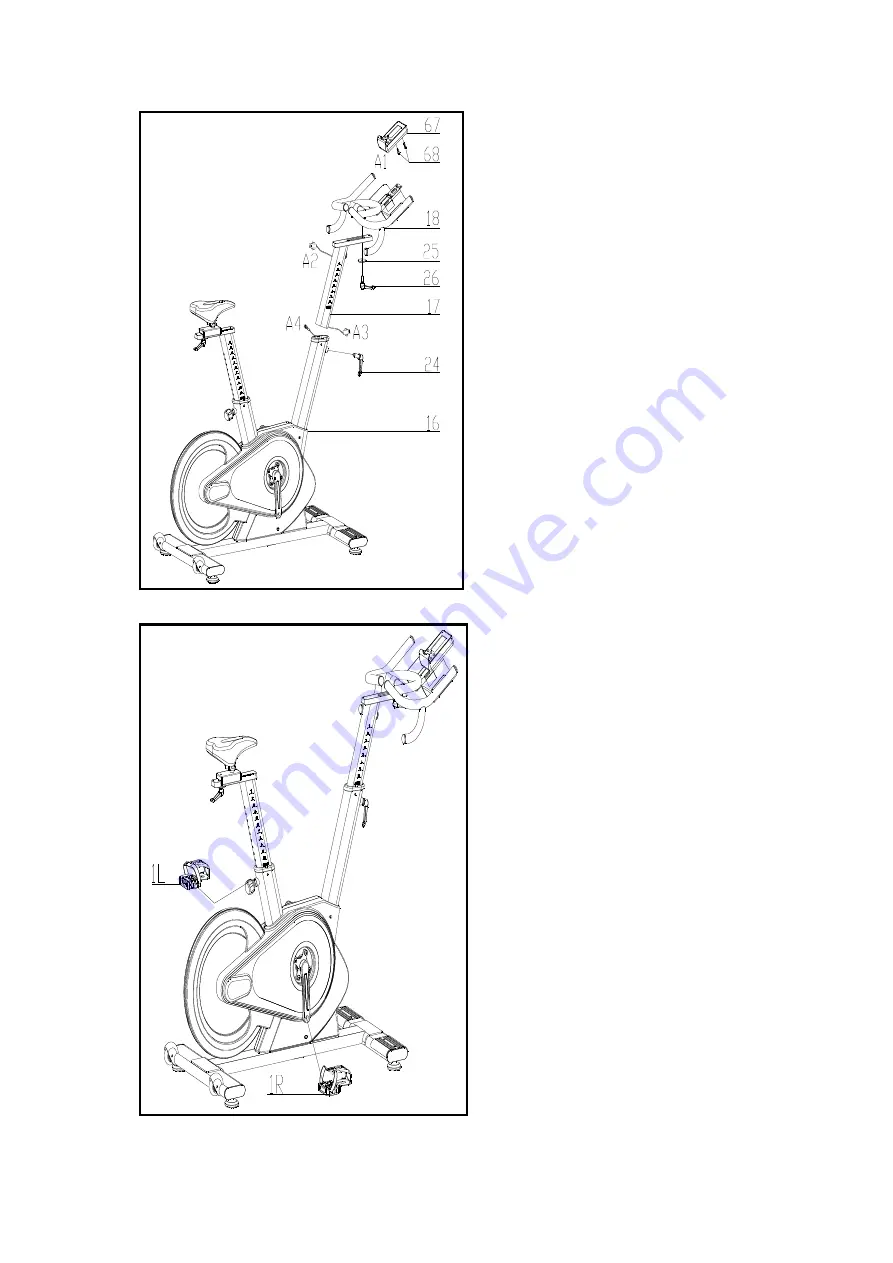
background image


8


FIG.3 

FIG.4 

FIG.3: 

The L type elastic pin (24) to relax and pull 

down,  then,  an  adjusting  tube  assembly 

(17)  inserted  into  the  main  frame 

assembly  (16)  of  the  pipe  between  the 

liner,  make  it  to  the  appropriate  location, 

open  L  type  elastic  pin  (24)  and  lock  it. 

Then  the  handrail  assembly  (18)  is 

inserted  into  the  adjusting  tube  assembly 

arm  (17),  the  use  of  3#  within  the  six 

corners of the inner six angle wrench flat 

round  head  bolts  (26)  of  the  locking  and 

locking the locking knob (19). 


ATTENTION:  YOU  SHOULD  FIX  THE 

HANDLEBAR TIGHTLY 

Fix    the Computer (pt.67) onto the 

Computer Holder (pt.18) with 

2p

cs 

Blot(68).

connect the plug 

(A1&A2&A3&A4), 


FIG.4: 

The  Pedals  (pt.1  L  &  pt.1  R)  are 

marked "L" and "R" - Left and Right. 

Connect  them  to  their  appropriate 

crank arms. The right crank arm is on 

the right- hand side of the cycle as you 

sit on it. 

Note  that  the  Right  pedal  should  be 

threaded  on  clockwise  and  the  Left 

pedal anticlockwise. 


Summary of Contents for SRX700

Page 1: ...Ed 01 18 Rev 00 INSTRUCTION iConsole App Manual www toorx it iconsole...

Page 2: ...4 EXPLODED VIEW PARTS LIST...

Page 3: ...5...

Page 4: ...6...

Page 5: ...e seat post housing on the main frame pt 16 Then slide the Seat Post pt 12 into the Vertical Seat Post pt 10 then Secure using a flat washer 25 and Shape knob 26 Secure the saddle in position with the...

Page 6: ...thin the six corners of the inner six angle wrench flat round head bolts 26 of the locking and locking the locking knob 19 ATTENTION YOU SHOULD FIX THE HANDLEBAR TIGHTLY Fix the Computer pt 67 onto th...

Page 7: ...9 A After power is energized the resistance is adjusted by the electronic watch...

Page 8: ...0 0 99 9 DISTANCE Workout distance displayed during exercise Range 0 0 99 9 CALORIES Burned calories during workout display Range 0 999 PULSE Pulse bpm displayed during exercise Pulse alarm when over...

Page 9: ...anual Mode Press UP or DOWN to select Manual workout mode press MODE to confirm Press UP or DOWN to set TIME DISTANCE CALORIES PULSE and press MODE to confirm Picture 3 6 Press START STOP key to start...

Page 10: ...lect Advance mode and press MODE to enter Press UP or DOWN to select Advance 1 4 Picture 8 and press MODE to confirm Press UP or DOWN to set TIME and press START STOP key to start workout Press UP or...

Page 11: ...ps correctly 8 Recovery Mode After exercising for a period of time keep holding on handgrips When there is PULSE detected press RECOVERY key Then all function display will stop except TIME that will s...

Page 12: ...operation one short beep ineffective operation two short beeps any function value count down to 0 during workout 2 short beeps every second In CARDIO mode when console is forced to stop continuous 6 s...

Page 13: ...GARLANDO SPA Via Regione Piemonte 32 Zona Industriale D1 15068 Pozzolo Formigaro AL Italy www toorx it info toorx it...

Reviews: