5
Assembly Instruction
Please make sure there’s enough space to install the treadmill and recommend 2 persons to
install it.
WARNING: Don’t insert the power wire until the treadmill was fully assembled.
Assembly tips:
1.In order to avoid instruction mistake, do not tighten bolt completely until the whole treadmill assembly
is finished.
2.This treadmill packaged for 2 cartons. #1 carton is main frame.#2 carton is Handlebar and controller.
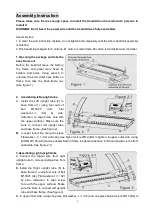
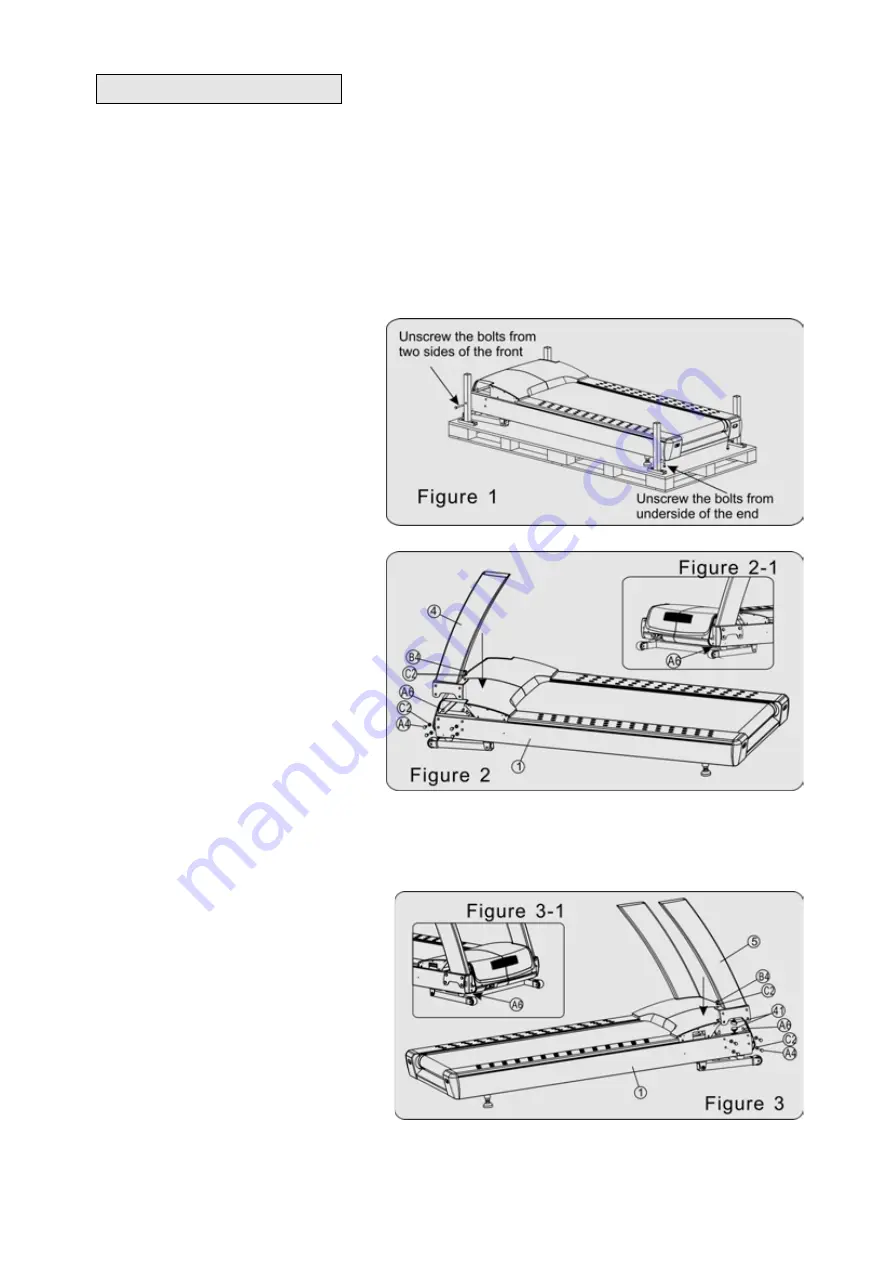
1. Opening the package and take the
base frame out
Before the treadmill leave the factory,
the frame and pallet were fixed by
holders and bolts. Using wrench to
unscrew the bolts (total 4pcs bolts) on
frame, then take the base frame out.
(See figure 1)
2. Assembling left upright tube
A. Install the Left upright tube (4) to
base frame (1) using four sets of
bolt
M10X25
(A4),
Flat
washers
φ10
(
C2)
by
side.
(Attention: to align screw hole with
the upper surface). Make sure the
bolts to connect left upright tube
and base frame. (See figure 2)
B.
In upper inner side, using one piece
Flat washer
φ10 (
C2) and one piece Nylon lock nut M10 (B4) to tighten. In upper outer side, using
Bolt M10X165 (A6) that was assembled on frame to tighten.(Attention: bolt head position is the front
underside. See figure 2-1)
3.Assembling right upright tube
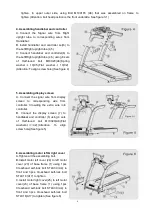
A. Connect the Signal wire from right
upright tube to corresponding wires from
frame.
B. Install the Right upright tube (5) to
base frame (1) using four sets of bolt
M10X25 (A4), Flat washers
φ10 (
C2)
by side. (Attention: to align screw
hole with the upper surface). Make
sure the bolts to connect left upright
tube and base frame. (See figure 3)
C.
In upper inner side, using one piece Flat washer
φ10 (
C2) and one piece Nylon lock nut M10 (B4) to


