background image

19 
 

P

P

A

A

R

R

T

T

S

S


L

L

I

I

S

S

T

T


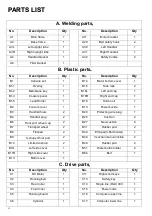
A. Welding parts


No.


Description


Qty


No.


Description


Qty


A1 

Main frame 

A11 

Motor bracket 

A2 

Base frame 

A29 

Belt safety hook 

A3L 

Left upright tube 

A30 

Left Handrail 

A3R 

Right upright tube 

A31 

Right Handrail 

A4 

Handrail bracket 

A32 

Safety buckle 

A6 

Filter bracket 


B. Plastic parts


No.


Description


Qty


No.


Description


Qty


B1 

Console set 

B14 

Motor bottom cover 

B1-1 

Overlay 

B15 

Side rails 

B1-2 

Membrane key 

B16L 

Left end cap 

B1-3 

Console panel 

B16R 

Right end cap 

B1-5 

I-pad Holder 

B18 

Silicon oil 

B2 

Console cover


B19 

Power buckle 

B3 

Handrail foam 

B20 

Protecting wire plug 

B4 

Handrail plug 

B25 

Cushion 

B6 

Transport wheel cap 

B27 

New cushion 

B7 

Transport wheel 

B31 

Rubber pad 

B8 

Flat pad 

B34 

EVA pad(I-Pad holder) 

B9 

U-shaped foot pad


B40 

3 section manual incline 

B10 

Limited cushion 

B46 

Rubber pad 

B11L 

Left side cover 

B51 

Water bottle holder 

B11R 

Right side cover 

B84 

Belt 

B13 

Motor cover 


C. Drive parts


No.


Description


Qty


No.


Description


Qty


C1 

DC Motor 

C11 

Right short keys 

C2 

Running belt 

C13 

Safety key 

C3 

Rear roller 

C14 

Single line (Red) 300 

C4 

Front roller 

C15 

Power code 

C5 

Running board 

C16 

Computer upper line 

C6 

Cylinder 

C17 

Computer lower line 

Summary of Contents for TRX WALKER PRO

Page 1: ...Ed 03 17 Rev 00 INSTRUCTION...

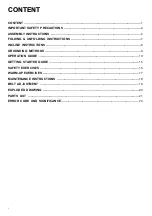
Page 2: ...TIONS 4 FOLDING UNFOLDING INSTRUCTIONS 7 INCLINE INSTRUCTIONS 8 GROUNDING METHODS 9 OPERATION GUIDE 10 GETTING STARTED GUIDE 15 SAFETY EXERCISES 16 WARM UP EXERCISES 17 MAINTENANCE INSTRUCTIONS 18 BEL...

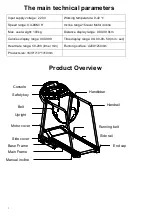
Page 3: ...100kg Distance display range 0 00 99 9km Calories display range 000 999 Time display range 00 00 99 59 min sec Heart rate range 50 200 time min Running surface 420X1250mm Product size 1630 710 1310mm...

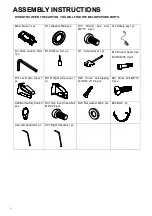
Page 4: ...13 Safety key 1pc D3 Allen wrench 5mm 1pc B18 Silicon oil 1 pc D1 Screw driver 1 pc D16 Round head hex bolt M8 45 4 pcs B11L Left side cover 1 pc B11R Right side cover 1 pc D48 Cross self tapping bolt...

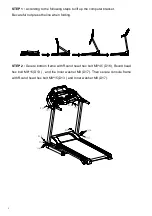
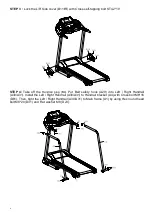
Page 5: ...cket Be careful not press the line when folding STEP 2 Secure bottom frame with Round head hex bolt M8 45 D16 Round head hex bolt M8 15 D13 and the Inner washer M8 D17 Then secure console frame with R...

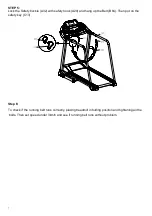
Page 6: ...ke off the Handrail plug B4 Put Belt safety hook A29 into Left Right Handrail A30 A31 Install the Left Right Handrail A30 A31 to Handrail bracket A4 with Cross bolt M6 16 D81 Then tight the Left Right...

Page 7: ...k A29 and hang up the Belt B84 Then put on the safety key C13 Step 6 To check if the running belt runs correctly placing treadmill in folding position and tightening all the bolts Then set speed under...

Page 8: ...ordance with all local codes and ordinances DANGER Improper connection of the equipment grounding conductor can result in a risk of electric shock Check with a qualified electrician or serviceman if y...

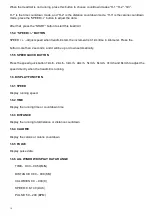
Page 9: ...noise And put the safety lock on the computer will display for 2 seconds and the date count down to 0 1 5 BUTTON FUNCTION 1 5 1 START STOP START When the treadmill is not running press this button to...

Page 10: ...han 2 seconds and it will be up or down automatically 1 5 5 SPEED QUICK BUTTON Press the speed quick button 1km h 2km h 3km h 4km h 5km h 6km h 7km h and 8km h to adjust the speed directly when the tr...

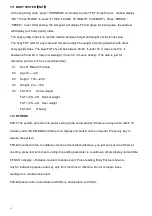
Page 11: ...6 8 8 6 2 P9 SPEED 2 4 5 5 6 5 6 3 3 2 P10 SPEED 2 5 7 5 8 6 5 2 4 3 P11 SPEED 2 5 6 7 8 9 10 5 3 2 P12 SPEED 2 3 5 6 8 6 9 6 5 3 1 9 Manual model operation 1 9 1 Press start key time count down 5 sec...

Page 12: ...and can not be as medicinal data 01 Sex 01 Male 02 Female 02 Age10 99 03 Height 100 200 04 Weight 20 150 05 FAT 19 Under weight FAT 20 25 Normal weight FAT 25 29 Over weight FAT 30 Obesity 1 13 OTHER...

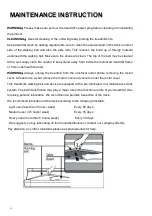
Page 13: ...from underneath the belt WARNING Always unplug the treadmill from the electrical outlet before removing the motor cover At least once a year remove the motor cover and vacuum under the motor cover Th...

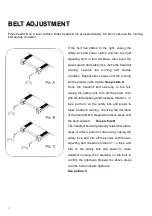
Page 14: ...nce the treadmill belt swerving to the left unplug the safety lock turn off the power then with the left adjusting bolt clockwise rotation 1 4 laps and turn on the safety lock and power to make treadm...

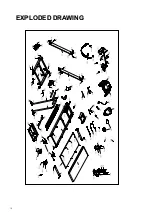
Page 15: ...18 E EX XP PL LO OD DE ED D D DR RA AW WI IN NG G B11R B4 B4...

Page 16: ...1 B18 Silicon oil 1 B2 Console cover 1 B19 Power buckle 1 B3 Handrail foam 2 B20 Protecting wire plug 1 B4 Handrail plug 2 B25 Cushion 2 B6 Transport wheel cap 2 B27 New cushion 6 B7 Transport wheel 2...

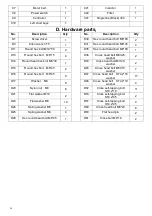
Page 17: ...M6X25 washer 2 D14 Round head hex bolt M8 30 1 D43 Cross head bolt M4 20 washer 2 D15 Round hex bolt M8 40 2 D45 Cross head bolt M5X15 washer 7 D16 Round hex bolt M8 45 9 D47 Cross head bolt ST4 2 16...

Page 18: ...GARLANDO SPA Via Regione Piemonte 32 Zona Industriale D1 15068 Pozzolo Formigaro AL Italy www toorx it info toorx it...

Reviews: