£
6
24
£
3 Use a mixture of Epoxy and balloons to
glue the fillet onto the wing saddle to
fill any voids.
£
4 Install FIL-C and FIL-D and trim these
to fit.
£
5
Test fig FIL-B. It should lay onto FIL-C
and FIL-D and be even with the outer
edges of FIL-A. Trim to fit and the glue
with Epoxy.
Place waxed paper over the wing where
it comes into contact with the wing sad-
dle. Mix up a medium dry mix of Ep-
oxy and Balloons. Apply a liberal bead
of the mixture to the fuselage wing sad-
dles and then install the wing. If there
are any voids, fill with the mixture. Pull
the wing bolts snug and let cure. After
curing, remove the wing and sand the
saddle to contour with the fuselage
This completes the assembly of the fu-
selage structure.
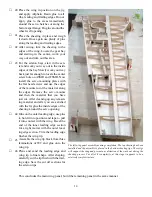
TOP, FIL-A has been glued to the wing saddle with a slurry of Epoxy and
balloons and FIL-C and FIL-D have been glued to FIL-A.
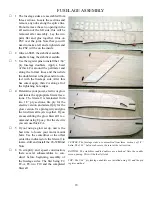
BELOW, FIL-B has been glued to FIL-A with a slurry of Epoxy and Ballons.
An Epoxy and balloons fillet will now be added to the entire wing saddle
area.
COWL ATTACHMENT
£
1 Place the cowl on the bench and using a Sharpie, draw a line 3/16” above the bench top all the way around
the cowl. Trim the edge of the cowl at this line. Temporarily place the cowl ring just inside the edge of the
cowl. Some sanding may be required but do not sand too much, you want a snug fit. Using a full sheet of
150-grit sandpaper laying flat on the bench. Sand the edge of the cowl perfectly straight. Use Epoxy to
attach the cowl ring to the cowl. The cowl ring should be exactly flush with the edge of the cowl.
£
2
Install four shoulder head wood screws into the holes provided in the firewall. Initially, run them in until
the shoulder is about 1/8” above the firewall. Place the cowl onto the firewall and then adjust the screws
for a snug fit to the firewall. You want the cowl to fit snugly to the firewall but also be easily removed.
£
3
Locate the ¼” magnets and using Epoxy, install one into each of the two holes provided in the firewall.
£
4
Place the two remaining magnets over the two in the firewall. Mark the side facing forward with a Sharpie
pen. Now glue the magnets into appropriate holes provided in the cowl ring.
£
5 Removing the cowl will require upward pressure to overcome the magnets and then slide it forward off
of the screws.


