12
c
4
c
2
Locate and prepare ribs W1 through W10.
c
3
Note that the labeling on the sheer webs is on
the root end. Carefully place ribs W2 through
W9 into the appropriate slot in the bottom
sheer web.
Slide the top sheer web onto the rib assembly
until the top and bottom sheer webs are flush
to each other top and bottom. Note that this
may require some patience. Remember fines
not force, when everything is lined up correct
ly they will fall together.
c
5
While holding the assembly in your hands,
press the two sheer webs together top and bot
tom and apply a dab of CA in the glue ports.
The glue ports are the elliptical holes in the
sheer webs for gluing. Proceed down the sheer
web until the full length of the sheer webs has
been tack glued together.
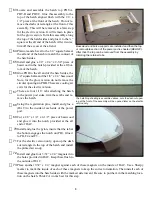
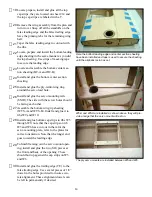
ABOVE: All internal ribs are installed onto the bottom sheer
web.
BELOW: The top sheer web has been installed and now all
ribs are captive in the sheer web.
c
6
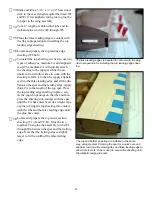
Place a 3/16” x ½” x 24” basswood spar n
position over the plans.
c
7
Place the leading edge tab of each rib into
the appropriate slot in the false leading edge
and down over the basswood spar. DO NOT
GLUT at this time.
c
8
Slide the false trailing edge into position and
slide each rib into the appropriate slot. DO
NOT GLUE at this time.
c
9
As you did on the false leading edge, line the
false training edge up with the alignment line
on the first stand off and secure it to the build
ing board with a pinning tab at every other
stand off.
c
10
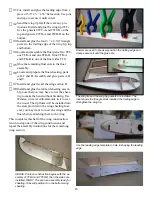
Install and glue W1 to the false leading edge,
the sheer web assembly and the false trailing
edge. Make sure W1 is in good contact with
the sheer webs as they will set the correct
dihedral angle for W1
c
11
Now move down the wing and glue each rib
to the false leading edge, the false trailing
edge and the sheer webs. Make sure each rib
is firmly in contact with the adjoining parts
before applying glue.
c
12
While holding the sheer web assembly into
firm contact with the bottom spar, apply glue
to the entire length.

