15
English
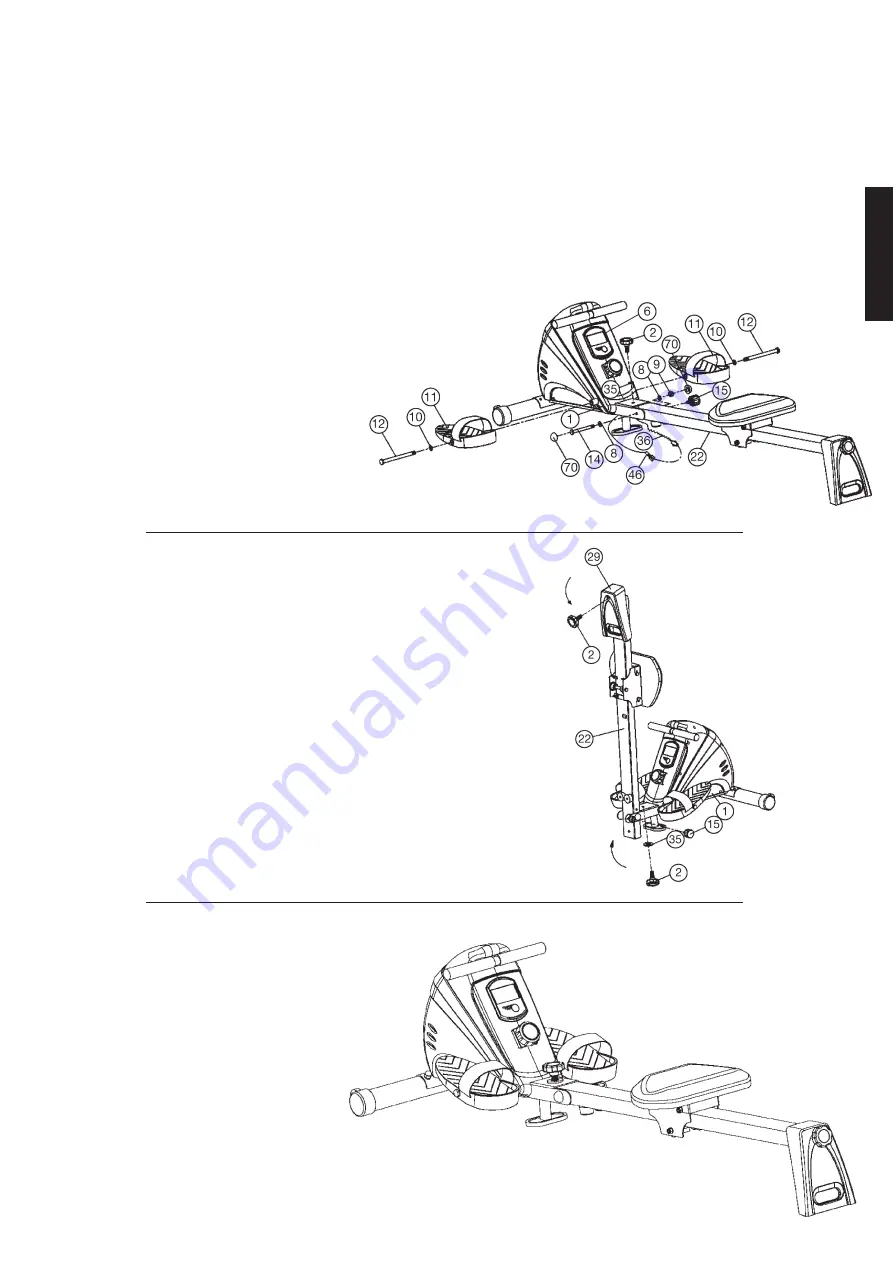
Step 5:
1. To storage the item, screw out the hand grip screw (2) totally
and turn/pull the quick release (15) to unlock the seat rail (22).
Fold up the seat rail (22) into vertically position and secure this
position with turn/pull the quick release (15) at bottom side of
main frame (1).
2. The rear foot (29) can fold up too, by removing the hand grip
screw (2).
Step 6:
Checks
1. Check the correct installation and function of all screwed
and plug connections. Installation is thereby complete.
2. When everything is in order, familiarise yourself with the
machine at a low resistance setting and make your indivi-
dual adjustments.
Note:
Please keep the tool set and the instructions in a safe
place as these may be required for repairs or spare
parts orders becoming necessary later.
Step 4:
Attach the seat rail (22) and pedals (11) at main frame (1).
1. Place the seat rail (22) against the main frame (1) and connect
the sensor cable (36) with connection cable (46).
2. Place the seat rail (22) into the holder of main frame (1), so that
the holes pattern and screw the seat rail (22) at main frame (1)
by using screw M10x100 (14), washer (8) and nut (9).
(Don’t tighten too much, the seat rail (22) should be fold up
easily.)
3. Secure the seat frame (22) during training by screw in the hand
grip screw (2) with washer (35).
4. Put a washer (10) and a pedal (11) on screw M12x155 (12) and
tighten the pedals (11) at main frame (1) into appropriate posi-
tion.
5. Take the computer (6) that has been preassembled at main co-
ver and insert the batteries (Type “AA”-1.5 V pencells) by wat-
ching for the right polarity on the back of the computer (6).
(Batteries for the computer are not included in this item. Please
buy them at your located market.) At the bottom of the compu-
ter is in the middle an arrest which the computer can be unlo-
cked and removed from the case.
Summary of Contents for Christopeit Sport 1560
Page 3: ...3 ...


