1
1
1
2
2
2
2
2
2
3
3
3
1
1
1
Instruction manual: Mino Comfort 100/240V
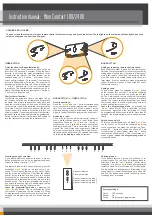
OPENING AND LOCKING:
To open or lock the columns, aim your remote control at the receiver eye and press the button. The led lights on the columns will then light up and the
columns will produce a short sound signal.
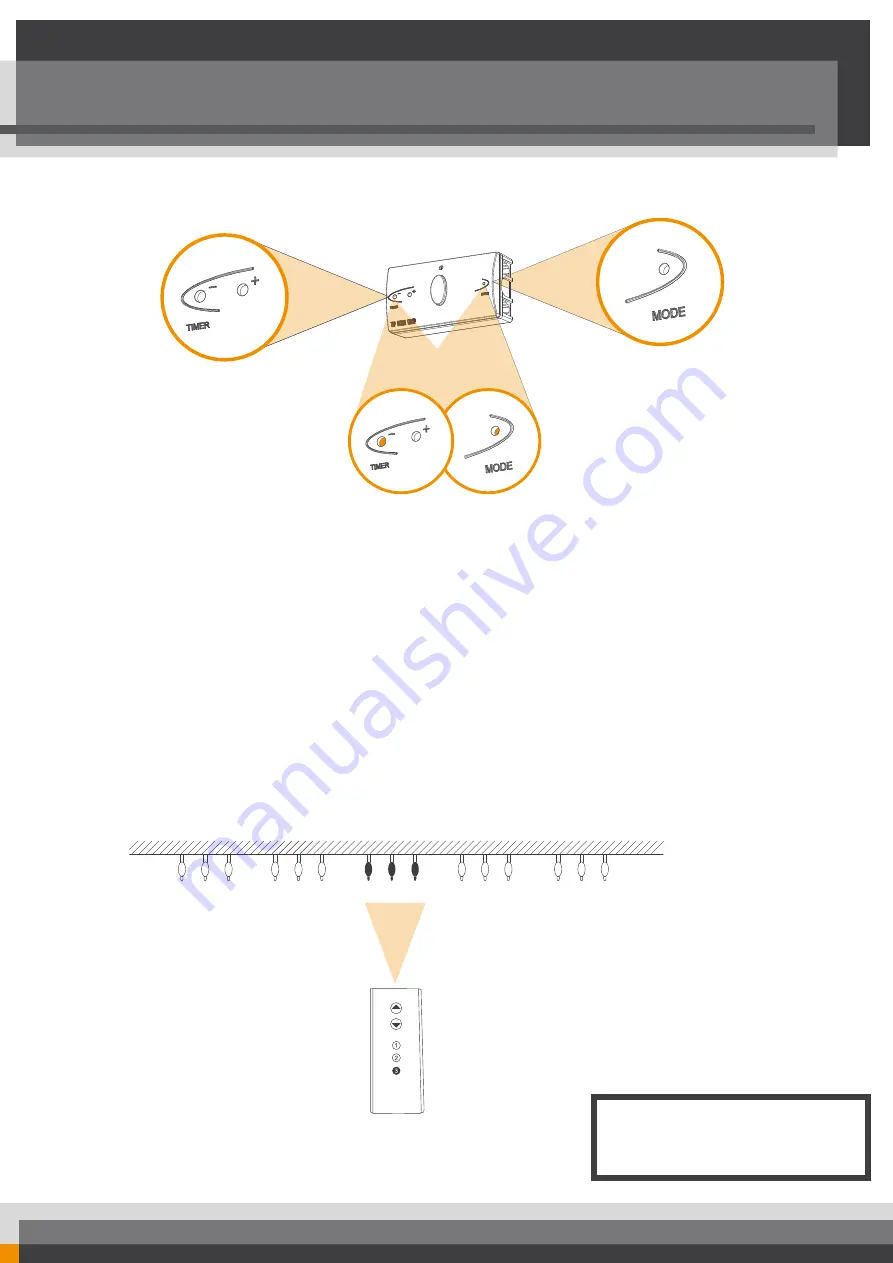
MODE BUTTON
Adding or removing remote controls codes:
Each production order is given a unique remote con-
trol code to prevent misuse of the security system by
third parties. Upon delivery, the code is pre-program-
med in the remote control and the receiving electro-
nics. If desired, it is possible to add extra codes in a
later stage. It is also possible to erase programmed
codes, for example in case of loss or theft of one of
the remote controls.
Adding a code:
To add codes, press the embedded “
mode
” button
on the receiver for 3 seconds. This will be confirmed
by a
long sound signa
l and the
green led
will light
up. Then, aim the new remote controls at the receiver
eye, one at a time and press the button on the remote
control. The remote control is accepted if you hear a
short sound signal
. A
double signal
will be heard if it
was an existing remote control.
Leave the programming mode
by pressing the
“
mode
” button shortly. This is confirmed by
three
short sound signals
and the
led turning off
. When
no programming action is executed for more then 60
seconds, the programming mode is closed automa-
tically.
Switch sound on/off:
To turn the sound signals on or off, press “
mode
” but-
ton for
3 seconds
. This will be confirmed by a
long
sound signal
and the
green led
will light up. Then,
presse the “
-
” button to switch the sound off. This
is confirmed by
3 light signals
. Press the “
+
” button
to switch the sound back on. This is confirmed by 3
sound signals.
Leave the programming mode
as
mentioned above.
TIMER BUTTON
Timer function, locking automatically:
Upon delivery, the timer function is on and set at an
interval of 120 seconds (2 minutes). When the frame
security is unlocked the timer automatically locks
it again after the interval. The timer interval can be
changed using the “
+
” and the “
-
” buttons on the re-
ceiver unit (in stages of 30 seconds). The maximum
interval is 300 seconds (5 minutes). The minimum (0
seconds) switches the timer off. When pressing the
“
+
” or the “
-
” buttons a high (+) or low (-) sound signal
is produced. The maximum and minimum can be in-
stantly reached by pressing pressing the “
+
” button or
“
-
” button for a longer period.
Comfort timer function:
Just before the automatic closure, the green led on
the receiver will blink and a tripple sound signal will
be heard. If desired to continue your sales pitch and
keep the column(s) opened, one push of the button
of the remote control will extend the timer interval by
5 minutes. A second push of the button of the remote
control during this 5-minute extension will lock the
column(s) again. The sales progress will not be inter-
ferred but security of the frames remains guaranteed.
During the timer interval it will always be possible to
lock the frame security using the remote control.
MODE BUTTON
and
TIMER BUTTON
Reset instructions:
Press the “
mode
” and the “
-
” button simultaneously
for a
5 seconds
, to erase all programmed remote con-
trols. This is confirmed by
3 sound signals
. The led
will stay on during erasure, followed by a
long sound
signal
to confrm that all the receiver has been reset.
Removing a code:
If you wish to remove all remote control codes, or
have a malfunction and desire a reset, follow these
instructions. Press the “
mode
” and the “
-
” button si-
multaneously for a
5 seconds
, to erase all program-
med remote controls. This is confirmed by
3 sound
signals
. The led will stay on during erasure, followed
by a
long sound signal
to confrm that all remote con-
trol codes have been erased. You can add new codes
by following the
Adding a code
instructions.
Creating groups of columns:
If you would prefer the columns to open in pre se-
lected groups you can do so by programming each
column to belong to group 1, 2 or 3.
To program a receiver into a specific group, press the
embedded “
mode
” button on the receiver for 3 se-
conds. This will be confirmed by a
long sound signa
l
and the
green led
will light up. Then, aim the remote
control at the receiver eye, and press the desired
group number on the remote control. All columns that
are connected to that specific receiver are now in this
desired group. The receiver accepted the group if
you hear a
short sound signal
. A
double signal
will be
heard if it was an existing remote control.
Leave the programming mode
by pressing the
“
mode
” button shortly. This is confirmed by
three
short sound signals
and the
led turning off
. When
no programming action is executed for more then 60
seconds, the programming mode is closed automa-
tically.
Deleting groups:
If you wish to remove a group, you will have to re-
move all codes. You can do so by following these in-
structions. Press the “
mode
” and the “
-
” button simul-
taneously for a
5 seconds
, to erase all programmed
remote controls. This is confirmed by
3 sound signals
.
The led will stay on during erasure, followed by a
long
sound signal
to confrm that all codes have been era-
sed. You can add new codes with the
adding code
or
creating groups
procedure.
Open all columns
Close all columns
Open all columns in group 1
Open all columns in group 2
Open all columns in group 3
Factory settings:
Timer:
120 seconds
Sound:
On
Group:
No groups pre programmed


