background image

50

Mana

ging Re

co

rde

d

 Dat

a

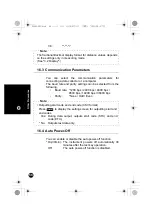
13.2 Number of Recorded Points

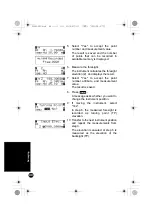
In the menu mode, select "REC," and then "Memory." The

number of points (up to 2000) that can be recorded is

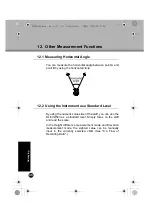
displayed.

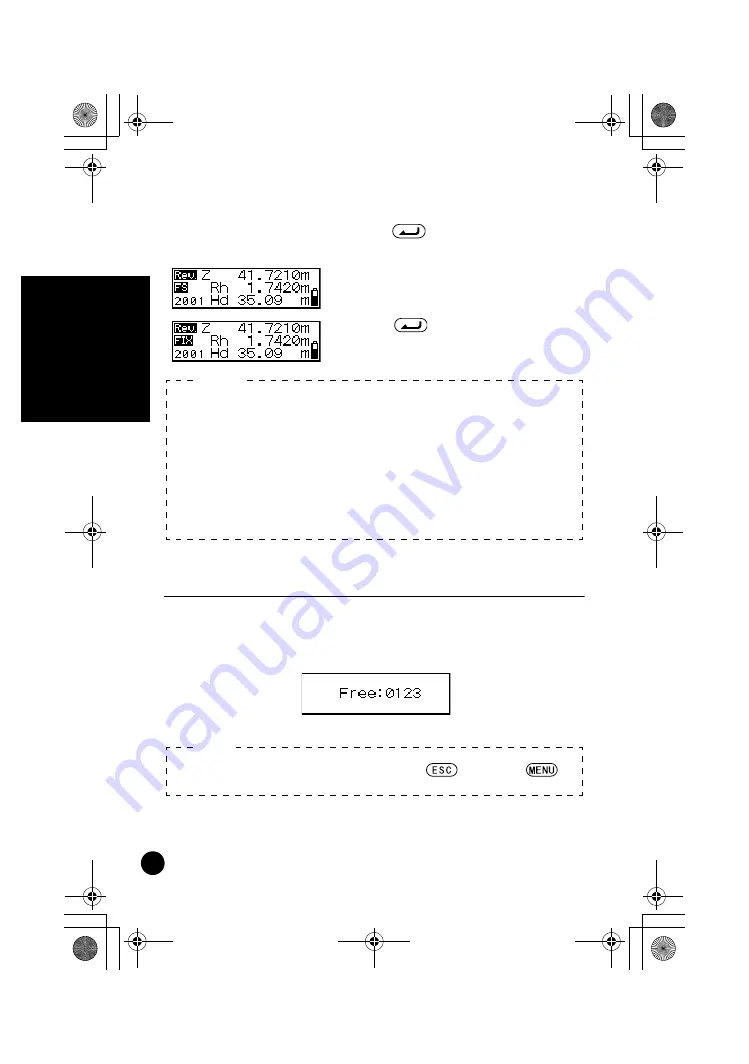
3 Press .

The attributes can now be changed.

4 Display the attribute you want to

change.

5 Press 

 to confirm the selected

attribute.

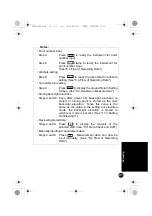
• "DEL" setting and Number of points that can be recorded

If the DEL attribute is selected for recorded data, the data is not

displayed. Setting DEL does not delete data from memory, so the

number of points that can be stored in free memory does not

increase. When a JOB is deleted, all data with the DEL attributes

recorded in other JOBs is also deleted. 

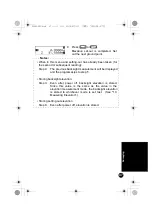
• Double-run Measurement

When "Return" is selected, "*" appears in front of measurement

value Rh.

Notes:

• You can reach here also by pressing 

 and then 

 in

status mode.

Note:

DL502-503.book  50 ページ  2010年4月5日 月曜日 午前9時47分

Summary of Contents for DL-502

Page 1: ...UAL DIGITAL LEVEL FC11808 A022 02 DL 500 SERIES http www topcon co jp GLOBAL GATEWAY http global topcon com Please see the attached address list or the following website for contact addresses Cover1 4 fm 1 ページ 2010年4月5日 月曜日 午後12時0分 ...

Page 2: ...ed For details refer to the Output Formats and Command Explanations DL Edition manual and ask your local dealer The specifications and general appearance of the instrument are subject to change without prior notice and without obligation by TOPCON Corporation and may differ from those appearing in this manual The content of this manual is subject to change without notice Some of the diagrams in th...

Page 3: ...n Status Mode 25 7 3 Measuring using Wave and Read 26 8 Setting Up Data Storage 29 8 1 JOB Setting 29 8 2 Record Conditions 31 8 3 Double run Measurement 32 8 4 Flow of Recording Data 32 9 Measuring Height Difference 36 10 Measuring Elevation 39 11 Setting Out Height Difference Distance and Elevation 42 11 1 Setting Out Height Difference 42 11 2 Setting Out Distance 44 11 3 Setting Out Elevation 4...

Page 4: ...Fractional Decimal representation of Height Unit 57 16 3 Communication Parameters 58 16 4 Auto Power Off 58 16 5 Unit of Measurement 59 17 Warnings and Error Messages 60 18 Charging the Battery 63 19 Checks and Adjustments 65 19 1 Adjusting the Circular Level 65 19 2 Adjusting the Reticle 66 20 Equipment and Accessories 72 20 1 Standard Equipment 72 20 2 Optional Accessory 73 20 3 Staffs 74 21 Spe...

Page 5: ...ials An explosion could occur Do not perform disassembly or rebuilding Fire electric shock or burns could result Never look at the sun through the telescope Loss of eyesight could result Do not look at reflected sunlight from a prism or other reflecting object through the telescope Loss of eyesight could result Do not use the carrying case as a footstool The case is slippery and unstable so a pers...

Page 6: ...A person could be injured if struck by the tripod shoes Keep hands and feet away from the tripod shoes when fixing the tripod in the ground A hand or foot stab wound could result Tighten the leg fixing screws securely before carrying the tripod Failure to tighten the screws could lead to the tripod legs extending causing injury Use only the specified battery charger to recharge batteries Other cha...

Page 7: ...r resulting in fire or burns Do not heat or throw batteries into fire An explosion could occur resulting in injury Do not connect or disconnect power supply plugs with wet hands Electric shock could result Do not touch liquid leaking from batteries Harmful chemicals could cause burns or blisters Caution DL502 503 book 6 ページ 2010年4月5日 月曜日 午前9時47分 ...

Page 8: ...ontinuous use or high levels of humidity In general special conditions are treated as being outside the scope of the product warranty Maintenance Always clean the instrument before returning it to the case The lens requires special care Dust it off with the lens brush first to remove tiny particles Then after providing a little condensation by breathing on the lens wipe it with the supplied cleani...

Page 9: ...umes no responsibility for consequential damage or loss of profits due to any natural disaster earthquake storms floods etc fire accident or an act of a third party and or usage under unusual conditions The manufacturer or its representatives assumes no responsibility for any damage change of data loss of data loss of profits an interruption of business etc caused by use of the product or an unusa...

Page 10: ...an use the mirror to check the position of the bubble in the tube Circular level Objective lens Focusing knob Use this knob to focus on the staff Except where stated screens and illustrations appearing in this manual are of DL 502 503 In principle screens used in procedures are based on the factory setting Important 1 2 3 4 5 DL502 503 book 9 ページ 2010年4月5日 月曜日 午前9時47分 ...

Page 11: ...al circle positioning ring You can rotate the horizontal scale while the instrument is fixed in position Use to align benchmarks with 0 etc Horizontal circle Reticle adjusting screw and screw cover Use this screw to mechanically adjust the reticle Battery cover Eyepiece Adjust the reticle focus to suit your eyesight Keyboard See 3 3 Operating Keys Display See 3 2 Display Gunsight Use for coarse ad...

Page 12: ... display The displayed mark shows the current mode Status mode or Measurement mode Menu mode JOB setting mode Record setting mode Height difference measurement mode Elevation measurement mode Setting out mode Configuration mode Data review menu Version number Currently selected JOB Measurement Battery level conditions indicator Mode indicator Attribute Measure Point number ment step Measurement va...

Page 13: ... staff a Take a reading on staff b Take a reading on staff a with the tripod turned 180 Take a reading on staff b with the tripod turned 180 At position B Take a reading on staff a Take a reading on staff b Take a reading on staff a with the tripod turned 180 Take a reading on staff b with the tripod turned 180 Displays the page number of the active menu when the Menu mode or Configuration mode is...

Page 14: ...s are displayed Staff reading height Horizontal distance to staff Height difference Elevation The fractional decimal display format for measurement value calculation value and input value depends on the settings in measuring mode and fractional decimal representation of height units See 16 Changing the Settings When the fractional decimal display format is set to 0 0001m and the unit of measuremen...

Page 15: ...ft and the unit of measurement is ft data is displayed as follows When measuring mode is Single Average or Repeat Height Up to 2 decimals Distance Up to 1 decimal When measuring mode is Tracking Height Up to 1 decimal Distance 0 decimal When the fractional decimal display format is set to 1 8 and the unit of measurement is inch the display is as follows When measuring mode is Single Average or Rep...

Page 16: ...rement Select cancel return to former procedure menus and options Scroll to next position JOB selection item selection etc Accept the option Enter Menu mode Return to former procedure or to Status mode Value input cancel Advance the numeral Toggle the sign Change the position of the inverted cursor Accept the input value The fractional decimal display format for distance measurements depends on th...

Page 17: ... previous screen Instrument information mode Measurement mode Job setting mode Record setting mode Status mode ESC ESC ESC Select Measure At completion of a measurement Menu of selected function is displayed ESC Select Menu of selected function is displayed Menu mode Page 1 Page 2 MENU Screen showing the number of points that can be recorded is displayed Select A B DL502 503 book 16 ページ 2010年4月5日 ...

Page 18: ...ce measurement mode ESC Select Menu of selected function is displayed Select Menu of selected function is displayed Elevation measurement mode Setting out Config mode Page 1 Page 2 MENU A B DL502 503 book 17 ページ 2010年4月5日 月曜日 午前9時47分 ...

Page 19: ...lly charged battery see 18 Charging the Battery 1 2 3 Procedure Always turn off the power before removing the battery from the instrument If the battery is removed when the power is still on stored data may be lost Important DL502 503 book 18 ページ 2010年4月5日 月曜日 午前9時47分 ...

Page 20: ...head tripod Loosen the centering screw and slide the instrument across the tripod head until the bubble is centered in the circular level Tighten the centering screw Flat head tripod Extend or push in the tripod legs until the bubble is centered in the circular level When the bubble is more or less centered turn the leveling foot screws until the bubble is exactly centered in the circle When you t...

Page 21: ...obs until the staff is nearly centered in the field of view then turn the focusing knob to focus on the staff 4 Looking through the telescope shift your eyes slightly up and down and to each side 5 If the staff and reticle show no deviation the instrument is ready for use If the staff and reticle deviate return to step 2 Procedure If deviation occurs at step 5 errors will occur when taking measure...

Page 22: ...zontal fine motion knobs until the staff is nearly centered in the field of view then turn the focusing knob to focus on the staff Procedure If the staff barcodes are out of focus they will not be readable and measurements cannot be taken Make sure they are correctly focused Important DL502 503 book 21 ページ 2010年4月5日 月曜日 午前9時47分 ...

Page 23: ... impossible Support the staff so that it is perpendicular checking the circular bubble scope on the staff If the staff is tilting height and distance measurements will be incorrect If the surface is catching the light turn it just enough to stop the reflection Make sure shadows are not cast on the staff as this could make measurement impossible When holding the staff during measurement make sure y...

Page 24: ...k between the sections If the staff is dirty measurements will not be very accurate Avoid scratching or soiling the barcode surface as this could make measurement impossible Store and carry the staff inside its case If the BGS series staff is used for leveling and the height difference and temperature difference are much larger than normal temperature variations may cause the staff to expand or co...

Page 25: ...expansion and contraction of the staff due to temperature changes C C0 T T0 x x h C Staff correction value C0 Scale factor T Measured temperature during observation average temperature during measurement of known site intermediate site new site T0 Reference temperature of 20 C Line expansion coefficient BGS series 20x10 6 1 C h Height difference Δ α Δ Δ α Δ Note DL502 503 book 24 ページ 2010年4月5日 月曜日...

Page 26: ... is completed the staff readings Rh and horizontal distance Hd are displayed During measurement if direct sunlight or strong light enters the eyepiece and measurement cannot be performed Measurement error or Too bright is displayed see 17 Warnings and Error Messages Shield the eyepiece from the light source using your body or cover the eyepiece with your hand and resume measurement If the DL 502 5...

Page 27: ... using a staff not equipped with a bubble scope Wave and Read can be used to take the staff reading Rh and measure the horizontal distance Hd to the staff In Repeat Average or Tracking mode Step 2 Values are renewed at each measurement Press or to stop the reading Press to cancel the reading Measure Note Wave staff back and forth DL502 503 book 26 ページ 2010年4月5日 月曜日 午前9時47分 ...

Page 28: ...n 2 Set measuring mode to Waving see 16 1 Measuring Mode 3 Focus on the staff 4 Wave the staff backwards and forwards 5 to 10 through the vertical position Waving speed should be equivalent to 3 passings of the staff through the vertical position in approximately 3 seconds Vertical OK No good No good Procedure DL502 503 book 27 ページ 2010年4月5日 月曜日 午前9時47分 ...

Page 29: ...ment cannot be performed Measurement error or Too bright is displayed see 17 Warnings and Error Messages Shield the eyepiece from the light source using your body or cover the eyepiece with your hand and resume measurement Conversely measurement cannot be performed when light conditions are too dark Measurement cannot be performed when the staff is waved too fast Measurement cannot be performed wh...

Page 30: ... beep tone sounds twice and the number of free points remaining is displayed as 0 Measurement results are not recorded Press any button to return to the previous screen See 15 2 Data Output and 14 JOB Delete for how to Output and Delete in the JOB setting mode See 13 Displaying Recorded Data for how to use Review and Memory in the Record setting mode Notes Between 1 and 12 characters can be set fo...

Page 31: ...nu mode select JOB and then Edit The currently selected JOB name is displayed and can now be edited The characters that can be input are shown below Each time is pressed the cursor jumps to the first character of each row shown below Procedure JOB Quick Access Step 2 When JOB numbers 1 to 10 are displayed press to jump to JOB number 11 When JOB numbers 11 to 20 are displayed press to jump back to ...

Page 32: ...rded for foresight point measurements check and record backsight point measurements manually Off Data cannot be recorded 0 1 2 3 4 5 6 7 8 9 ABCDEFGHIJ KLMNOPQRST U V W X Y Z Example Displaying the word AT 2 Press four times to display A 3 Press to move the cursor to the next character 4 Press five times to display T 5 When the word has been input press to record the JOB name DL502 503 book 31 ページ...

Page 33: ...n Line Go Record sent data Return Record returned data 8 4 Flow of Recording Data The following explains the flow of recording measurement data When using the numerical scale side of the staff and not the RAB code manually input the measurement data A detailed explanation is provided below for items indicated by a Note When Return is selected is displayed in front of measurement value Rh DL502 503...

Page 34: ...e set Set the backsight point number Measure the backsight point Check and record the measurement results Set attributes of foresight point Set the point number of the foresight point Measure foresight point Check and record the measurement results Move the instrument point Measure previous point as backsight point Measure next foresight point Procedure DL502 503 book 33 ページ 2010年4月5日 月曜日 午前9時47分 ...

Page 35: ...e automatically set number in the currently selected JOB Check the measurement results together with the point number Point number is displayed as follows First record after power is switched ON No data stored in JOB 0001 First record after power is switched ON Data stored in JOB point number of last measurement point Second or later record after power is switched ON turning point point number of ...

Page 36: ...503 on the numerical scale side of the staff and measure the backsight point 2 Press Measurement data can now be input manually 3 Input the measurement value found in step 1 4 Check the point number and press Yes to record the selected data 5 Measure the next point If the attribute is not set a point other than the backsight point is recorded as the foresight point Note Procedure DL502 503 book 35...

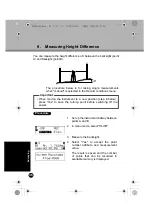
Page 37: ... instrument midway between points A and B 2 In menu mode select Ht diff 3 Measure the backsight 4 Select Yes to accept the point number attribute and measurement value The result is saved and the number of points that can be recorded in available memory is displayed ΔH When moving the instrument to a new position step 8 below press Yes to save the turning point before switching off the power Impor...

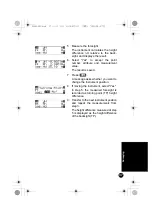
Page 38: ...saved 7 Press A message asks whether you want to change the instrument position 8 If moving the instrument select Yes In step 5 the measured foresight is recorded as turning point TP height difference 9 Transfer to the next instrument position and repeat the measurements from step 3 The height difference measured at step 5 is displayed as the height difference of the backsight TP DL502 503 book 37...

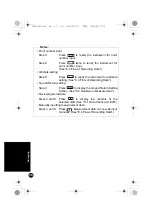
Page 39: ...tribute setting See 8 4 Flow of Recording Data Go and Return setting Step 3 Press to display the Go and Return Setting Screen See 8 3 Double run Measurement Reviewing stored data Steps 3 and 5 Press to display the contents of the selected JOB See 13 1 Data Check and Edit Manually inputting measurement data Steps 3 and 5 Press Measurement data can now be input manually See 8 4 Flow of Recording Dat...

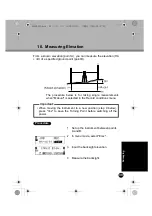
Page 40: ...asurements when Manual is selected in the Record conditions menu 1 Set up the instrument between points A and B 2 In menu mode select Elev 3 Input the backsight elevation 4 Measure the backsight When moving the instrument to a new position step 9 below press Yes to save the Turning Point before switching off the power Important Procedure DL502 503 book 39 ページ 2010年4月5日 月曜日 午前9時47分 ...

Page 41: ...ct Yes to accept the point number attribute and measurement value The result is saved 8 Press A message asks whether you want to change the instrument position 9 If moving the instrument select Yes In step 6 the measured foresight is recorded as turning point TP elevation 10 Transfer to the next instrument position and repeat the measurements from step 3 The elevation measured at step 6 is measure...

Page 42: ...ng backsight elevation Steps 3 and 10 Even after power off backsight elevation is stored or turning point is stored as the next backsight elevation Since this value is the same as the value in the setting out elevation mode the backsight elevation is stored to whichever mode is set last See 11 3 Setting Out Elevation Reviewing stored data Steps 4 and 6 Press to display the contents of the selected...

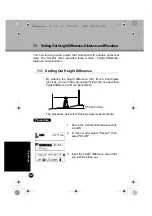
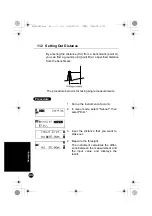
Page 43: ...Height Difference By entering the height difference ΔH from a benchmark point A you can find a ground point point B at a specified height difference from the benchmark The procedure below is for taking single measurements 1 Set up the instrument between points A and B 2 In menu mode select Set out then select Ht diff 3 Input the height difference value that you want to stake out Procedure DL502 50...

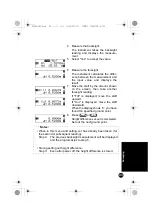
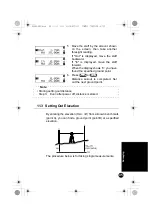
Page 44: ...f Fill is displayed move the staff upward If Cut is displayed move the staff downward When the display shows 0 you have found the specified ground point 8 Press or Height difference set out is completed Set out the next ground point When in this menu and setting out has already been taken for the second or subsequent reading Step 4 The previous backsight measurement will be displayed and the progr...

Page 45: ... The procedure below is for taking single measurements 1 Set up the instrument at point A 2 In menu mode select Set out then select Dist 3 Input the distance that you want to stake out 4 Measure the foresight The instrument calculates the differ ence between the measurement and the input value and displays the result Procedure DL502 503 book 44 ページ 2010年4月5日 月曜日 午前9時47分 ...

Page 46: ...he staff by the amount shown on the screen then take another foresight reading If Out is displayed move the staff backward If In is displayed move the staff forward When the display shows 0 you have found the specified ground point 6 Press or Distance set out is completed Set out the next ground point Storing setting out distance Step 3 Even after power off distance is stored Note DL502 503 book 4...

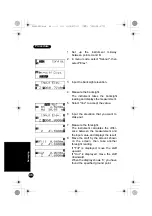
Page 47: ...6 Input the elevation that you want to stake out 7 Measure the foresight The instrument calculates the differ ence between the measurement and the input value and displays the result 8 Move the staff by the amount shown on the screen then take another foresight reading If Fill is displayed move the staff upward If Cut is displayed move the staff downward When the display shows 0 you have found the...

Page 48: ... be displayed and the program skips to step 5 Storing backsight elevation Step 3 Even after power off backsight elevation is stored Since this value is the same as the value in the elevation measurement mode the backsight elevation is stored to whichever mode is set last See 10 Measuring Elevation Storing setting out elevation Step 6 Even after power off elevation is stored Notes DL502 503 book 47...

Page 49: ...e Instrument as a Standard Level By using the numeric scale side of the staff you can use the DL 502 503 as a standard level Simply focus on the staff and read the scale In the Height difference measurement mode and Elevation measurement mode the sighted value can be manually input in the currently selected JOB See 8 4 Flow of Recording Data DL502 503 book 48 ページ 2010年4月5日 月曜日 午前9時47分 ...

Page 50: ...eview The last recorded data in the currently selected JOB is displayed 2 Display the data that you want to review Press to display the previously displayed data Attributes can be changed in the following order only BS backsight point Æ FS foresight point Æ IS intermediate sight Æ FIX fixed point Æ Off Æ DEL delete Example Data recorded as IS intermediate sight can be changed to FIX fixed point Of...

Page 51: ...points that can be recorded If the DEL attribute is selected for recorded data the data is not displayed Setting DEL does not delete data from memory so the number of points that can be stored in free memory does not increase When a JOB is deleted all data with the DEL attributes recorded in other JOBs is also deleted Double run Measurement When Return is selected appears in front of measurement v...

Page 52: ...OW 1 In menu mode select JOB and then Delete The currently selected JOB and number of data recorded in the JOB are displayed 2 Display the JOB you want to delete 3 Press and then select Yes The selected JOB and contents of the JOB are deleted JOBs that cannot be output indicated by next to JOB cannot be deleted Important Procedure DL502 503 book 51 ページ 2010年4月5日 月曜日 午前9時47分 ...

Page 53: ... number 1 JOB name Step 3 After the JOB is deleted the default JOB name set at the factory is displayed JOB01 to JOB20 Number of points that can be recorded When a JOB is deleted data with the DEL attributes recorded in other JOBs is also deleted and the value indicating the number of points that can be stored in free memory increases Notes DL502 503 book 52 ページ 2010年4月5日 月曜日 午前9時47分 ...

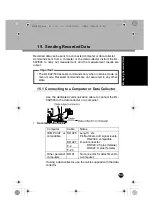
Page 54: ...2 503 to the data collector or a computer Communication cable If using a data collector use the cable supplied with the data collector Computer Cable Notes IBM PC AT or compatible DOC26 Length 2m Pin Numbers and signal levels RS 232C compatible D sub connector DOC26 25 pins female DOC27 9 pins female DOC27 F 4 F 24 Other personal computers DOC1 No connector for attachment to a computer The DL 502 ...

Page 55: ...ource output 6 Reserved must not be used 1 Use a cable to connect the DL 502 503 to a computer 15 1 Connecting to a Computer or Data Collector 2 In menu mode select JOB and then Output The currently selected JOB and recorded point numbers are displayed 3 Select the JOB you wish to send Data recorded in a JOB that has not been sent is indicated by an asterisk Important Procedure DL502 503 book 54 ペ...

Page 56: ...rs 01 to 10 are displayed press to jump to JOB number 11 When numbers 11 to 20 are displayed press to jump to JOB number 1 Step 4 Press to display the communication conditions setting screen Data output format command operations For details refer to the Output Format and Command Explanations DL Edition manual and ask your local dealer Note DL502 503 book 55 ページ 2010年4月5日 月曜日 午前9時47分 ...

Page 57: ...rage Displays the average value calculated from the number of times fine measurement is repeated Repeat default setting 5 times Repeat setting range 2 to 9 times Page 1 Meas measuring mode Display fractional decimal representation of height units Adjust checks and adjustment RS 232C communication parameters Page 2 Auto off auto power off Unit unit of measurement Press to toggle between the pages A...

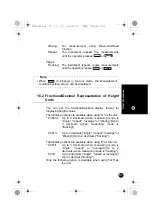
Page 58: ...n measuring mode is single repeat average or Waving Up to 3 decimals when measuring mode is tracking 0 001m Up to 3 decimals single repeat average or Waving Up to 2 decimals tracking The following options are available when using ft as the unit 0 001ft Up to 3 decimals when measuring mode is single repeat or average Up to 2 decimals when measuring mode is tracking 0 01ft Up to 2 decimals single re...

Page 59: ...le the auto power off function On 30min The instrument powers off automatically 30 minutes after the last key operation Off The auto power off function is disabled The fractional decimal display format for distance values depends on the settings only in measuring mode See 3 2 Display Note Outputting start code and end code CSV format Press to display the setting screen for outputting start and end...

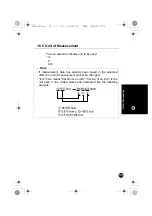
Page 60: ... inch If measurement data has already been saved in the selected JOB the unit of measurement cannot be changed Inch here means fraction of an inch fraction of an inch is the unit used in the United States and expressed like the following example Note DL502 503 book 59 ページ 2010年4月5日 月曜日 午前9時47分 ...

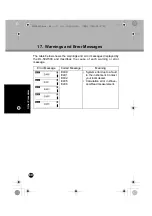
Page 61: ...isplayed by the DL 502 503 and describes the cause of each warning or error message Error Message Coded Message Meaning E400 E401 E402 E405 E406 System error due to a fault in the instrument Contact your local dealer Calculation error in Wave and Read measurement DL502 503 book 60 ページ 2010年4月5日 月曜日 午前9時47分 ...
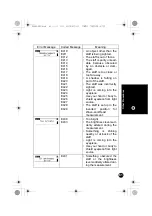
Page 62: ...ghted Light is coming into the eyepiece Use your hand or body to shield eyepiece from light source The staff is set up in the inverted position for Wave and Read measurement E430 E433 Too bright The brightness level sud denly altered during the measurement Something is shining nearby or at back of the staff Light is coming into the eyepiece Use your hand or body to shield eyepiece from light sourc...

Page 63: ...d is either less than 0 5m too low or greater than 4m too high when performing Wave and Read measurement E458 E459 The distance to the staff is either less than 5m too near or greater than 50m too far when per forming Wave and Read measurement E498 Measurement results not obtained within 20 sec onds of starting Wave and Read measurement Error Message Coded Message Meaning Coded messages are not di...

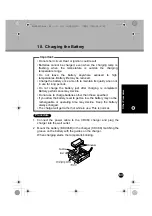
Page 64: ... outside the charging temperature range Do not leave the battery anywhere exposed to high temperatures Battery life may be reduced Charge the battery once a month to maintain its quality when not in use for long periods Do not charge the battery just after charging is completed Battery performance may decline Do not use to charge batteries other than those specified If you allow the battery level ...

Page 65: ...o batteries in the charger the battery in slot 1 is charged first and then the battery in slot 2 Charging lamp Steps 2 and 3 The charging lamp is off when The charger is outside the charging temperature range The battery is mounted incorrectly If the lamp is still off after the charger falls within its charging temperature range and the battery is mounted again contact your local dealer Notes DL50...

Page 66: ...as measuring mode 19 1 Adjusting the Circular Level Check that the bubble remains centered in the circular level Adjust if the bubble shifts position 1 Adjust the leveling foot screws until the bubble is centered in the circle 2 Turn the instrument 180 The bubble should not shift from the center If the bubble does move adjust as follows 3 Compensate for one half of the shift by adjusting the level...

Page 67: ...of the staff For less accurate readings see Notes for checking the reticle without turning the tripod 4 Eliminate the remaining shift by turning the circular level adjusting screws with the hexagonal wrench until the bubble is centered 5 Turn the instrument 180 If the bubble stays in the center adjustment is completed If the bubble moves repeat steps 3 and 4 1 In menu mode select Config then in pa...

Page 68: ...tripod 180 10 Repeat steps 4 through 6 sighting the two staffs and taking the readings 11 Select Yes to accept the value 12 Move the instrument to a position approximately 3m from staff a along a straight line joining staffs a and b The new position is B 13 Press 14 Repeat steps 4 through 11 sighting the two staffs and taking the readings If you turned the tripod at step 8 a diagram of the tripod ...

Page 69: ...ts and decide whether correcting the reference value of the sensor is required If the difference is 0 3mm or less no adjustment is necessary If the difference exceeds the 0 3mm permissible range adjustment is necessary DL502 503 book 68 ページ 2010年4月5日 月曜日 午前9時47分 ...
Page 70: ...rns to the menu selection 17 Repeat steps 1 through 15 Make sure that the difference between the results is within 0 3mm 1 Sight the barcode face of staff b from position B and measure with the instrument 2 Sight the scale face of staff b from position B and take a visual reading 3 If the difference between the mea surements taken at steps 1 and 2 is 2mm or more adjust the cross line as described ...

Page 71: ... between the two measure ments is less than 2mm If the measurement at step 2 is larger than the measurement at step 1 lower the cross line by slightly loosening the adjusting screw If the measurement at step 2 is smaller than the measurement at step 1 raise the cross line by slightly tightening the adjusting screw 6 Replace the adjusting screw cover DL502 503 book 70 ページ 2010年4月5日 月曜日 午前9時47分 ...
Page 72: ...nce calculations Step 15 If the tripod is turned and repeat measurements taken Value at position A 1st reading on staff a 1st reading on staff b 2nd reading on staff a 2nd reading on staff b 2 Value at position B 1st reading on staff a 1st reading on staff b 2nd reading on staff a 2nd reading on staff b 2 Difference absolute value of value at position A value at position B If the tripod is not tur...

Page 73: ...lan DL 502 503 1 Battery BDC46B 1 Charger CDC68 1 Power cable EDC113A 113B 113C 1 Hexagonal wrench M2 5 for circular level 1 Dust cover 1 Cleaning cloth 1 Operator s manual 1 Carrying case 1 The optional accessory can also be placed in the carrying case Diagonal eyepiece DE23 1 2 batteries can be placed here 1 2 3 4 5 6 7 8 9 10 DL502 503 book 72 ページ 2010年4月5日 月曜日 午前9時47分 ...

Page 74: ...23 The diagonal eyepiece is useful for taking measurements in confined spaces First remove the standard DL 502 503 eyepiece by turning it counter clockwise Then screw the diagonal eyepiece in place of the standard eyepiece DL502 503 book 73 ページ 2010年4月5日 月曜日 午前9時47分 ...

Page 75: ...th handle BGS50 Glass fiber 5 09m 4 sections Front RAB code Reverse graduated With handle BGS50G Glass fiber 5 09m 4 sections Front RAB code Reverse graduated With handle Unit feet BAS55 Aluminum 5 0m 5 sections Front RAB code Reverse graduated BRS55 Aluminum 5 0m 5 sections Front RAB code Reverse graduated on reflective surface Distances can be measured with Total Station by using the reverse sid...

Page 76: ...75 Other Procedures RAB code RAndom Bi directional code is a coded staff used with TOPCON digital levels DL502 503 book 75 ページ 2010年4月5日 月曜日 午前9時47分 ...
Page 77: ...0mm D x 2000mm H 3 4in W x 1 6in D x 6 6ft H 4 3kg 9 5lb one staff 17 1kg 37 7lb two staffs and case BIS30 85mm W x 40mm D x 3038mm H 3 4in W x 1 6in D x 10 0ft H 5 5kg 12 2lb a staff 23 4kg 51 6lb two staffs and case The coefficient of linear expansion α 1 x 10 6 C Glass fiber staff BGS40 58mm W x 28mm D x 4080mm H 3 sections 2 3in W x 1 1in D x 13 3ft H 2 4kg 5 3lb one staff 3 0kg 6 6lb a staff ...

Page 78: ...ft with BIS20 staff 0 0375 to 2 9725m 0 124 to 9 752 ft with BIS30 staff Distance 1 6 to 100m Minimum display Height 0 0001m 0 001m 0 001 ft 0 01ft selectable single repeat average or Wave and Read mode 0 001m 0 01m 0 01ft 0 1ft tracking mode Distance 0 01m 0 1ft single repeat or average mode 0 1m 1 ft tracking or Wave and Read mode Accuracy 1 with staff BGS40 50 or BIS20 30 Height Standard deviat...

Page 79: ... and pendulum mechanism Compensation range 15 Wave and Read Recommended brightness level for measurement 150 lx or more Recommended speed for waving of staff 0 5Hz 3 passings of the staff through the vertical position in 3 seconds Measuring range Waving angle 5 to 10 either side of the vertical position Height 0 5 to 4m Distance 5 to 50m Recommended staff 3 BGS series BAS55 up to heights of 3m 1 W...

Page 80: ...to 104 F Storage temperature range 20 to 65 C 4 to 149 F 4 Charging can take longer than the times stated above when temperatures are either especially high or low General Display 128 x 32 dot matrix LCD with illuminator Keypad 8 keys 7 keys on front panel 1 key on side panel Auto power off On instrument powers off if not used for 30 min Off selectable Data output RS 232C compatible Circular level...

Page 81: ...th the instruction manual may cause harmful interference to radio communications Operation of this equipment in a residential area is likely to cause harmful interference in which case the user will be required to correct the interference at his own expense For users in California WARNING Handling the cord on this product or cords associated with accessories sold with this product will expose you ...

Page 82: ...81 Regulations For users in the Republic of Korea DL502 503 book 81 ページ 2010年4月5日 月曜日 午前9時47分 ...
Page 83: ...DL502 503 book 82 ページ 2010年4月5日 月曜日 午前9時47分 ...

Page 84: ...DL502 503 book 83 ページ 2010年4月5日 月曜日 午前9時47分 ...
Page 85: ...DL502 503 book 84 ページ 2010年4月5日 月曜日 午前9時47分 ...
Page 86: ...This is the mark of the Japan Surveying Instruments Manufacturers Association 2009 TOPCON CORPORATION ALL RIGHTS RESERVED Cover2 3 fm 1 ページ 2010年4月5日 月曜日 午前9時52分 ...

Reviews: