background image

20

6. PREPARATION FOR MEASUREMENT

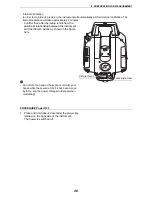
• Internal Calibration

In order to maintain its precision, the instrument will automatically perform internal calibration. The 
internal calibration will take approximately 2 minutes.

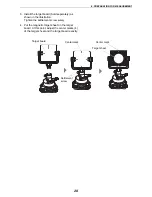
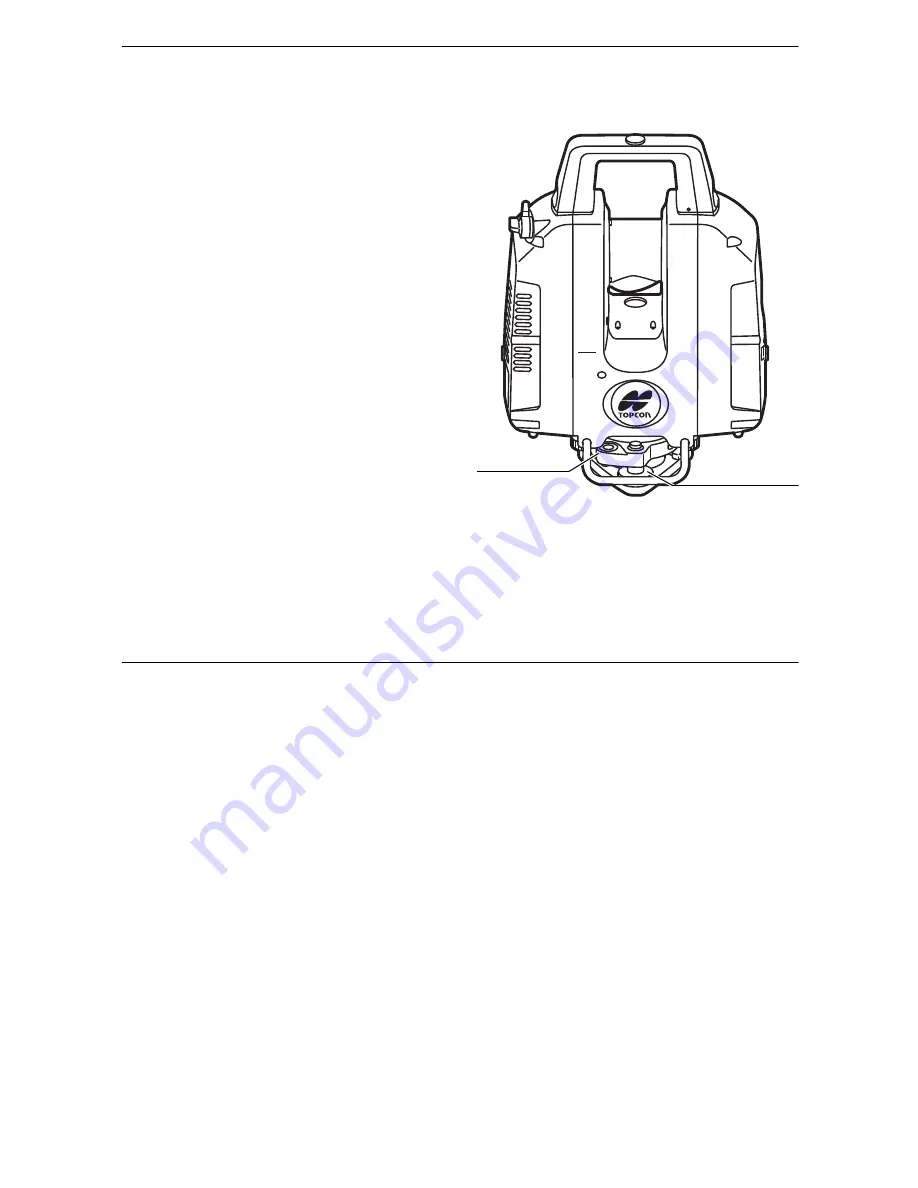
Confirm that, after the setup is finished, the 
positional relationship between the instrument 
and the tribrach will be as shown in the figure 
here.

• Do not turn the head or the scanner unit with your 

hands while the power is ON. If it has been turned 
by force, turn the power ON again. (Except when 
collimating)

PROCEDURE Power OFF

1. Press and hold (about 2 seconds) the power key 

located on the right side of the instrument.
The power is switched off.

Leveling screw

Circular level

Summary of Contents for GLS -2000 Series

Page 1: ...GLS 2000 SERIES LASER SCANNER INSTRUCTION MANUAL 64652 90261 ...

Page 2: ...all rights are reserved by TOPCON CORPORATION Except as permitted by Copyright law this manual may not be copied and no part of this manual may be reproduced in any form or by any means This manual may not be modified adapted or otherwise used for the production of derivative works Symbols The following conventions are used in this manual Indicates precautions and important items which should be r...

Page 3: ...tering Numeric and Alphabetic Characters 26 6 9 Preparing the Target 27 Assembling the target 27 7 INSTRUMENT SETTINGS 29 7 1 Setting the Tilt Sensor ON OFF 29 7 2 Camera Settings Angle of view and Resolution 31 7 3 Settings for Scanning Conditions 32 7 4 Measuring Distance to the Target Measurement Object 35 8 FLOW OF THE CONFIGURATION SCREEN 37 8 1 Setting Temperature and Atmospheric Pressure 39...

Page 4: ...D range setting scanning 65 Performing 3D whole circumference scanning 68 10 3 View the Data on the SD Card 70 11 CHECKS AND ADJUSTMENTS 71 11 1 Circular Level Adjustment 71 11 2 Tilt Sensor Calibration 72 11 3 Aligning the Laser Plummet Beam with the Instrument Center 73 11 4 Aligning the Center of the Instrument and that of the Image 75 12 BATTERY CHARGING 77 12 1 Battery Charging 77 13 HOW TO S...

Page 5: ...ire electric shock burns or hazardous radiation exposure could result Because this instrument is heavy make sure to carry it carefully using both the handle and the side handle There is a possibility that the instrument may topple and fall resulting in possible injury and incorrect lifting posture may also result in hurting your back When securing the instrument in the carrying case make sure that...

Page 6: ...gnition could result Do not heat or throw batteries or chargers into fire An explosion could occur resulting in injury To prevent shorting of the battery in storage apply insulating tape or equivalent to the terminals Otherwise shorting could occur resulting in fire or burns Do not use batteries or the battery charger if wet Resultant shorting could lead to fire or burns Do not connect or disconne...

Page 7: ...inside the case it may cause the instrument to rust If there is a crack or deformation in the rubber packing for the battery cover stop using and replace the packing To retain the waterproof property it is recommended that you replace the rubber packing once every two years To replace the packing contact your local sales dealer The Lithium Battery The lithium battery is used to maintain the Calend...

Page 8: ...when taking the instrument out from a heated vehicle Let instrument acclimate itself to ambient temperature Direct sunlight Do not expose the instrument to direct sunlight for extended periods of time When left in the sun for long periods performance may be adversely affected or if the inner temperature of the instrument may rise to an abnormally high level the instrument may fail to operate When ...

Page 9: ...epending on countries you wish to export or bring the product to a US export license may be required In such a case it is your responsibility to obtain the license The countries requiring the license as of May 2013 are shown below Please consult the Export Administration Regulations as they are subject to change North Korea Iran Syria Sudan Cuba URL for the EAR of the US http www bis doc gov polic...

Page 10: ... skin If an eye injury is caused by exposure to the laser beam seek immediate medical attention from a licensed ophthalmologist Do not look directly into the laser beam Doing so could cause permanent eye damage Do not stare at the laser beam Doing so could cause permanent eye damage Never look at the laser beam through a telescope binoculars or other optical instruments Doing so could cause perman...

Page 11: ...duct Hazardous protection procedures read LASER SAFETY INFORMATION Requisite protective gear read LASER SAFETY INFORMATION Accident reporting procedures stipulate procedures beforehand for transporting the injured and contacting physicians in case there are laser induced injuries Persons working within the range of the laser beam are advised to wear eye protection which corresponds to the laser wa...

Page 12: ...attery cover lever Wide angle camera with lens cap Levelling base locking screw Battery cover Left Battery connector Leveling screw Handle Scanner unit laser aperture and Camera telescope Heat vents Stylus pen Instrument height mark Heat vents Sighting collimator ...

Page 13: ...y Operation key Battery cover lever Battery cover Right Tribrach fixing lever Side handle Instrument height mark Handle locking screw Card slot inside of a battery cover Circular level Laser plummet window Instrument center mark ...
Page 14: ...g Keys Key Indicator name Function Collimating Position Setting key Sets the collimating position Start Stop Scan key Starts or stops scanning Power key Turns the power ON and OFF Power Indicator Lighting up in orange when the power is turned ON Collimating Position Setting key Start Stop Scan key Power key Screen Power Indicator Start Scan button Scan Stop key Collimating Position Setting key ...

Page 15: ...1 Target Scanning Battery icon Displays the remaining battery life Also use it to replace the batteries while scanning 6 6 Battery Power Remaining Display 6 7 Replacing the Batteries during the power is ON Tilt Setting icon Displays the electronic circular level Switches the tilt ON or OFF 7 1 Setting the Tilt Sensor ON OFF Adjusts the tilt sensor installation error 11 2 Tilt Sensor Calibration SD...

Page 16: ...creens Use a stylus pen to operate the screen Do not scratch or use any sharp objects other than a stylus pen on the screen face 4 4 Flow of the Screens Power ON Main Menu Scan Setting Screen Camera Setting Screen Config Screen Tilt Setting Screen SetUp Screen Main Menu ...

Page 17: ...reak the projection Open Close sensor inside the battery cover Be careful not to pinch your finger Make sure that no water drop or dust gets inside the instrument when setting or removing the batteries When storing the batteries remove the batteries from the instrument or the charger The batteries are chemical products that use a chemical reaction and have a limited life expectancy Even if the bat...

Page 18: ...ot When removing the SD card press the center of the card slowly Pressing the edge of the card may cause the card to eject strongly While a progress bar displays do not remove the SD card Otherwise the data may be destroyed 3 Checking the terminal side on the battery insert two batteries as shown 4 Close the battery cover Right Make sure it clicks SD card Card slot Battery ...

Page 19: ... BEFORE USE 5 Open the battery cover left 6 Similarly Install two batteries Never remove the backup memory in the battery cover Left 7 Close the battery cover Left A click is heard when the cover is secure Backup memory ...

Page 20: ... sure to close the connector cap of the power source connector when an external power source is not being used When connecting the power cable to the power source connector place the power cable outside the side handle as shown below If the power cable is inside the side handle it may be disconnected due to the instrument s rotation Rotate the instrument before turning the power on to make sure th...

Page 21: ...stall the instrument Prepare for scanning Turn the power OFF 6 4 Setting Up the Instrument 6 3 Power ON OFF 9 1 Creating a New Station 9 2 Setting the Point Name Occupied point and Backsight point 10 MEASURING SCANNING 10 1 Target Scanning 10 2 3D Scanning 2 Set the occupied point name and the backsight point name and then scan the backsight point 3 Set up this instrument 7 INSTRUMENT SETTINGS 1 T...

Page 22: ...ach the handle position and align the handle and then tighten up the handle locking screws Two points need to be screwed The instrument is easily detached or attached to the tribrach PROCEDURE Detaching the instrument from the levelling base 1 Loosen the levelling base locking screw by turning 2 or 3 rotations in the counterclockwise direction 2 Turn the tribrach clamp counterclockwise to loosen W...

Page 23: ...hed very often Simply tighten the securing screw on the fixing lever with the accessory screw driver PROCEDURE Power ON 1 Press the power key located on the right side of the instrument After the power Indicator turned on a startup screen will be displayed It takes approximately 3 minutes after the power has been switched ON to initialize the instrument and warm up the laser Do not turn the instru...

Page 24: ... is finished the positional relationship between the instrument and the tribrach will be as shown in the figure here Do not turn the head or the scanner unit with your hands while the power is ON If it has been turned by force turn the power ON again Except when collimating PROCEDURE Power OFF 1 Press and hold about 2 seconds the power key located on the right side of the instrument The power is s...

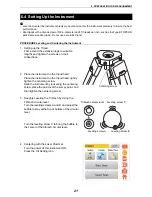
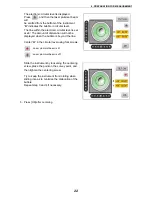
Page 25: ...tripod head Place the instrument on the tripod head lightly tighten the centering screw Slide the instrument by loosening the centering screw place the point over the survey point and then tighten the centering screw 3 Roughly Leveling the Tribrach by Using the Tribrach circular level Turn the leveling screws A and B and adjust the bubble to stay at the top or bottom of the circular level Turn the...

Page 26: ...mount of dislocation will not be displayed when the bubble is beyond the line Center in the circular level using foot screws Slide the instrument by loosening the centering screw place the point on the survey point and then tighten the centering screw Try to keep the instrument from rotating when sliding it so as to minimize the dislocation of the bubble Repeat step 3 and 4 if necessary 5 Press OK...

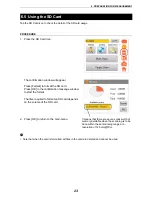
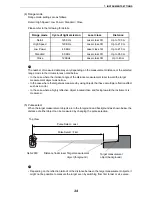
Page 27: ...irmation message window to start the format The time required to format an SD card depends on the volume of the SD card 2 Press OK to return to the main menu Note that when the card is formatted all files in the card are deleted and cannot be used 6 5 Using the SD Card It means that there are seven scans worth of memory available when the scanning is to be done within the set scanning range at a r...

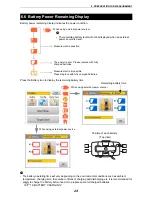
Page 28: ... safety to charge the battery beforehand or to prepare spare full charged batteries 12 BATTERY CHARGING 6 6 Battery Power Remaining Display Measurement is possible The power is poor Please replace with fully charged batteries Measurement is impossible Please replace with fully charged batteries When using external power source The remaining battery level will not be displayed when an external powe...

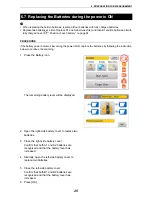
Page 29: ...ollowing the instruction below to continue the scanning 1 Press the Battery icon The remaining battery level will be displayed 2 Open the right side battery cover to replace two batteries 3 Close the right side battery cover Confirm that both A1 and A2 batteries are recognized and that the battery level has increased 4 Similarly open the left side battery cover to replace two batteries 5 Close the...

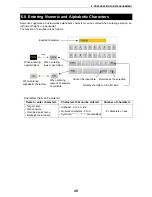
Page 30: ...tems to enter characters Characters that can be entered Number of characters Target name Station name Occupied point name Backsight point name Alphabet a to z A to Z Numeric characters 0 to 9 Symbols are disabled 8 characters or less When entering capital letters When entering lower case letters When entering alphabetic characters When entering numeric characters or symbols Deletes the letter on t...

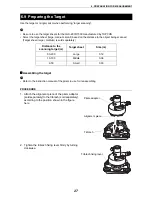
Page 31: ...ly Assembling the target Refer to the instruction manual of the prism in use for its assembling PROCEDURE 1 Attach the alignment piece of the prism adaptor sold separately to the tribrach sold separately according to the position shown in the figure here 2 Tighten the tribrach fixing lever firmly by turning clockwise 6 9 Preparing the Target Distance to the scanning target m Target sheet Size m 50...

Page 32: ...ly as shown in the illustration Tighten the settlement screw surely 4 Put the magnetic target sheet on the target board At this point adjust the center marks 4 of the target sheet and the target board exactly Settlement screw Center mark Target board Target sheet Center mark ...

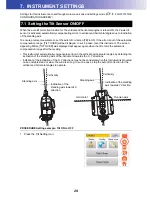
Page 33: ...yed will appear again when the tilt enters the automatic compensation range after the leveling This instrument automatically compensates errors in the vertical and horizontal angles by detecting the inclination of the standing axis of the instrument towards the X Y directions Indication of the inclination of the X Y directions may not be consistent when this instrument is mounted on an unstable st...

Page 34: ...l is set at 6 The amount of dislocation will not be displayed when the bubble is beyond the line 3 Press OK The Tilt Setting icon is switched OFF OK It is correctable by using the tilt correction function NG It is not correctable by using the correction function OFF The tilt correction function is turned off ...

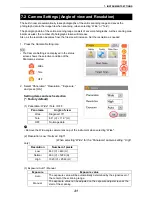
Page 35: ... selected 2 Select Panorama Resolution Exposure and press OK Setting items and each selection Factory default 1 Panorama Wide Tele OFF Remove the Wide angle camera lens cap of the instrument when selecting Wide 2 Resolution Low Normal High When selecting Wide for the Panorama camera setting High only 3 Exposure Auto Manual 7 2 Camera Settings Angle of view and Resolution Panorama Angle of view Wid...

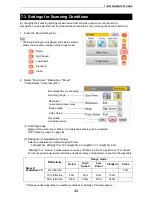
Page 36: ...ned value Select a predetermined resolution listed below 50mm 10m 25mm 10m 12 5mm 10m 6 3mm 10m 3 1mm 10m Edit 50mm 10 m means a measurement accuracy of 50mm in pitch at a position of 10 m ahead For the range of measurement distance and the accuracy of measurement see the following table 1 Range varies depending on weather conditions or stability of the atmosphere 7 3 Settings for Scanning Conditi...

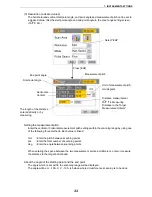
Page 37: ...r the total number of scanning points deg Enter the angle between scanning points When entering the space between the two measurement points in millimeters enter or measure the distance to the target beforehand About the angle of the starting point and the end point The angle which is set within the scanning range will be displayed The angle will be H 180 0 V 135 45 when whole circumference scanni...

Page 38: ...strument is measured 5 Pulse select When the target measurement objects are in the foreground and background as shown below the distance of either object can be measured by changing the pulse selection Depending on the reflection ratio of or the distance between the target measurement objects it might not be possible to measure the target even by switching from first to last or vice versa Range mo...

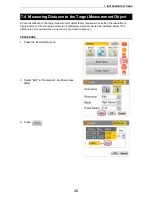
Page 39: ...tion a desired value of the scanning parameter in millimeters will be measured as indicated below The distance is not required when using the unit of points or degrees PROCEDURE 1 Press the Scan Setting icon 2 Select Edit in Resolution and then press Edit 3 Press 7 4 Measuring Distance to the Target Measurement Object ...

Page 40: ...splayed around the middle of the screen While doing this the horizontally rotating part and the turn of the scanner unit will be locked To unlock turn the horizontally rotating part or the scanner unit manually 5 Press Meas 6 The scanning distance is displayed 20 1m Press OK This function confirms rough distance and is not for measuring accurate distance to the target Do not use a prism or a targe...

Page 41: ...NFIGURATION SCREEN Press the Config icon to enter the Config mode The following illustrates the flow of the configuration screen Parameter Temp Press Prism Tilt 0 Set PC offset PL offset Press the Config icon EDM Settings ...

Page 42: ...38 8 FLOW OF THE CONFIGURATION SCREEN Back Light LCD Sound Units Unit Coord Sound Time Date Calib Date Time Date ...

Page 43: ...CEDURE 1 Press the Config icon 2 Press EDM Settings 3 Press Temp Press 4 Enter the temperature and atmospheric pressure and then press OK Temperature 10 C to 50 C increments of 0 1 C Default setting 20 C Atmospheric pressure 560 hPa to 1066 0 hPa increments of 0 1 hPa Default setting 1013 0 hPa 8 1 Setting Temperature and Atmospheric Pressure ...

Page 44: ...hoose ON OFF of the flash light and then press OK When the target scanning is started after the flash light is set to ON and the instrument is set to use the prism a white spot beam will be emitted from the scanner unit to detect the position of the prism Prism Constant 99 mm to 99 mm Default setting 0 mm Flashlight ON OFF Default setting OFF 8 2 Setting the Prism Constant and Flash Light ...

Page 45: ...e in the measurement data Setting example Date July 11 2014 Time 12 00 PROCEDURE 1 Press the Config icon 2 Press Time Date 3 Press Time Date 4 Tap the value that you want to change and use the up and down arrows to set the date and time and press OK 8 3 Setting the Date and Time ...

Page 46: ... distance and angle can be displayed We recommend performing the precision calibration again within one year from the last calibration date PROCEDURE 1 Press the Config icon 2 Select Time Date 3 Select Calib Date 4 Press OK The last calibration date will be displayed 8 4 Displaying the Last Calibration Date ...

Page 47: ...display section in the evening or in a tunnel The level of backlight brightness can be adjusted from OFF to 10 PROCEDURE 1 Press the Config icon 2 Press LCD 3 Press Back Light 4 Adjust the brightness using the slider and then press OK 8 5 Adjusting the Brightness of the Display Section ...

Page 48: ...CREEN The volume of the sound which can be heard from this instrument can be adjusted as follows PROCEDURE 1 Press the Config icon 2 Press Sound 3 Press Sound 4 Adjust the volume with a slider and then press OK 8 6 Setting the Volume ...

Page 49: ...EDURE 1 Press the Config icon 2 Press Units 3 Press Unit 4 Select the units for Temperature Pressure Distance and Angle Items set and options Factory setting Temperature celsius fahrenheit Pressure hPa mmHg inHg Distance m ft us ft NT Angle deg gon 8 7 Selecting the Unit ...

Page 50: ... SCREEN Select the coordinate system ENH or NEH as follows PROCEDURE 1 Press the Config icon 2 Press Units 3 Press Coord 4 Select the coordinate system ENH or NEH and then press OK Factory setting 8 8 Selecting the Coordinate System ...

Page 51: ... format of the file to CSV when saving it 8 9 Handling the Coordinate Point File Items Conditions for creation CSV file A CSV file is comma delimited and records fields in the following order coordinate point name E N H X Y Z Example pt 01 1105 494 1069 231 6 6 pt 02 1110 989 1088 461 7 2 pt 03 1116 483 1107 691 7 8 Save the CSV file in the highest hierarchy in the SD card If the file is saved in ...

Page 52: ...tUp icon 2 Press of the OCC name or BS name window 3 Press List Import 4 Select the CSV file you wish to import and then press OK The CSV file has been imported The data of the coordinate point that is already imported into the instrument will be erased when the data of the coordinate point in another CSV file is added ...

Page 53: ... the OCC name or BS name window 3 Press List Clear to delete the coordinate list The coordinate list will be deleted The coordinate list stored in the instrument will be erased However the coordinate list stored on an SD card will not be affected Thus it is possible to read the coordinate list again from the SD card ...

Page 54: ... trg file format Camera orientation calibration data binEXT file format SCN0002 Scan data folder STA0002 Station information file sta file format Point cloud file of back sight clt file format 3D coordinate of back sight trg file format Camera orientation calibration data binEXT file format STA0021 Station information file sta file format Point cloud file of back sight clt file format 3D coordinat...

Page 55: ...tation data folder SCN0001 Scan data folder TAR0001 Target data folder Station information file sta file format Point cloud file of back sight clt file format 3D coordinate of back sight trg file format Camera orientation calibration data binEXT file format SCN0002 Scan data folder Point cloud file clr file format JPEG file e g 0000 jpg 0001 jpg Angle file e g 0000 ang 0001 ang Tilt orientation fi...

Page 56: ...on example Set the station name as STA0002 6 8 Entering Numeric and Alphabetic Characters PROCEDURE 1 Press 2 Enter the station name Example STA0002 and then press Ent to create the station Station0002 is set 9 1 Creating a New Station ...

Page 57: ... the occupied point name and the backsight point name from the coordinate list For the import method of coordinate lists 8 9 Handling the Coordinate Point File For target scanning 10 1 Target Scanning PROCEDURE Setting the occupied point name 1 Press the SetUp icon 2 Press of the OCC name window to display the coordinate list 3 Select a coordinate point that you want to set as the occupied point f...

Page 58: ...does not turn on 6 As shown in the image to the right place the target for instrument height on the survey point 7 Press Meas The instrument height will be entered automatically If Meas is pressed in step 5 the instrument height will be measured without displaying the survey point The screen shown in step 8 Target for measuring instrument height Survey point ...

Page 59: ...tor on top of the screen For details of setting ScnAng and HR 10 1 Target Scanning 11 Press to switch the camera to Tele and tap the target at the backsight point Explanation of the buttons on page 61 The instrument will automatically turn to the object which will be displayed around the middle of the screen While doing this the horizontally rotating part and the turn of the scanner unit will be l...

Page 60: ...t the backsight point name and the backsight coordinate will be stored Press OK in the confirmation message window Only the prism or the target sheet for Topcon s GLS 2000 1500 can be used as the target The target sheet used varies depending on the scanning distance 6 9 Preparing the Target ...

Page 61: ...oint Configuration example Configure the settings as follows Occupied point name OCC 1 Instrument height 1 5m depending on the measurement result Backsight point name BACK 1 PROCEDURE 1 Press the SetUp icon 2 Tap on the occupied point name input editor and then enter the occupied point name 3 Press and then press Meas to measure the instrument height Instrument height IH can also be entered direct...

Page 62: ...the horizontally rotating part and the turn of the scanner unit will be locked To unlock turn the horizontally rotating part or the scanner unit manually 7 Press Start Start Stop scan key or collimating position setting key Sometimes Internal calibration Please wait is displayed When is pressed it will take a while to stop Scanning results will be displayed 8 Press OK The instrument height the bac...

Page 63: ...he 3D data First determine the scanning range and then set parameters for the resolution of scanning The name of the folder will be the same as that of the station which has been set STA0001 Station data folder SCN0001 Scan data folder Station information file sta file format Point cloud file of back sight clt file format 3D coordinate of back sight trg file format Camera orientation calibration d...

Page 64: ...of the data at least three sets of common target scanned data are required Place the target on three or more positions that can be collimated from each station 3D data cannot be obtained from the positions where the target sheet is stuck Avoid sticking the sheet on an important scanning position Do not stick the target sheet in a straight line Secure a wide range for 3D scanning to stick target sh...

Page 65: ...scan key or collimating position setting key Example Target name pt01 ScanAng 2 HR 1 m Recommended search width setting on page 63 Setting the target height on page 63 Make sure to select the target according to the target object Target scanning is in progress Sometimes Internal calibration Please wait is displayed When is pressed it will take a while to stop Target name Zoom in or out of the imag...

Page 66: ...G SCANNING 4 The scanning results will be displayed Check the scanning range and then press OK You will return to the main menu 5 Similarly perform steps 1 to 4 until the completion of target scanning the target pt06 ...

Page 67: ...ing point by entering the target height Set the target height as follows Distance to the scanning target m Search width degrees Target sheet 2 5 2 5 Small 5 10 1 0 Small 10 20 1 0 Small medium 20 50 0 5 Small medium large 50 100 0 5 Medium large 100 200 0 5 Large Target Distance to the scanning target m Size m Target sheet Large 50 200 0 12 Target sheet Medium 10 100 0 06 Target sheet Small 2 50 0...

Page 68: ... There are two types of 3D scanning range setting scanning and whole circumference scanning Remove the handle when scanning around the zenith or the whole circumference Range setting scanning Scan the target by setting the range as illustrated below To set the range determine the left top and right bottom of the range that you want to scan by collimating The built in camera takes photographs of th...

Page 69: ...d To unlock turn the horizontally rotating part or the scanner unit manually 5 Confirm the position and then press OK When performing scanning indoors or in a dark place the collimating position can be confirmed precisely by turning the laser pointer ON 6 Rotate the instrument tap the right bottom of the scanning range on the center of the screen While doing this the horizontally rotating part and...

Page 70: ...s the Start Scan button When Manual is chosen for Exposure of camera settings move the exposure value slider and adjust the brightness 7 2 Camera Settings Angle of view and Resolution 11 Press OK The status is indicated by the progress bar Sometimes Internal calibration Please wait is displayed When is pressed it will take a while to stop Exposure value slider ...

Page 71: ...67 10 MEASURING SCANNING 12 The scanning results will be displayed Check the scanning range and then press OK ...

Page 72: ... 3D whole circumference scanning PROCEDURE 1 Press the Scan Setting icon 2 Press 3 Perform the scan setting For details of the setting items and the procedure 7 3 Settings for Scanning Conditions 4 Press OK 5 Press the Start Scan button ...

Page 73: ...mera settings move the exposure value slider and adjust the brightness 6 Press OK Sometimes Internal calibration Please wait is displayed When is pressed it will take a while to stop 7 The scanning results will be displayed Check the scanning range and then press OK ...

Page 74: ...NG The following describes how to view data saved on the SD card PROCEDURE 1 Press the Data View icon 2 Select the data you want to view and press Open Bitmap and JPEG data can be displayed 10 3 View the Data on the SD Card ...

Page 75: ...regularly If the bubble in the circular level is deviated during the leveling follow the below steps to adjust PROCEDURE Checking and adjusting 1 Remove the tribrach from the instrument 2 Install the adjusted instrument such as a total station and a theodolite to the tribrach 3 Level the instrument while looking at the plate level If the bubble in the circular level of the tribrach is not deviated...

Page 76: ...sor Firmly set the instrument on the stable board before adjusting PROCEDURE Adjustment 1 Press the Config icon 2 Press Parameter 3 Press Tilt 0 set 4 Level the instrument to within 30 arcseconds 5 Press Start The instrument will be automatically inverted 6 Press OK Adjusting the tilt sensor is complete 11 2 Tilt Sensor Calibration ...

Page 77: ...to center the instrument This adjusts the alignment of the laser plummet beam and the center position of the instrument PROCEDURE Checking and adjusting 1 Carefully level the instrument 2 Press the Config icon 3 Press Parameter 4 Press PL offset 11 3 Aligning the Laser Plummet Beam with the Instrument Center ...

Page 78: ... precisely While doing this the turn of the scanner unit will be locked To unlock turn the scanner unit manually 8 Press OK Adjusting the laser plummet is complete Press to turn the laser plummet off and then the image captured by the camera will be displayed Adjust the instrument carefully since this adjustment might cause an error while measuring the instrument height When the laser beam keeps d...

Page 79: ...s to align the survey point and the center of the displayed image after aligning the center position of the instrument and the survey point PROCEDURE Adjustment 1 Carefully level the instrument 2 Press the Config icon 3 Press Parameter 4 Press PC offset 11 4 Aligning the Center of the Instrument and that of the Image ...

Page 80: ...cross hairs near the survey point 6 Use the directional buttons at the left right top and bottom to align the cross hairs with the survey point precisely Press OK after the adjustment is complete 7 Press to turn the laser plummet on and display the leveling screen ...

Page 81: ...eriods battery capacity deteriorates with the passage of time This may result in the operating time of the battery shortening despite having been charged correctly In this event a new battery is required Batteries generate power using a chemical reaction and as a result have a limited lifetime Even when in storage and not used for long periods battery capacity deteriorates with the passage of time...

Page 82: ...f when the charger is outside the charging temperature range or when the battery is mounted incorrectly If the lamp is still off after the charger falls within its charging temperature range and the battery is mounted again contact your local dealer steps 2 and 3 Charging time per battery at 25 C BDC70 about 5 5 hours At a low or high temperature it may take longer than stated This instrument can ...

Page 83: ...79 13 HOW TO STORE After using the instrument store it as shown below Power cable SD card Target for measuring instrument height Battery BDC70 GLS 2000 Battery charger CDC68A Battery BDC70 Tool pouch ...

Page 84: ...get sheets for GLS 2000 Select the target sheet based on the scanning distance Target sheet Magnet type Large Middle Small Target sheets for GLS 2000 Select the target sheet based on the scanning distance Tilting 1P unit W8 Prism adapter Plug Power cable PC 26 Target board Large Target board Small Target sheet Large Target sheet Middle Target sheet Small Target sheet Large Magnet type Target sheet...

Page 85: ...ication Error code XXXX 7000 s 8000 s 9000 s An error occurred during internal data transfer Turn the power off and restart If the error persists have the instrument repaired Ranging unit Error code XXXX 2000 s 3000 s An error occurred in the laser beam emitting system Tilt unit Error code XXXX 6000 s Failed to communicate with the tilt controller Servo unit Error code XXXX 4000 s An error occurre...

Page 86: ...inserted correctly If the error persists format the card using a PC with the SD format tool pro vided by the SD Association on the web Download from https www sdcard org jp downloads formatter_4 If the SD card cannot be format ted using this tool the SD card may be broken Use another SD card If the second SD card can not be formatted have the instrument repaired This file can t open A file other t...

Page 87: ...surement Battery Battery Low The battery is low Or the battery may become depleted while scanning Replace with fully charged batteries Coordinate point import Can not find data Please start over Displayed when there is no usable data stored in the selected CSV file Confirm the content of the selected CSV file No coordinates are selected Please import csv file Displayed when you attempt to import a...

Page 88: ...oint increment Minimum of 3 1 mm at 10 m Maximum point number V 15 202 points Line H 20 268 points Field of view Per scan Horizontal 360 maximum Vertical 270 maximum Laser Laser class Class3R IEC EN60825 1 Distance measurement laser 50 mW or less for measuring the range of 1064 nm invisible Laser pointer 1 mW or less for measuring the range of 639 nm Target scan Target sheet Size 0 03m Distance to...

Page 89: ...changed Display Type TFT LCD 3 5 VGA with a touch panel Card slot Type SD card Standard Supporting SD SDHC memory card SD 6MB sec SDHC Class 6 or greater is required Number of slots 1 Sensitivity of levels Circular level 10 2 mm Electronic Circular levels Graphic display range 6 inner circle Digital display range 6 30 Plummet Laser Laser class Class3R IEC EN60825 1 Laser plummet 1 mW or less for m...
Page 90: ...ing time per battery at 25 C BDC70 about 5 5 hours Charging can take longer than the times stated above when temperatures are either especially high or low Charging temperature range 0 to 40 C Storage temperature range 20 to 65 C Size 94 W 102 D 36 H mm Weight about 170 g ...

Page 91: ...17 REGULATIONS Region Country Directives Regulations Labels Declarations California U S A Proposition 65 California U S A Perchlorate Material CR Lithium Battery California and NY U S A Recycling Batteries ...

Page 92: ...lies with IC radiation exposure limits set forth for uncontrolled equipment and meets RSS 102 of the IC radio frequency RF Exposure rules This equipment should be installed and operated with at least 20cm and more between the radiator and person s body excluding extremities hands wrists feet and ankles EU EMC Class B EU R TTE Class 1 R TTE Directive GLS 2000 Hereby TOPCON CORP declares that the ab...

Page 93: ...89 17 REGULATIONS EU EU Battery Directive Region Country Directives Regulations Labels Declarations ...

Page 94: ...http www topcon co jp GLOBAL GATEWAY http global topcon com Please see the attached address list or the following website for contact addresses 2014 TOPCON CORPORATION ALL RIGHTS RESERVED ...

Reviews: