17-5
17 CHECK AND ADJUSTMENT
17.2.2Checking the optical axis of Laser pointer
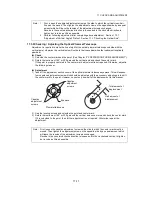
Check whether the optical axis of the laser pointer coincides with the optical axis of the telescope by
carrying out the following steps.
1) On the center of a piece of graph paper or white paper, draw a target in the form of a vertical line
and an intersecting horizontal line.
2) Set up the target about 10 meters from the GPT-3000W, and collimate the GPT-3000W to the point
of intersection of the two lines.
3) Turn on power to the GPT-3000W, press the star key mode, and then press the L. P. key, lighting up
the laser pointer.
●
Checking of laser pointer's optical axis
4) With the GPT-3000W collimated to the point of intersection of the two lines, check whether the
center of the laser pointer is within about 6 mm of the point of intersection.
5) If the center of the laser pointer is within about 6 mm of the point of intersection, there will be no
problems with using the GPT-3000W. If the distance is greater than 6 mm, carry out the following
steps to align the center of the laser pointer with the point of intersection, and to align the laser
pointer's optical axis with that of the telescope.
●
Adjusting the laser pointer's optical axis
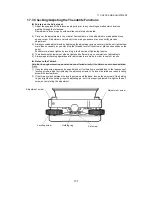
6) As shown in the drawing, remove the 3 rubber caps on top of the instrument, revealing the
adjustment screws.
7) Using the accessory hexagonal wrench, adjust each of the screws - A, B and C - thereby moving
the laser pointer so that it coincides with the point of intersection.
e:
The laser pointer indicates the approximate collimation position of the telescope. It does not indicate
the exact collimation position.
Therefore, it is not failure of the GPT-3000W although it may shift to 6mm by the optical axis and
laser point
on
the target about 10 meters from the GPT-3000W
.
Target
About10m
Note:
If you look through the telescope at this time, you will not be able to see the laser pointer.
Therefore, conduct this check with the naked eye, viewing the target and the laser pointer
from the side of, or from above, the GPT-3000W.
Summary of Contents for GPT-3000W Series
Page 2: ......
Page 140: ...12 4 12 SETTING ATMOSPHERIC CORRECTION...
Page 141: ...12 5 12 SETTING ATMOSPHERIC CORRECTION...
Page 181: ...APPENDIX 5...
Page 183: ......


