background image


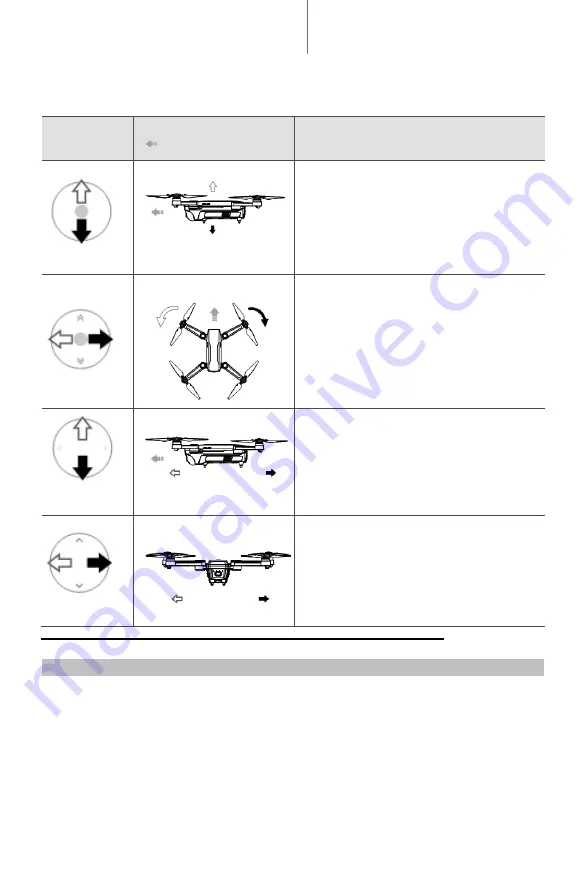
The figure below explains how to use each control stick, using Mode 2 as an example. 


Remote 

Controller 

(Mode 2) 

Aircraft 

Indicates Nose Direction) 


Remarks 


Left Joystick 


Moving  the  left  stick  up  or  down  changes  the 
aircraft’s altitude. Push the stick up to ascend and 
down to descend. The more the stick is pushed 
away  from  the  center  position,  the  faster  the 

aircraft  will  change  altitude.  Always  push  the 
stick  gently  to  prevent  sudden  and  unexpected 

changes in altitude. 


Left Joystick 


Moving the left stick to the left or right controls  the 
orientation of the aircraft. Push the stick left to rotate the 
aircraft counter-clockwise and right to rotate the aircraft 
clockwise. The more the stick is pushed away from the 
center position, the faster the aircraft will rotate. 


Right Joystick 


Moving  the  right  stick  up  and  down  changes  the 
aircraft’s pitch. Push the stick up to fly forward and 
down to fly backward. The more the stick is pushed 
away  from  the  center  position,  the  faster  the 
aircraft will move. 


Right Joystick 


Moving  the  right  stick  to  the  left  or  right  changes  the 
aircraft’s roll. Push the stick left to fly left and right to fly 
right. The more the stick is pushed away from the 
center position, the faster the aircraft will move. 


 Linking the Remote Controller 


Remote controllers that are bought together with an aircraft are linked before shipment. To link a remote 
controller to an aircraft, follow the instructions below: 

1.  Power on the aircraft and the remote controller. 
2.  Push controller switch to the front, then press top left/right button of remote controller at the same 

time. 

3.  Select 

“Connect to the Aircraft’s Wi-Fi” and “Wired Connection”. And then select “Linking the remote controller”. 

4.  Release the button upon the Front LEDs blink. 

Summary of Contents for TE-F360

Page 1: ...TE F360 UserManual ...

Page 2: ...s Indicator 6 Return to Home 7 Propellers 8 Intelligent Flight Battery 9 Camera 10 Remote Controller 11 Using the Remote Controller 12 Linking the Remote Controller 15 Optimal Transmission Zone 16 TOPEUAV App 17 Overview of Menu Page 17 Intelligent Flight Modes 18 Flight 23 Flight Environment Requirements 23 Flight Limits and GEO Zones 24 Calibrating the Compass 24 Preflight Checklist 24 Test Flig...

Page 3: ...recommend that you watch all tutorial videos and read the Disclaimer and Safety Guidelines before you fly Prepare for your first flight by reviewing the Quick Start Guide and refer to TE F360 User Manual for more details Download the TOPEUAV App Scan to download TOPEUAV APP TOPEUAV APP supports IOS 9 0 and Android 4 4 or later versions Video Tutorials Please go to the TOPEUAV App to watch the tuto...

Page 4: ...s 1080P HD video and takes HD photos with double anti shock structure camera Flying time is about 25 minutes The next generation flight controller has been updated to provide a safer more reliable flight experience The aircraftisabletoautomaticallyreturntoitsHomePointwhentheremotecontrol signal is lost or the battery level is low As well as being able to hover indoors at low altitudes the aircraft...

Page 5: ...Switch Battery Preparation Please charge to activate intelligent flight battery before using for the first time Activate the Intelligent Flight Battery Use the provided charger to charge and activate the battery for the first time It is recommended to fully charge the battery before each flight The TE F360 aircraft contains a flight controller video downlink system propulsion system and an Intelli...

Page 6: ...has no obstacles When using GPS satellite signal or compass the aircraft is vulnerable to external interference If interference occurs please use the manual mode to control the aircraft or land as soon as possible in a safe location to avoid accidents At the same time when using GPS satellite signal avoid narrow flight areas or areas with obstacles to avoid flight accidents Aircraft LEDs and Statu...

Page 7: ... Smart RTH Remote controller can exit Smart RTH with the following operations Push to lowest grade if the switch on controller is not in lowest grade then push to middle or highest grade user can re control the aircraft once exiting Smart RTH Users can also use left right joystick to control which indicates Smart RTH exit Low Battery RTH Low BatteryRTH istriggeredwhen the Intelligent Flight Batter...

Page 8: ...eless signal connection is reestablished RTH Procedure 1 Home Point is recorded automatically 2 RTH procedure is triggered 3 Home Point is confirmed and the aircraft adjusts its orientation 4 The aircraft rises to the RTH altitude when RTH procedure starts If the current altitude is higher than the RTH altitude the aircraft maintains current altitude to returns directly RTH Procedure as following ...

Page 9: ...arks For example the forward rotating propellers include two pieces of type 8330R A or two pieces of 8330R B blades The reverse propellers include two pieces of 8330L A or two pieces of 8330L B blades The propellers are consumable items Please purchase separately if necessary Ensurethatthepropellersandmotorsareinstalledfirmlyandcorrectlybeforeeachflight Ensurethat all propellersareingood condition...

Page 10: ... Batteries cannot be used in extremely low temperature 0 C environments 3 To ensure optimal performance of the battery keep the battery temperature above 5 C 20 C is recommended Checking Battery Level ThebatterylevelLEDsonthebatterydisplayhowmuchchargeremains Ifthebatteryisturnedoff press thePowerbutton onceandthebatterylevelLEDswilllightuptodisplaythecurrentbatterylevel Charging the Battery The I...

Page 11: ...thestabilityofthecamera system single videorecordingsarecappedat30 minutes Micro USB interface The Micro USB interface is only used for software and firmware upgrades not for charging Remote Controller TE F360 remote controller features a brand new amplified 2 4G signal transmission system capable of controlling the aircraft and the gimbal camera at a maximum transmission range of 1KM The remote c...

Page 12: ...Rights Reserved 12 Using the Remote Controller Turning the Remote Controller On and Off Press the Power button once to check the current battery level Press once then again and hold 3 seconds to turn the remote controller on or off ...

Page 13: ...to the AC power adapter then plug the USB adapter into the Charging Main Video Link port on the remote controller It takes approximately two hours to fully charge the remote controller battery Controlling the Aircraft The remote controller s control sticks are configured for JP mode Mode 1 and US mode as following ...

Page 14: ...TE F360 User Manual TOPE All Rights Reserved 14 ...

Page 15: ...tate Right Joystick Moving the right stick up and down changes the aircraft s pitch Push the stick up to fly forward and down to fly backward The more the stick is pushed away from the center position the faster the aircraft will move Right Joystick Moving the right stick to the left or right changes the aircraft s roll Push the stick left to fly left and right to fly right The more the stick is p...

Page 16: ...gnal lights turn on then release all buttons At this time the remote controller will make audio sounds US hand mode is indicated with one beep and JP hand mode is indicated with two beeps At the same time the four lights flash slowly and then flash quickly and the power indicator remains on after the flash is over which means the switch has completed successfully Note The joystick cannot be touche...

Page 17: ...g your aircraft and editing and sharing your photos and videos with others Overview of Menu Page Enter Camera View by tapping the GO FLY icon on the Equipment page when Wi Fi of the aircraft is connected Camera View 1 System Status Bar READY TO GO GPS This icon indicates aircraft flight status and displays various warning messages 2 Flight Mode The text next to this icon indicates the current flig...

Page 18: ...eview Photo Video Check the photos videos that have been recorded 11 Flight Telemetry D M Distance between the aircraft and the Home Point H M HeightfromtheHomePoint H S M S Aircraft horizontal speed V S M S Aircraft verticalspeed 12 Flight Map Click to open flight map which can be downloaded during internet connected status 13 Flight Speed Level Control flexibility of joysticks 14 Smart RTH Tap t...

Page 19: ...d keep tracking the point together over a certain distance GPS signal must be stable during the active track Using Active Track Ensure the Intelligent Flight Battery is fully charged and the aircraft is in GPS Mode Follow the steps below to use Active Track 1 Take off and hover at least 3 m above ground 2 Tap in TOPEUAV APP to bring up the intelligent flight modes 3 Tap to start active track The a...

Page 20: ...UAV APP The aircraft will travel to that point at your current altitude then hover in place 1 Ensure the Intelligent Flight Battery is fully charged and the aircraft is in GPS Mode Take off and ensure the aircraft is hovering at least 10m above ground 2 Tap in TOPEUAV APP to bring up Intelligent Flight Mode 3 Tap to start Tap Fly Aircraft will fly to the target automatically and hover after confir...

Page 21: ...the Intelligent Flight Battery is fully charged and the aircraft is in GPS Mode Take off and ensure the aircraft is hovering at least 10m above ground 2 Tap in TOPEUAV APP to bring up Intelligent Flight Mode 3 Tap to start Point of Interest mode The aircraft will set current position as a subject and circle radius is set by the front rear left and right joysticks The radius of the aircraft is not ...

Page 22: ...1 Camera of aircraft focuses on people that make gesture and make sure upper body or whole person is in capture range 2 Tap in TOPEUAV APP to bring up Intelligent Flight Mode 3 Tap to start Gesture mode to take selfies 4 Take Photos by Gesture Make a V gesture with one hand Once your selfie gesture has been recognized a three second countdown will begin with three audio beeps A photo will be autom...

Page 23: ...ommended that you use the flight simulator to hone your flight skills and practice flying safely Ensure that all flights are carried out in an open area The flying height is limited to 120 m DO NOT exceed the safe height Make sure to read the TE F360 Disclaimer and Safety Guidelines beforeyou fly Flight Environment Requirements 1 Do not use the aircraft in severe weather conditions These include w...

Page 24: ...ontroller push throttle joystick to the bottom push front and rear joystick to the top and release all joysticks until front indicator alternate yellow and green fast flashing Grab the rear of the aircraft and turn it clockwise 5 times or more Calibration is complete once indicator turns to red slow flashing Preflight Checklist 1 Ensure the remote control device smart device and Intelligent Flight...

Page 25: ...ombination Stick Command CSC is used to start the motors Push both sticks to the bottom inner or outer corners to start the motors Once the motors have started spinning release both sticks simultaneously OR b Pull throttle slowly to the aircraft to rise Auto Takeoff The aircraft can takeoff automatically using TOPEUAV APP or by remote controller Auto takeoff in TOPEUAV APP Tap icon motor starts au...

Page 26: ...d motor stops automatically 7 Turn off the aircraft and remote controller Video Suggestions and Tips 1 Go through the full pre flight checklist before each flight 2 Only take photo shoot video when flying in safe flight status 3 Always fly in good weather and avoid flying in rain or heavy wind 4 Perform flight tests to establish flight routes and preview scenes 5 Push the control sticks gently to ...

Page 27: ...TE F360 User Manual TOPE All Rights Reserved 27 Appendix Specifications This content is subject to change without any notification Copyright TOPE All Rights Reserved ...

Reviews: