background image

20 

Without a properly installed safety reversal system, person (particularly small children) could be SERIOUSLY INJURED 

or KILLED by a closing gate. 

*Too much force on gate will interfere with proper operation of safety reversal system. 

*NEVER increase force beyond minimum amount required to close gate. 

*NEVER use force adjustments to compensate for a binding or sticking gate. 

* If one control (force or travel limits) is adjusted, the other control may also need adjustment. 

* After ANY adjustments are made, the safety reversal system MUST be tested. Gate MUST BE TESTED. Gate MUST 

reverse on contact with a rigid object. 

The  opener  is  equipped  with  an  obstruction  sensing  feature.  If  the  gate  encounters  an  obstruction  the  opener  will 

automatically reverse direction and stop. Based on the length and weight of the gate it may be necessary to make force 

adjustments.  The  force adjustment  should be high  enough  that small  objects  such  as  branches or  wind  will  not cause 

nuisance interruptions but low enough to prevent serious injury to a person or a vehicle. 

Press  the 

“FUNC”  button  to  store  the  data  when  the  master/slave  gate  is  chosen.  The  Digital  Display  will 

indicate 

“P3”. Now Master/Slave Gate Set is finished.   

(Factory set is 

“01”) 

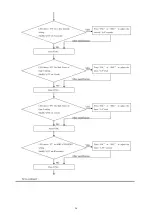
4.  Set the Open Interval between Master and Slave Gate 

When the Digital Display indicates 

“P3”, the gate opener is on the Open Interval between Master/Slave Gate 

Setting. 

The open interval can be adjusted by pressing the 

“INC” and “DEC” Buttons respectively. The Digital Display 

will show 

“0”-“9”, which indicates the interval time “0” means the Master and Slave gates open simultaneously. 

“1” means the Master Gate starts to open 1 second before Slave gate starts to open. Max. open interval is 9 
seconds.  Each  time  you  press  and  release  the 

“INC” button, the figure increases by 1, and the Master gate 

starts to open 1 more second earlier. Each time you press and release the 

“DEC” button, the figure decreases 

by 1, and the interval decreases by 1 second. 

(Factory set is 3 seconds) 

Press the 

“FUNC” button to store the data when the open interval is set. The Digital Display will indicate “P4”. 

Now Open Interval Set is finished. 

5.  Set the Close Interval between Master and Slave Gate   

When the Digital Display indicates 

“P4”, the gate opener is on the Close Interval between Master/Slave Gate 

Setting. 

The close interval can be adjusted by pressing the 

“INC” and “DEC” buttons respectively. The Digital Display 

will  show 

“0”-“9”,  which  indicates  the  interval  time  ”0”  means  the  Master  and  Slave  gates  close 

simultaneously. 

”1” means the Slave Gate starts to close 1 second before Master gate starts to close. Maximum 

close interval is 9 seconds. Each time you press and release the 

“INC” button, the figure increases by 1, and the 

Slave gate starts to close 1 more second earlier. Each time you press and release the 

“DEC” button, the figure 

decreases by 1, and the interval decreases by 1 second. 

(Factory set is 3 seconds) 

Press the 

“FUNC” button to store the data when the close interval is set. The Digital Display will indicate “P5”. 

Now Close Interval Set is finished. 

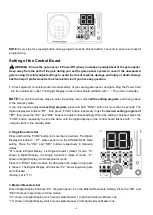
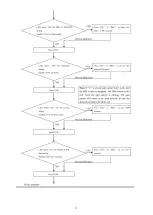
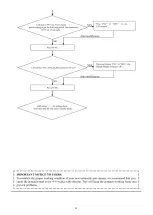
6.  Adjust the Obstruction Sensitivity/Stall Force 


When the Digital Display indicates 

“P5”, the gate opener is on the Stall Force Adjustment. 


6-a Adjust Stall Force of Gate Opener 1   

Now we adjust the stall force of gate 1 

The  stall  force  of  gate  opener1  is  adjusted  by  pressing 

“INC”  and  “DEC”  buttons  respectively.  The  Digital 

Display  will  show 

“1”-“9” which indicates the stall force levels. “1” means the minimum force, and “9” is the 

maximum  force.  Each  time  you  press  and  release the 

“INC” button, the figure increase by 1, and the force 

increases to a higher level. Each time you press and release the 

“DEC” button, the figure decreases by 1, and 

the force decreases to a  lower level. Press 

“FUNC” to store the data. The Digital Display will indicate “P6”. 

Summary of Contents for KD902

Page 1: ...ens com VER 21a KD902 Please read and follow all warnings precautions and instructions before installation and use Never connect the solar panel to the control board directly to charge the battery Per...

Page 2: ...n ca Amazon co uk Amazon de Other Please Specify Order Product Model Purchase Date Full Name Phone Email Address VERY IMPORTANT Street Address Apartment Unit City State Province Zip Code Country Regio...

Page 3: ...for Pull to Open 7 Install the Opener on the Gate for Push to Open 10 Mounting the Control Box 13 Connection of the Power Supply 14 Connecting of the Control Board 15 Motor connection for PUSH TO OPE...

Page 4: ...l be located such that persons will not come in contact with the moving vehicular gate 8 Pedestrians should never cross the pathway of a moving gate The gate opener is not acceptable for use on any pe...

Page 5: ...gate and keep all controls out of their reach NOTE TOPENS Gate Operator can be used for driveway gates made by steel wood vinyl and shaped as panel tube and chain link While use on solid surface gate...

Page 6: ...3 KD902 Parts List Accessories Parts Included in some models refers to the actual package...

Page 7: ...k TRF3 Reflection Photocell Sensor TC102 Photo Eye Beam Sensor JD24VY 24V Warning Light TSP30W 30W Solar Panel Charging Kit TCS3 Solar Charge Controller 25FT Extension 5 Conductor Cable Replacement Pa...

Page 8: ...re subject to change without notice Features Soft start and soft stop Emergency release key in case of power failure Dual Single gate running mode Adjustable opening closing interval between master an...

Page 9: ...ation Overview Pull to Open Gates Important The second gate opener cable should be put into the PVC conduit not provided which is buried underground This protects the cable from lawn mowers and string...

Page 10: ...er size washer or metal plate should be used between the bolts and the wooden post to ensure the stability of the fastening hardware If the post is smaller than 6 diameter or square it should be made...

Page 11: ...he opener fully retracted and with the gate in the fully open position for Pull to Open installation place the opener with the Post Bracket Assy and Gate Bracket on the gate post and the gate While ho...

Page 12: ...gate post Fasten each bolt with one 10 washer one 10 lock washer and one 10 nut 9 Attach the gate brackets to each gate by inserting two M10 x 75 bolts through the gate brackets and the drilled holes...

Page 13: ...en The position of Post Bracket is very important The following illustrations and tables are required to determine the proper mounting position for the Post Bracket The tables show the maximum opening...

Page 14: ...erclockwise 4 With the opener fully retracted and with the gate in the fully closed position for Push to Open installation place the opener with the Post Bracket Assy and Gate Bracket on the gate post...

Page 15: ...gate post Fasten each bolt with one 10 washer one 10 lock washer and one 10 nut 9 Attach the gate brackets to each gate by inserting two M10 x 75 bolts through the gate brackets and the drilled holes...

Page 16: ...es above the ground to avoid being flooded or buried under snow Step 2 Insert the power cable and cable of the first gate opener through the front strain relief and into the control box by loosening t...

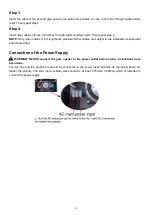
Page 17: ...1 5m length are provided Other cables are subject to site installation requirement and not provided Connection of the Power Supply WARNING NEVER connect the gate opener to the power outlet before all...

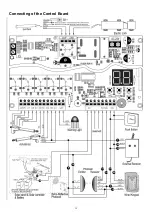
Page 18: ...15 Connecting of the Control Board...

Page 19: ...ow wire into DLT2 terminal NOTE It is recommended that Gate Opener 1 is installed in the Master Gate and Gate Opener 2 is installed in the Slave Gate Warning Light Included in some models refers to th...

Page 20: ...be connected into the 9 terminal Wired Keypad 24VDC optional The RED wire of the wired keypad should be connected into the 9 terminal The BLACK wire of the wired keypad should be connected into the 14...

Page 21: ...tely open stop close stop open 2 Use one remote to operate TOPENS swing gate opener sliding gate opener at the same time All of TOPENS sliding gate opener have midway mode Button B is designed to real...

Page 22: ...Always ask the help of professional technician electrician if you have any question 1 Check again for completed and correct assembly of your swing gate opener and gate Plug the Power Cord into the ne...

Page 23: ...and the Master gate starts to open 1 more second earlier Each time you press and release the DEC button the figure decreases by 1 and the interval decreases by 1 second Factory set is 3 seconds Press...

Page 24: ...indicate P8 Factory default setting is 40 seconds 7 b Adjust the MRT of MOTOR2 When the Digital Display indicates P8 you can adjust the MRT of MOTOR2 Please perform the same procedure as adjusting MOT...

Page 25: ...by yourself from the arm actuator starting to move on the fully open position to the arm arriving at the fully close position how can we get 4 sec of Soft Stop Period SPP to meet the requirement The a...

Page 26: ...y a silicone spray to reduce its friction In cold climates where temperatures reach 1 C 30 F or less spray silicone on the actuator every 4 6 weeks to prevent freeze up 2 Regularly check gate hinges t...

Page 27: ...n cold weather as the gate will not move freely 3 Check if the MRT period is too short Gate opens but does not close 1 Photocell PBS function is enabled in control board setting but is not equipped op...

Page 28: ...25 Quick Setting Guide...

Page 29: ...26...

Page 30: ...27...

Page 31: ...28...

Page 32: ...you have any need to contact us the info below will help you get in touch TOPENS Website www topens com Contact Us E mail support topens com Kindly include your Product Model Purchasing Date Site Ord...

Reviews: