20
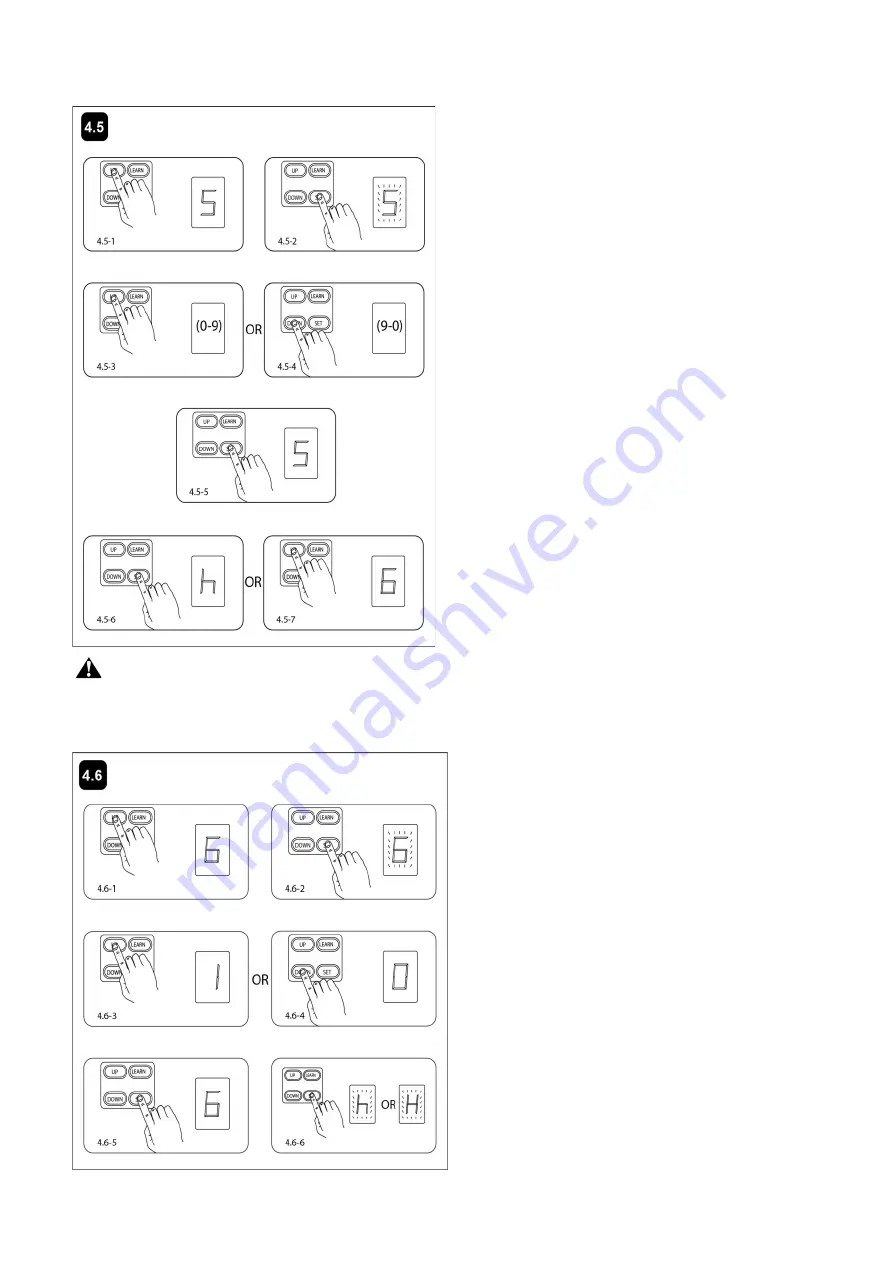
4.5 Setting the Automatic Closing Time
Important Note: When the auto close function is enabled, the photocell sensor is highly recommended to be
installed with the gate opener for safety.
4.6 Set the Safety Photocell Beam (SPB) System (Optional)
1. Press and hold SET button for more than 4 seconds.
The Digital Display indicates “1” (Skip if continuing
Closing Time Set after the Close Force Set is finished).
2. Press UP button and choose figure “5” (Pic.4.5-1).
Press and release SET button. “5” flashes in the Digital
Display (Pic.4.5-2). Now the unit enters into Setting the
Automatic Closing Time.
3. Press and release UP button. “
0
” –“9” flashes in the
Digital Display (default value is “
0
”, Automatic Closing
function is closed) indicating current automatic closing
time (Pic.4.5-3). The minimum time is 1 minute, 9
minutes maximum. Each time press and release UP
button, the figure is bigger by 1, and the timing increases
by 1 minute accordingly. Each time press and release
DOWN button, the figure is smaller by 1, and the timing
decreases by 1 minute accordingly (Pic. 4.5-4). When
the indication is “
0
”, it means the Automatic Closing
function is closed.
4. Press SET button to store the data when desired
Automatic Closing Time is set. “5” glows steadily in the
Digital Display (Pic.4.5-5). The unit is ready for setting
other parameter. Press SET button for seconds till “h”
appears in Digital Display (Pic.4.5-6). Now the Automatic
Closing Time has been set.
1. Press and hold SET button for more than 4 seconds.
The Digital Display indicates “1” (Skip if continuing SPB
Set after the Closing Time Set is finished).
2. Press UP button and choose figure “6” (Pic.4.6-1).
Press and release SET button. “6” flashes in the Digital
Display (Pic.4.6-2). Now the unit enters into Setting the
Safety Photocell Beam (SPB) Function.
3. Press and release UP button. The Digital Display
indicates “1” (SPB is available).(Pig.4.6-3) Press and
release DOWN button. The Digital Display indicates “
0
”
(SPB is null) (Pig.4.6-4).
4. Press SET button to store the data when SPB is set.
“6” glows steadily in the Digital Display. (Pig.4.6-5).The
unit is ready for setting other parameter. Press SET
button for seconds till “H” or “h” appears in Digital
Display (Pig.4.6-6). Now Setting the SPB Function is
finished.
NOTE: The unit doesn’t work until the SPB is equipped
and “1” is set in the LED.
Summary of Contents for MultiRuta CASAR 800
Page 28: ...25 5 Quick Setting Guide 5 1 Program your Opener Remote 5 2 To Erase all remote Control codes...
Page 29: ...26 5 3 Unit Setting...
Page 30: ...27...
Page 31: ...28...
Page 32: ...29...


