background image


pad to support the base plate of opener in order to maintain proper stability. 

The installation proceeds are as follows: 

1.

Dig a hole for a concrete pad which should be approximately 50 x 30 x 35cm (20

x 12

x 14

). It may 

protrude 10 cm (4”) above ground and 25 cm (10”) in depth underground. Increase the pad height if 

necessary to protect the system from flooding, heavy snow etc.   

2.

  Prepare one or more conduits for the electrical cables before pour concrete. Remember that cable 

conduits have to pass through the hole in the base plate. 

3. 

Pour concrete and before it starts to harden, check that it is parallel to the gate leaf and perfectly level. 

4. 

Mark the position of four expansion anchors according to the position of mounting hole on the base plate 

as soon as concrete become harden. Double check your marking, move the base plate and drill the 4 holes 

using a 10mm (3/8”) masonry bit. Put the 4 expansion anchors (provided) into the holes and firmly tighten. 

5. 

Place the opener onto base plate. Check that it is perfectly parallel to the gate leaf, and then screw the 

four nuts and washers supplied. It's only temporary installation. Further adjustment will be required when 

install the rack or chain. 


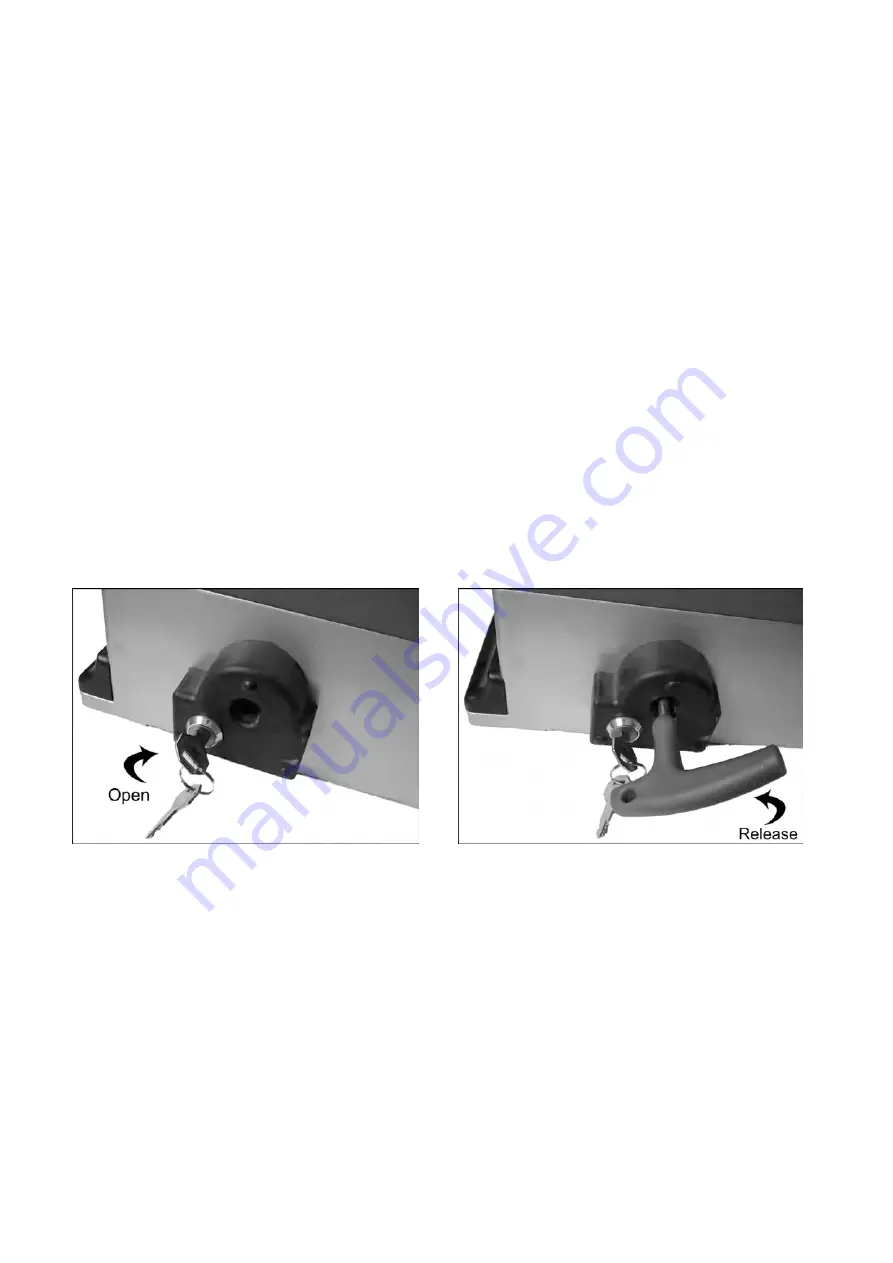
Manual Operation   

The opener should be put in the manual (emergency release) position before fitting the rack, installing the 

opener and limit switch. The process is as follows: 

1) Insert and turn the key clockwise 45° to slide the lock cover. Now the key slot appears. 

2) Insert the T-handle Key

provided

to the key slot and turn it in counter-clockwise 135° to disengage the 

clutch between the gear shaft and power output. Now the opener is in the manual operation. 


Fit the Rack 

There are two kinds of rack available as per buyer’s option, which are steel reinforced plastic rack  and 

galvanized steel rack. The galvanized steel rack is usually used for the heavy duty gate. 

A. Fit the plastic rack reinforced with steel   

1. Start with gate in closed position 

2. There are four sections of plastic rack which is one meter length, each section for standard package. (you 

can order extra rack from dealer if necessary)   

3. Put one end of rack section on the gear of opener as a temporary support. 

Make rack level and mark the rack’s mounting holes (four holes) on the gate. 

4. Fit the rack by self-threading screws. This kind of plastic rack is quieter and allows height adjustments to 

be made even after it has been fixed. Please keep 1.0mm space between the rack and the gear to avoid the 

weight of the gate leaf effect on the opener. 

Summary of Contents for RK1200

Page 1: ...OPENS Website http www topenstool com VER 20a RK1200 T Please read and follow all warnings precautions and instructions before installation and use Periodic checks of the opener are required to ensure...

Page 2: ...TOPENS Store 5 Technical Specifications Feature 5 Installation Overview 6 Installation of the Opener 6 Manual Operation 7 Fit The Rack 7 Install the magnets for Limit Switches 9 Connecting of Power Su...

Page 3: ...ere The factory declines all responsibility for any consequences resulting from failure to observe Good Technical Practice when constructing closing structures door gates etc as well as from any defor...

Page 4: ...table for use The gate should be mounted and moved freely Check that the structure is sufficiently strong and rigid and that its dimensions and weights conform to those listed in the specifications ta...

Page 5: ...4 Parts List Extra Parts for RK1200T Accessories Parts Included in some models refers to the actual package Rev 20a...

Page 6: ...0VAC Absorbed power 550W Gate moving speed 20 cm s 8 in s Max gate weight 1500kg 3400lbs Max torque 35Nm Environmental conditions 20 50 4 F to 122 F Protection class IP44 Features Easy to install and...

Page 7: ...s installed in a level and paralleled position and is properly secured Improper installation could result in property damage severe injury and or death Before starting installation ensure that there i...

Page 8: ...required when install the rack or chain Manual Operation The opener should be put in the manual emergency release position before fitting the rack installing the opener and limit switch The process i...

Page 9: ...from dealer if necessary 3 Put one end of rack section on the gear of opener as a temporary support Make rack level and mark the rack s mounting holes three holes on the gate 4 Weld the rack nut on th...

Page 10: ...he gate fully open by hand Locate and install the magnet bracket so that the opener will stop at the desired open position when the open limit switch approaches it The higher magnet bracket must be in...

Page 11: ...10 Connecting of the Control Board WARNING Before making any electrical wire connection or and setting the control board make sure that the power switch is OFF...

Page 12: ...Exit Wand Optional First insert the Adapter BOARD into the CONTROL BOARD and then connect the wand to the control board refers to following instruction The BLACK wire of the exit wand should be connec...

Page 13: ...disabled if both DIP switches are turned off Factory default setting is disabled The midway mode could be activated by pressing button B of the remote control when the gate is in the full closed posit...

Page 14: ...on or remote DO NOT ALLOW CHILDREN TO PLAY NEAR THE GATE If you purchase additional remote controls the gate opener must be programmed to accept the new remote code If you lose one of any remote contr...

Page 15: ...you may program either C button or D button with TOPENS swing gate opener Wireless Keypad Programming You can follow the below steps to program wireless keypad to the opener Press the LNSW button unt...

Page 16: ...e control is not on Check the battery in your remote control Replace the battery as necessary 2 The distance you use the remote is too far away from the opener Try it again closer 3 Remote control is...

Page 17: ...the Stop Reverse in case of obstruction function when performing any maintenance If this function can t be made operable remove this opener from service until the cause of the malfunction is identifi...

Page 18: ...e do not hesitate to contact us E mail support topenstool com Kindly include your Product Model Purchasing Date Site Order and your contact information All your concerns will be replied within 24 hour...

Reviews: