background image

7.4 Editing a recording

55

1. Press the

button to display the progress bar.

2. Move to the beginning scene of the part you want to play

repeatedly by holding down the

or

button.

3. Press the

button, then the pointer starts to blink.

4. Move to the end scene; the part is marked in purple.

5. Press the

button again, then the part turns green, and

repeated playback starts.

6. To cancel it, press the

button when the progress bar

is displayed.

7.3.6

To play back recordings in sequence

You can play several recordings continuously in sequence by
performing the following steps:

1. Press the

button to display the list of recorded pro-

grammes.

2. Select each desired recording with the

button. When

a recording is selected, it is numbered.

3. Press the


OK

button to start playback.

4. The selected recordings are played in the sequence that

they are numbered.

5. To jump to start of next selected recording, press the

button to display the progress bar, then press the
button.

7.4

Editing a recording

You can cut out or save a part such as a commercial from a
recording by performing the following steps:

1. Press the

button to display the progress bar during

a playback.

Summary of Contents for TF 5000 PVRt

Page 1: ...TOPFIELD TF 5000 PVRt User Guide Digital Terrestrial Receiver Personal Video Recorder...

Page 2: ......

Page 3: ...r giving invaluable hints and tips to enhance your Topfield digital experience If you require support on your Topfield product or have a question which you don t know the answer to you can visit our f...

Page 4: ...ions 9 2 3 Rear panel connections 10 2 4 Connecting up your digital receiver 12 2 4 1 Connecting the antenna 12 2 4 2 Connecting to your television 13 2 4 3 Connecting to your video cassette recorder...

Page 5: ...ory settings 28 5 Daily Usage 29 5 1 Volume control 29 5 2 Watching television 29 5 2 1 The services list 29 5 2 2 The favourite services list 31 5 2 3 Viewing programme information 32 5 2 4 Selecting...

Page 6: ...a new folder 51 7 2 6 To move a recording to another folder 51 7 3 Playing back a recording 52 7 3 1 To navigate using the progress bar 52 7 3 2 To play in slow motion 53 7 3 3 To play in fast motion...

Page 7: ...Contents vii Index 64...

Page 8: ......

Page 9: ...r unlike analogue broadcasts digital broadcasts are not all assigned to their own frequencies instead multiple tele vision broadcasts are transmitted through a single frequency The frequency in digita...

Page 10: ...e of 160 gigabytes in excellent picture and sound quality Time shift is a special technical feature available on the TF 5000 PVRt You can pause the programme you are watching and resume it again at a...

Page 11: ...NDBY lamp lights up while the digital receiver is in standby mode Front display displays the current time in standby mode and displays the current service in operation mode STANDBY button switches the...

Page 12: ...device con nected to the VCR SCART socket See 3 2 3 for more details 5 button sets a sleep timer 6 Numeric buttons are used to enter service numbers and menu options 7 button switches between the curr...

Page 13: ...title track 19 button displays teletext 20 button displays minifies or hides the sub screen See 5 6 for information about picture in picture 21 button changes the position of sub screen counter clockw...

Page 14: ...2 for detailed description 36 N P button is not used in this model 37 M button is not used in this model If you do not have wide screen television but normal screen television pressing the 0 button ch...

Page 15: ...1 2 Controlling the digital receiver 7 Mode 1 1 Mode 2 2 Mode 3 3 Mode 4 4 The mode 1 will work at default...

Page 16: ...te control AAA 1 5 V One loop cable to connect the first tuner with the second tuner One SCART to component cable to link the digital re ceiver to your television set One S Video cable to link the dig...

Page 17: ...urface Do not place the digital receiver close to heat emitting units or in direct sunlight as this will impair cooling Do not lay any objects such as magazines on the digi tal receiver When placed in...

Page 18: ...RF OUT ANT 2 1 3 5 8 11 2 4 6 12 10 13 14 9 7 Check what connections your television set has in comparison with the digital receiver 1 ANT 1 Terrestrial broadcasting signal input socket for the first...

Page 19: ...Analogue television output socket 12 RF IN Analogue television input socket 13 S PDIF Dolby digital output socket for the audio system 14 RS 232 Serial port for firmware update and data transfer Tabl...

Page 20: ...services Connect the antenna cable to the ANT 1 socket on the back panel of the digital re ceiver Also you must ensure that there is a connec tion to both the ANT 1 and ANT 2 connectors on your digita...

Page 21: ...ee 3 2 for detailed description To use the SCART connector For best results with a standard television set you should use a SCART cable plugging one end into the TV socket on the digital re ceiver and...

Page 22: ...ceiver and the other end into the matching socket on your television To connect the audio connectors You will need to obtain an audio cable RCA cable to connect the audio connectors Plug one end of t...

Page 23: ...receiver 2 4 3 Connecting to your video cassette recorder The digital receiver can also output video to another appliance such as a video cassette recorder or video receiver through an auxiliary SCAR...

Page 24: ...ge resulting from leaking batteries NOTE Batteries including those which contain no heavy metals may not be disposed of with household waste Please dispose of used batteries in an environmentally soun...

Page 25: ...f subtitle track to be output Select the System Setting Language Setting menu You should see a screen like the left figure Menu language The digital receiver supports many menu languages Dutch English...

Page 26: ...t any available language no subtitle will be displayed Apart from this setting you can select a subtitle track with the button See 5 2 5 for further information Audio language Set the 1st Audio Langua...

Page 27: ...ard of your local area If you have a PAL television you have to set the TV Type op tion to PAL In this case if a service is broadcasted in NTSC standard the digital receiver converts it into the PAL s...

Page 28: ...B colour model provides the best video quality with little difference from the YUV colour model but the CVBS colour model does the least So RGB would be most desirable for this option 3 2 3 Video cass...

Page 29: ...een pictures then will be reduced to fit to the width of the normal screen Otherwise to watch them in the shape like the right figure set it to Center extract Wide screen pictures then will be cut out...

Page 30: ...ya Lithuania Luxembourg Netherlands New Zealand Norway Portugal Slovakia Slove nia Spain Sweden Switzerland Syria Yugoslavia PAL I Hong Kong Macao Republic of Ireland South Africa United Kingdom PAL K...

Page 31: ...ehran GMT 4 00 Abu Dhabi Muscat Baku Tbilisi GMT 4 30 Kabul GMT 5 00 Ekaterinburg Islamabad Karachi Tashkent GMT 5 30 Bombay Calcutta Madras New Delhi GMT 6 00 Almaty Dhaka Colombo GMT 7 00 Bangkok Ha...

Page 32: ...ecifying a programme classification Select the System Setting Parental Control menu You should see a screen like the left figure and you will be asked your Personal Identifica tion Number PIN The numb...

Page 33: ...person has to enter the personal identification number to override To change the number select the Change PIN Code menu then an input box appears You have to enter a desired num ber twice for confirm...

Page 34: ...ition of the informa tion box Select the System Setting menu and set the Info Box Position option as you desire Its available range is from 10 to 3 line The more high the value is set the more low the...

Page 35: ...Installation Service Search menu You should see a screen like the left figure If you have an antenna booster you should set the Antenna Supply 5V option to On to sup ply power to it Not used in Austra...

Page 36: ...entifies transport stream packets Start search To start service search select the Start Search item then a list box appears in which found services will be listed When it has completed press the OK bu...

Page 37: ...e button Press it again to restore the sound to previous level 5 2 Watching television To change services press the P or P button Pressing the button switches to the previously viewed service You can...

Page 38: ...the following By setting the Show Provider option to On you can view the provider of the services which is usually the name of the television company responsible for broadcasting them To change the n...

Page 39: ...favourite service put the hightlight bar on a desired group and press the V button a highlight bar appears on the favourite services list Once you select a desired service with the OK button it will b...

Page 40: ...evel and quality Programme name Programme classification symbol Programme summary Broadcasting time Current time In addition you might see the following symbols Subtitle symbol if subtitle tracks are...

Page 41: ...title symbol will be marked on the infor mation box Pressing the button displays available subtitle tracks Once you select a subtitle track it will be displayed 5 2 6 Viewing teletext On some services...

Page 42: ...he button To switch it back press the button again Pressing the button displays the programme guide in the form of a spreadsheet To switch it back press the button again You can make a timer recording...

Page 43: ...ed time shifted televi sion Then you can skip com mercials until you catch up to the live broadcast In order to use the time shift feature the Time Shifting option must be set to Enable See 3 6 When e...

Page 44: ...see 7 1 5 To end time shift press the button The live pro gramme will be presented When time shift option is disabled and pause is kept for more than 10 seconds the time shift feature will be switche...

Page 45: ...Even when you play back a recording you can watch a live programme in the sub screen How ever you cannot swap the pictures in that case 4 Pressing the button moves the sub screen counter clockwise an...

Page 46: ...ng Favorites menu You should see a screen like the left figure There are 3 columns Group list left Favourite list centre Services list right The services list contains all available services whereas t...

Page 47: ...OK button to select it The high light bar then moves to the services list 2 To add a service to the selected group put the highlight bar on a desired service entry and press the OK button The selected...

Page 48: ...pe a space select the Space key To type lower case letters or numerals select the Other key To delete a letter put the cursor on a desired letter at the input line and then select the Del key You must...

Page 49: ...to the matching port on the other digital re ceiver 2 turn on the source digital receiver 3 Select the Installation Transfer Firmware Transfer Data to Other IRD menu 4 To start the data transfer turn...

Page 50: ...cture in picture feature You can record two different services while playing back a previously recorded programme You can record two different services while watching one of them using the time shift...

Page 51: ...rding Therefore you can only change to a limited number of services while the two programs are being recorded NOTE Do not move the digital receiver nor pull off the plug while it is running It may dam...

Page 52: ...ress the OK button the recording will end at the specified time If the information about the next programme is provided by the electronic programme guide the After this programme and After next progra...

Page 53: ...arted it is put on the recorded pro gramme list even though it is not finished yet The recording file is named after its service name with a suffix of a num ber To view the recorded programme list pre...

Page 54: ...you can specify a file name for the timer recording If you do not specify anything it will be named after the service name See 6 2 for how to use the on screen keyboard Once the Record Start option i...

Page 55: ...means literally every day Every Weekend means Saturday and Sunday every week Weekly means one day every week Every Weekday means from Monday to Friday ev ery week If your favourite programme is broad...

Page 56: ...try you want to remove and press the button then you are asked for confirmation If you select Yes it will be deleted 7 1 4 Scheduling a recording using the programme guide The provider of each service...

Page 57: ...ce again 7 1 5 Recording a time shifted programme See 5 5 for detailed description about the time shift feature While watching a programme with time shift you can record it by performing the following...

Page 58: ...e and lock a recording file You can also sort the recording files by file name playing du ration or file size In addition you can make a new folder 7 2 1 To delete a recording To delete a recording pu...

Page 59: ...recording perform the following steps 1 Put the highlight bar on a desired recording 2 Press the button to display the additional options 3 Select the Rename option and the on screen keyboard appears...

Page 60: ...a playback you can enjoy the following tricks To see the detailed information about the currently played recording press the button then the informa tion box appears and shows its file name playing du...

Page 61: ...gain 7 3 2 To play in slow motion To watch in slow motion during a playback press the button If you press it repeatedly the playback speed changes in 3 steps 1 2 1 4 and 1 8 times To resume normal spe...

Page 62: ...l see a small dot appear above the progress bar like in the picture above 3 To jump forward to next bookmark press the but ton 4 To jump to first bookmark press the button then the button 5 To delete...

Page 63: ...You can play several recordings continuously in sequence by performing the following steps 1 Press the button to display the list of recorded pro grammes 2 Select each desired recording with the butt...

Page 64: ...suffix of CUT and a number 7 5 Copying a recording You can copy a recording file in whole or in part during a play back by performing the following steps 1 Start playback of a recording you want 2 Mo...

Page 65: ...desired file if you want to play several files select them with the button 3 Press the OK button to start playback 4 To stop playback press the button To play all MP3 files in a subfolder put the high...

Page 66: ...tal receiver 5 Run Altair then its screen will appear like the figure below The instructions on how to use Altair are as follows 1 Select files to transfer The left panel shows files and folders that...

Page 67: ...gular MPEG player on your computer because they are formatted differ ently from the standard MPEG format Visit http www videolan org or http www elecard com where you can find a MPEG player able to pl...

Page 68: ...latest firmware and an update utility from the web site http www i topfield com You have to check the firmware information of your digital re ceiver before downloading a new firmware Select the Infor...

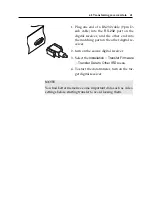
Page 69: ...to the digital receiver from the Topfield web site 2 Plug one end of a USB cable into the USB port on the digital receiver and the other end into the matching port on your com puter 3 Turn on the digi...

Page 70: ...gital receiver from the Topfield web site 2 Turn off the digital receiver 3 Plug one end of a RS 232 cable 9 pin D sub cable into the RS 232 port on the digital receiver and the other end into the mat...

Page 71: ...t digital receiver 2 Plug one end of a RS 232 cable 9 pin D sub cable into the RS 232 port on the digital receiver and the other end into the matching port on the other digital re ceiver 3 If not alre...

Page 72: ...2 ANT 2 10 Antenna Supply 5V 27 AUDIO L 14 AUDIO L R 11 AUDIO R 14 Auto 27 AV 25 Button 4 Censorship 24 Center extract 21 Change PIN Code 25 Channel 28 Current Event 46 Cut 56 Date 47 Download 61 62 D...

Page 73: ...l 22 RF IN 15 RF IN 11 RF LOOP 1 OUT 12 RF LOOP 1 OUT 10 RF LOOP 2 OUT 12 RF LOOP 2 OUT 10 RF OUT 15 22 RF OUT 11 RF Output 22 RS 232 41 62 63 RS 232 11 S VIDEO 14 S VIDEO 11 S PDIF 11 S PIDF 14 Save...

Page 74: ...DEX transponder 1 Turbo Off 59 TV 13 47 TV 11 TV Aspect Ratio 21 TV Type 19 Type 47 USB 58 61 USB 11 VCR 15 VCR 11 VCR Scart Type 20 VIDEO 13 14 VIDEO 10 Video Output 20 Weekly 47 wide screen televisi...

Page 75: ...ent shock or hazard risk Do Not place Liquid or Fluids near the appliance Do Not place appliance in a dusty or wet location Full warranty conditions are listed on the rear of this card For further War...

Page 76: ...d in its original carton and protective packaging or alternatively in a packing suitable to prevent damage Topfield Australia will not accept any responsibility for goods damaged whilst the goods are...

Page 77: ......

Page 78: ...ither the retailer where they purchased this product or their local government office for details of where and how they can dispose this product for environmentally safe recycling Business users shoul...

Reviews: