4
GB
Congratulations!
With your purchase you have decided on a
high-quality product. Get to know the product
before you start to use it.
Carefully read the following instructions
for use.
Use the product only as described and only
for the given areas of application. Keep these
instructions safe. When passing the product
on to a third party, always make sure that the
documentation is included.
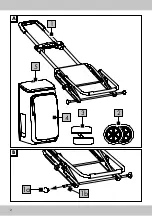
Package contents (Fig. A)
1 x Shopping trolley (1)
2 x Wheels (2)
2 x Mudguards (3)
1 x Bag (4)
1 x Shopping chip (5)
1 x Instructions for use
Technical Data
max.
35
KG
Max. load capacity: 35kg
Filling space/volume: approx. 50l
Measurements: approx. 46.5 x 38.5 x 102cm
(L x W x H)
Date of manufacture (month/year):
08/2018
Intended Use
The item has been developed as a trolley for
private use. The item is suitable to transport items
with a maximum load weight of 35kg.
Do not transport any unpackaged foodstuffs in
this item.
Do not use to transport animals or people.
Safety information
• Never leave children unattended with the pa-
cking materials. There is a risk of suffocation.
• Avoid contact with sharp, hot, or hazardous
items.
• Do not exceed the maximum load capacity of
35kg.
• Do not modify the item in such a way as to
endanger your safety in any circumstances.
• Do not use the item indoors. The tires can lose
their grip on smooth surfaces such as laminate,
parquet flooring, wood floors, tile, etc. and
slide away.
• Do not sit or stand on the item.
• The item may not be used to transport people
or animals.
• Always consider others when using the item!
• CAUTION! Not suitable for unpackaged
foodstuffs!
Danger of pinched
fingers!
• Watch out for pinch points when pulling the
telescopic grip in and out.
Avoiding property damage!
• Avoid water, oil, potholes and very rough
surfaces.
Assembly
1. Remove all transport packaging.
Note:
Make sure that children cannot play
with it.
2. Place the trolley (1) so that its underside is on
the floor.
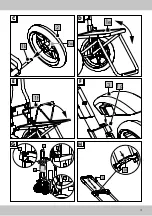
3. Remove the protective caps (1a) form the
wheel axels (1b) (Fig. B).
4. Place the wheels (2) on the wheel axels (1b)
(Fig. C), until they click in audibly.
Note:
To remove the wheels from the wheel
axels (1b), press the button (2a) in the middle of
the wheels downwards.
5. Fold the storage area (1e) down (Fig. D).
6. Tilt the handle (1f) for a larger storage area
(Fig. E).
Note:
The handle and the storage area, must be
tiled and unfolded every time it is transported.
7. Fasten the mudguards (3) onto the connectors
(1g) on either side of the shopping trolley
(Fig. F).
Note:
Make sure that the longer side of the
mudguard is facing forwards.
8. Pull the clip-on feature (4a) over the telescop-
ic handle (1c) and put the bag (4) on the
storage area.


