background image

Proceed as follows:

Keep the

outputs in

status (LEDs light on).

MUTE

RT-DRIVE DLM-206

Feed a signal in on the

's input and watch the

LED meter to

obtain a good signal / noise ratio, i.e. an up-front distortion-free signal, keep the signal quite high,

but make certain the red

LED doesn't light up continually.

INPUT LEVEL A-B

CLIP

RT-DRIVE DLM-206

Adjust the

input gain if necessary:

RT-DRIVE DLM-206

Press the

key to enter into

Use the

to increase clockwise or decrease counterclockwise with gain range from -40dB to +12dB.

IN

INPUT GAIN

DIAL

It is much more important to set the input signal of a digital unit than that of
excessively high input signals will make any saturation of the A / D converters cause a typical particularly
distinct noise (high level square wave).

an analog unit, because

Press

DIAL.

The display will show the

page (using

key to convert INA orINB) in the memory:

INA Gain or INB Gain

IN

2. Adjusting the input signal

Find out the output level setting for your mixer (or other unit) and connect it to the input of the

RT-DRIVE DLM-206.

+ 0 1 . 5 d B

G a i n

I N A

Use the

to change the gain value and watch the level of the signal on the LED meter until the ideal

values are reached.

DIAL

I N A

0 . 0 d B

G a i n

6

I N B

0 . 0 d B

G a i n

C

onfiguration & Functions

5

3. First Setup

Firstly, set the following parameters shown in order:

Polarity of the outputs

Alignment of the speaker enclosure components

Levels of the outputs

Output Pol.

Output Delay

Output Gain

At this point, the first custom setup can be prepared.
The following is only the description of setup procedure.
The detailed specifications of each parameter are shown in the respective paragraphs of the manual.

Note:

The regulation of the

's parameters is closely related to the characteristics of

the components of the sound system. So if you're not the expert, please refer to the docum-
entation and technical specifications of your power amplifiers, loudspeaker enclosures, monitors, etc..
This will enable you to work faster and safely.

RT-DRIVE DLM-206

8

Summary of Contents for RT-DRIVE DLM-206

Page 1: ...SEIKAKU TECHNICAL GROUP LIMITED OCT 27 2010 A3 A4 A5 TOPP PRO RS RT DRIVE DLM 206 TOPP PRO_V1 0 RT DRIVE DLM 206 0 10KG 1 105g NH00149 5PCS 14 NPD TO 201006008 NF03490 PHFAA102 20101000006...

Page 2: ...EL 4 MUTE CLIP 3 6 24 30 12 LIMIT OUTPUT LEVEL 2 3 MUTE MUTE OUTPUT LEVEL OUTPUT LEVEL MUTE 1 OUTPUT LEVEL A CLIP 3 6 18 24 30 12 CLIP 3 6 18 24 12 B 30 R CLIP 3 6 24 30 12 LIMIT CLIP 3 6 24 30 12 LIM...

Page 3: ......

Page 4: ...UCTION 2 4 FEATURES 3 4 USEFUL DATE 4 5 CONTROL ELEMENTS 5 7 CONFIGURATION FUNCTIONS 6 20 CONNECTIONS 7 21 REMOTE CONTROL 9 25 TECHNICAL SPECIFICATIONS 10 26 TROUBLE SHOOTING 11 27 GUARANTEE 8 24 BLOC...

Page 5: ...Thanks again for choosing TOPP PRO RT DRIVE DLM 206 2 balanced unbalanced Inputs and 6 4 balanced Outputs 10 Factory Presets and 70 User Presets 7 LEDs for every Channel Level Display Digital Audio In...

Page 6: ...signal clipped Several functions parameters setting such as ID number setting Digital and Analog Input selection are used for different application 1 2 3 4 5 6 7 8 9 10 11 12 13 IN OUT UTIL POWER PAS...

Page 7: ...nect source such as the channel inserts of a mixing console or power amplifier s inputs balanced 14 15 16 17 19 PUSH 2 1 3 NEW TIDE Use only with a 250V fuse PUSH 2 1 3 NEW TIDE PUSH 2 1 3 NEW TIDE PU...

Page 8: ...g with the operating system release for a few seconds RT DRIVE DLM 206 Press key Load the you ve found Use the to select the The display will show the page LOAD configuration DIAL PRESET Load PRESET F...

Page 9: ...ng the input signal Find out the output level setting for your mixer or other unit and connect it to the input of the RT DRIVE DLM 206 0 1 5 d B G a i n I N A Use the to change the gain value and watc...

Page 10: ...Sum 1 P post PEQ Sum 2 Numbers 1 2 3 4 5 and 6indicate the respective outputs In the example The signal connected to Input A is assigned to outputs 1 2 3 and 4 The signal connected to Input B is assi...

Page 11: ...as required and then store it again in the same Press The page appears by means of which it s possible to edit the name of the PRESET to be saved The name of the start PRESET i e of the PRESET curren...

Page 12: ...ly high input signal causes a typical particularly distinct noise To achieve a good signal noise ratio i e an up front distortion free signal feed a signal in on the s input and watch the LED meter Ke...

Page 13: ...onfiguration Functions 5 B Centre Frequency Cutoff Frequency Allows to choose the centre frequency of the Peaking curve or the cutoff frequency of Shelving curves 5 0 1 0 2 k 0 0 E I N A B P x Q 1 k a...

Page 14: ...mpLim I N A D e l a y m S 0 0 0 0 0 2 1 O I N M I X I N B V S U M 1 x S U M 2 V P 1 A x Configuration Functions 5 2 OP EQ Output equalizer with 5 parametric filters Also called Channel EQ allows to al...

Page 15: ...O 1 k 0 0 H z B U T 1 2 L P F P 1 Output 1 high pass filter O 1 k 0 0 H z B U T 1 2 H P F P 1 LPF HPF HPF LPF Signal segment obtained with the combination of LPF and HPF Configuration Functions 5 Sinc...

Page 16: ...on the outputs that require it In this case remember that enabling the LIMITER changes the display mode on the relative LED meter in fact the level shown is no longer the absolute output level but the...

Page 17: ...ke Up Misc Setup Input Select UART IDNumber Noise Gate Configuration Functions 5 Used this submenu to choose the measurement units to be used with certain functions Delay Units Used to set the measure...

Page 18: ...XIT LOAD SAVE ENTER CONTROL PANEL PARAMETER 6 MUTE OUTPUT LEVEL 5 MUTE CLIP 3 6 24 30 12 LIMIT OUTPUT LEVEL 4 MUTE CLIP 3 6 24 30 12 LIMIT OUTPUT LEVEL 2 3 MUTE MUTE OUTPUT LEVEL OUTPUT LEVEL MUTE 1 O...

Page 19: ...tection of the system against accidental or unauthorized changes Lock Lock How to enable protection Total all editing functions are blocked and access to the PRESET menu is disabled This function is v...

Page 20: ...ection Access the Submenu The display shows the prompt for entering the password to unlock the protection The four alphanumeric characters of the password are encrypted LOCK Enter in the using the com...

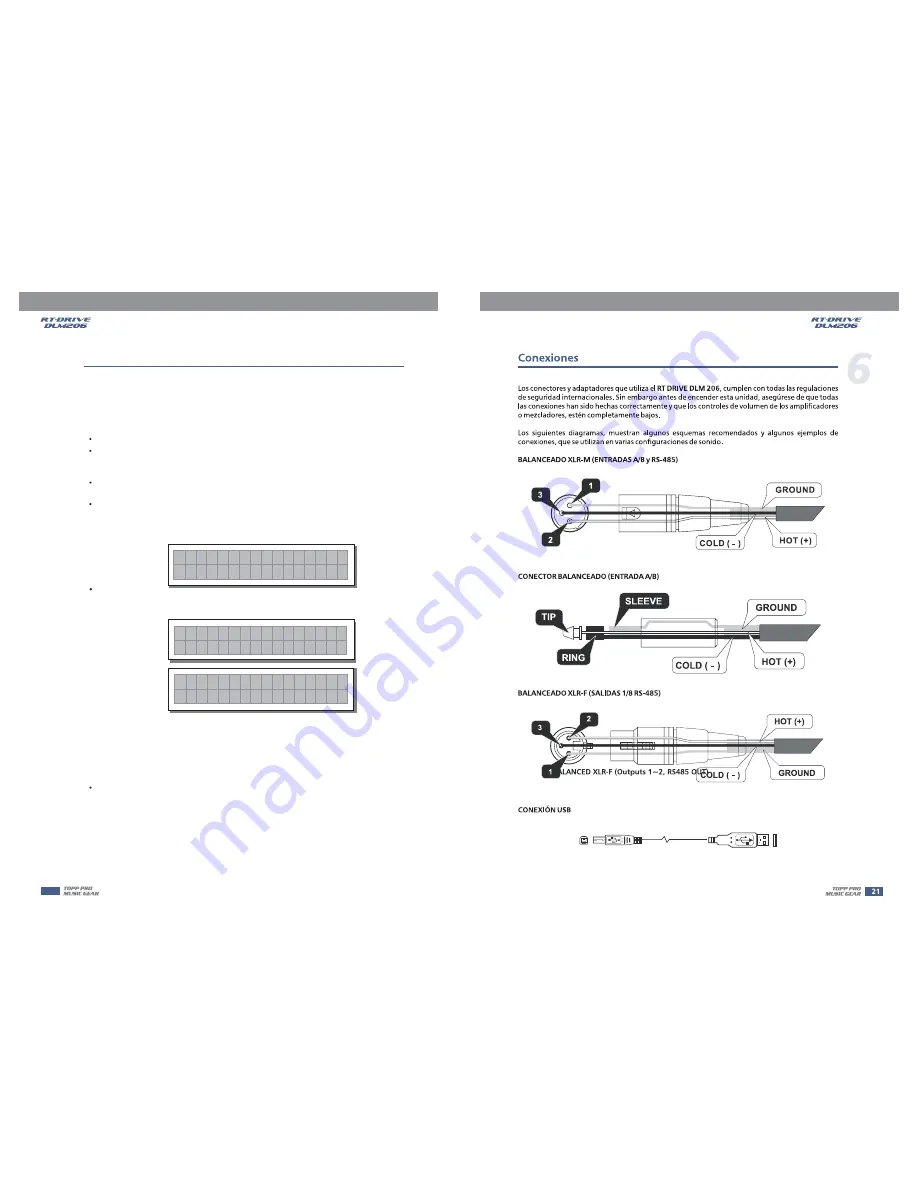
Page 21: ...ixer are turned down completely RT DRIVE DLM 206 RT DRIVE DLM 206 The following diagrams show the schemes of the recommended cables and some connection examples various system configurations referred...

Page 22: ...PUSH 2 1 3 NEW TIDE Use only with a 250V fuse PUSH 2 1 3 NEW TIDE PUSH 2 1 3 NEW TIDE PUSH PUSH DIGITAL IN RS485 OUT RS485 IN INPUT A INPUT B USB SERIAL PORT 4 3 2 1 OUTPUTS 5 6 A102 Apparaten skall a...

Page 23: ...HIGH POWER STEREO AMPLIFIER CH A CH B CLIP SIG POWER ON OFF CLIP SIG PROT CH A CH B CLIP SIG POWER ON OFF CLIP SIG PROT SIGNAL POWER AUDIO MIXER 1 2 3 4 5 6 5 6 1 2 3 4 A B PUSH 2 1 3 NEW TIDE Use onl...

Page 24: ...T CH A CH B CLIP SIG POWER ON OFF CLIP SIG PROT 2 A135 B246 3 WAY STEREO 2X3WAY AUDIO MIXER SIGNAL POWER 1 2 3 4 5 6 5 6 5 3 2 1 A B PUSH 2 1 3 NEW TIDE Use only with a 250V fuse PUSH 2 1 3 NEW TIDE P...

Page 25: ...lay Gain Gain Comp Lim Comp Lim DAC DAC In Select Xover 5 PEQ In Select Xover 5 PEQ Delay Delay Gain Gain Comp Lim Comp Lim DAC DAC SUM1 In Select Xover 5 PEQ Delay Gain Comp Lim DAC In Select Xover 5...

Page 26: ...x Output level bypass 20 dBu Impedance 500 Output Section 24 bit sigma delta converters 48 kHz Sampling Rates Digital Processing Bypass all the DSP function Bypass 16 2 LCD Display for parameters sett...

Page 27: ...wered microphone if possible use and external phantom power supply for condenser type microphones Excessive input signal trying to exceed the capabilities of the speakers Reduce the output level of th...

Page 28: ...27...

Page 29: ......

Reviews: