4.3
PROGRAMMING AND USE OF THE 433 MHZ RADIO CONTROL DEVICE (optional)
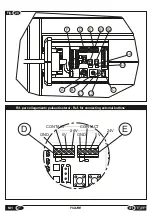
To configure the remote control, just press S2 as shown in figure 26 for 3 seconds, then wait for the green led L1 to light up
with fixed red light. At this point, press any key on the remote control. Confirmation of association is given by rapid blinking
of led L1.
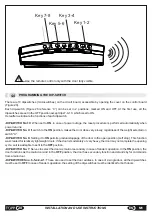
The four keys on the remote control are divided into two sets, one above and the other below, so that it is possible to have a
total of 8 channels available. Starting from the upper set, using the remote control, it is possible to control the door as
follows:
key 1 – open door
key 2 – close door
key 3 - stop door (stops the door in any position and blocks the sensor controls)
key 4 - ultraslow mode (the door is made to move at reduced speed to reduce the danger and noise)
key 5 – enter only mode (blocks the sensor on the automation)
key 6 – exit only mode (blocks the external sensor)
key 7 - reset alarms
key 8 - reset commands (restores the machine to normal operation blocking other functions previously set with the remote
control)
Up to 20 different remote controls can be associated for every machine. To disassociate them and clear the memory of the
associated remote controls, just press and hold S2 for 15 seconds. Confirmation of completed procedure is given by rapid
blinking of red led L1.
The remote control has a radius of action of 5m. Beyond 5m the commands are not guaranteed.
Adjustment trimmer “
B
” (Figure 26)Allows the adjustment of the door dwell time in open position from 6 seconds to a
maximum of 50.
After making this adjustment, connect the actuator to the power supply to perform the initialization procedure.
Before performing the initialization procedure, open the door manually by about 10 cm. This is necessary only at the
time of starting the automation.
-
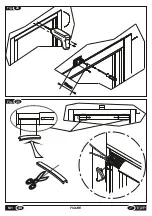
Figure 20
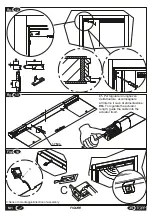
: Move the extruded cover as shown in the figure so as to expose the electronic board on the inside.
If the cover does not slide easily, remove the actuator from its location and try again
.
-
Figure 26
: Press key S1 for about seven seconds. At this point the automation will start the procedure of searching for
the limit switches; wait until it has completed this process. The door performs two opening and closing cycles, after which
the automation is ready to use. If it should be necessary to change the VPA or other, the procedure has to be
repeated.After initialization, the "standing by for open command" status is confirmed by LED S2 on with fixed green light.
This status remains unchanged until the door is commanded to open, and returns at the end of the open/close cycle.
If, during the initialization procedure, the door does not reach the limit switches correctly, repeat the procedure,
accompanying the door so that it completes the cycle. This situation could indicate the presence of excessive friction on
the glide of the door, excessive weight of the door or an improper reading of its position by the actuator. If after the second
initialization the door does not move correctly, check for unusual friction and door weight and if necessary contact the
technical service department.
During the procedure of initialization it may happen that, when it rests on the limit switch, the magnetic coupling between
the rotor and rail is interrupted for a few seconds. This situation will cause an unusual noise but does not endanger the
correct function of the machine under conditions of normal use.
During the procedure do not disconnect the power, do not open or close the door manually and do not touch any
of the keys on the electronic board.
Normal door function, following any alarm situation that blocks operation, can be restored with the reset procedure. To
start this procedure press S1 for 2 seconds, or press 7 “Reset” on the remote control. Following this command, the door
will open at greatly reduced speed and then will close at the speed setting. After closing, the mechanism will return to the
stand-by condition, restoring normal operation. The holding time with the door open during the reset cycle is much longer
than in a normal cycle and it is possible that, when the automation reaches the open limit switch, the magnetic coupling
between the rail and the rotor may be interrupted briefly so that the rotor spins in neutral for a few seconds.
During the initialization and reset procedures all controls (sensors, remote controls, etc.) are blocked. Therefore,
stand clear of the door operating area.
After the initialization procedure, close the sliding cover on the board.
Default settings provide for very slow opening / closing speed and for automatic reset in the event of lack of
supply voltage. For more details see Section 4.4.
27
EN
INSTALLATION AND USE INSTRUCTIONS
M1
Summary of Contents for M1
Page 2: ...2 ISTRUZIONI PER L INSTALLAZIONE E L USO IT M1 ...
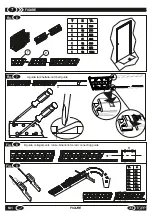
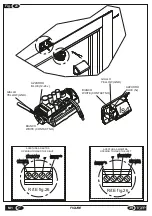
Page 34: ... 34 FIGURE M1 Fig 11 5 0 Fig 10 ...
Page 37: ...Fig 19 75 10 Fig 20 37 M1 FIGURE ...
Page 38: ... M1 FIGURE 38 Fig 21 Fig 22 ...
Page 40: ... M1 FIGURE 40 Fig 70mm 24 Fig 25 TOPP M1 TOPP M1 ...
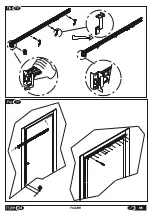
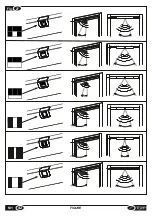
Page 42: ... M1 FIGURE 42 Fig 27 ...


