15
Troubleshooting
The power unit does not run:
- Check electrical supply breaker or fuse.
- Check to see if limit switch is being contacted by a tall vehicle.
- Check micro-switch and connections in motor control box.
- Check voltage to the motor.
- Check micro-switch and connections on the overhead switch.
The power unit runs but does not raise the lift:
- Check the oil level.
- Check that the lowering valve is not stuck open.
- Check the connections and components on the suction side of the pump.
The power unit raises the lift empty but will not lift a vehicle.
- Make sure the vehicle is not above the rated capacity of the lift.
- Make sure the vehicle is positioned properly.
- Clean the lowering valve by running the power unit for 30 seconds while holding the lowering valve open.
- Check the motor voltage.
Lift lowers slowly down.
- Check for oil leaks.
- Clean the lowering valve by running the power unit for 30 seconds while holding the lowering valve open.
Repeat this procedure a few times.
-
Clean the check valve seat .
Slow Lifting and/or oil foaming up.
- Check that oil used meets the specification in the Installation Instruction section of this manual.
- Tighten all suction line fittings.
- Not enough oil in tank and air has been transferred into the hoses and cylinder. (Complete bleed system and
replace oil.)
Anchors continually work loose
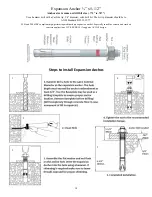
- If holes were drilled too large, relocate the lift per the Installation Instruction section of this manual.
- Floor is not sufficient to provide the necessary resistance. Remove an area of concrete and re-pour as
described in the Expansion Anchor Installation Instruction section of this manual.
Lift does not raise and lower smoothly.
- Reposition vehicle for a more even weight distribution.
- Check the four inside corners of the two columns for roughness. Any rust or burrs must be removed with
emery cloth.
- Lubricate the four corners with heavy duty bearing grease.
- Use a level to check the columns for vertical alignment both side to side and front to back. Shim the columns
as necessary per the Installation Instruction section of this manual.
- Check the oil level.
- Inspect that there is no air in the hydraulic lines. Bleed the hydraulic system as described in the Installation
Instruction section of this manual.
Summary of Contents for QJY240C
Page 9: ...9...
Page 23: ...23 Fig 12 Fig 12...
Page 32: ...34 Parts Diagram...
Page 33: ...35 Parts List...
Page 34: ...36 COMPANY INFO BACK PAGE...


