PowerSlide 13
ENGLISH
1
2
13
1
1 3
1 4
1 5
3
1
2
18
1 6
2x17
1
2
0
1
2
3
4
5
6
!
If one of the two holes will not have cables running through it, insert
the plastic cable gland whole.
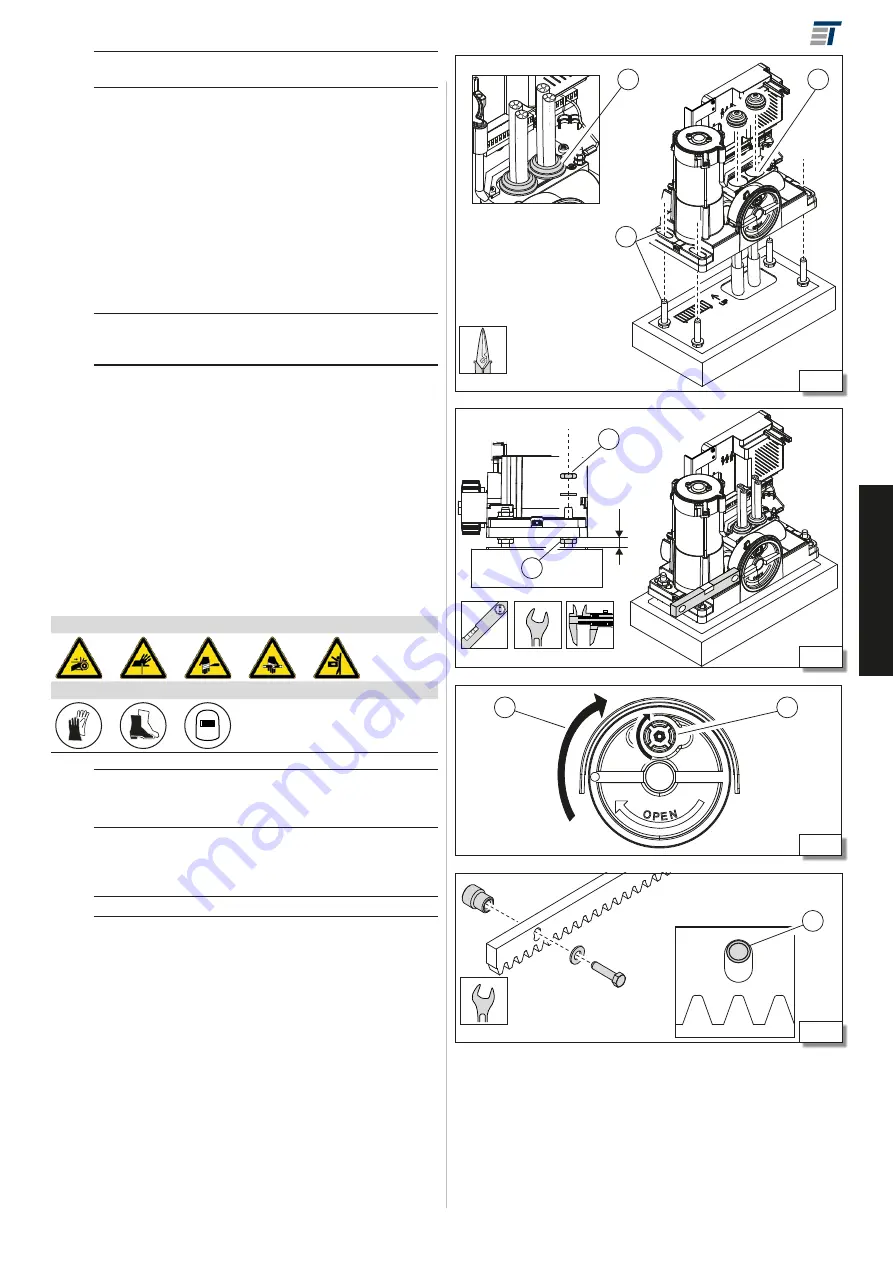
4. Bring the base of the gear motor to 18mm from the base plate
using the four support nuts (
1 4
-1).
5. Fit four M10 locknuts and four washers, supplied with the base
plate, as in
1 4
-2.
6. Ensure there is 13.5mm between the pinion and the sliding gate
section (§ -
9
-
1 0
).
7. Use a spirit level to check that the gear motor is horizontal (
1 4
):
make any adjustments with the support nuts (
1 4
-1).
8. Provisionally tighten the four locknuts using two hex spanners
(
1 4
-1-2).
5.5 MANUAL OPERATION
!
Shut off the power to the system and ensure that the automation
system is stopped before performing manual movement operations
and restoring automatic operation.
A lock with personalised key is available as an optional accessory.
MANUAL RELEASE
1. Open the plastic cap on the release device (
1 5
-1).
2. Turn the lock clockwise using a coin or your personalised key
(
1 5
-1).
3. Turn the knob clockwise (
1 5
-2).
RESTORING AUTOMATIC OPERATION
1. Turn the knob anticlockwise.
2. Turn the lock anticlockwise.
3. Manually move the gate until the mechanical system engages.
5.6 INSTALLING THE RACK
RISKS
PERSONAL PROTECTIVE EQUIPMENT
L
i
The rack installation accessories contain screws for aluminium or steel
sliding gate sections. Use specific screws for other materials.
Do not use grease or other lubricants.
Release the gear motor and close the gate manually (§ ).
STEEL RACK WITH SPACERS TO BE WELDED ON
L
i
Do not weld the rack components to the spacers or to each other.
Summary of Contents for POWERSLIDE
Page 1: ...POWERSLIDE GEBRAUCHSANLEITUNG D 913002 26 6 50 01 2018...
Page 2: ......
Page 31: ...POWERSLIDE INSTRUCTION MANUAL GB...
Page 32: ......
Page 61: ...POWERSLIDE GEBRUIKSAANWIJZING NL...
Page 62: ......
Page 91: ...PowerSlide 31...


