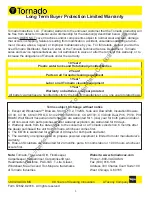
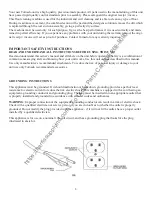
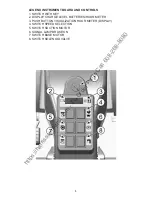
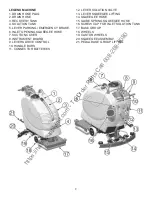
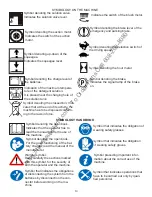
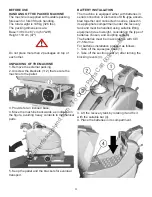
background image

3

NOTES

https://harrissupplyind.com - To Order Parts Call 608-268-8080

Summary of Contents for 99694

Page 1: ...01 WWW TORNADOVAC COM Operations Maintenance Manual For Commercial Use Only Form No L9694AA 07 16 Tornado Industries LLC All rights reserved ORBITAL WALK BEHIND SCRUBBER OB 20 14 MODEL NO 99694 h t t...

Page 2: ...1 Except all Windshears Blowers Storm TV 2 TV2SS Side and Downdraft Insulation Blowers CV 30 CV 38 CK14 1 PRO CK 14 2 PRO SWM 31 9 CK LW13 1 CV 38 48 Dual PV6 PV10 PV6 ROAM Wall Mount Vacuum and all...

Page 3: ...3 NOTES h t t p s h a r r i s s u p p l y i n d c o m T o O r d e r P a r t s C a l l 6 0 8 2 6 8 8 0 8 0...

Page 4: ...ent speed max mph kph 2 2 8 3 2 4 5 Maximum gradient 10 Solution tank gal l 14 53 Reserve solution tank gal l 1 3 5 Recovery tank gal l 15 56 Machine length in mm 49 1244 Machine height in mm 43 2 109...

Page 5: ...uality control standards prior to assembly Please safeguard the original receipt invoice This floor cleaning machine is used for the industrial and civil cleaning and is able to clean any type of floo...

Page 6: ...movement 17 Speed adjustment 17 Working brake 17 Emergency brake 17 Adjustment of the base pressure 18 Overflow device 18 Signal detergent solution reserve H2O on the display 18 STOP OF THE MACHINE AF...

Page 7: ...he appropriate waste disposal of its materials especially oils batteries and electronic compo nents and considering that the machine itself has been where possible constructed using recy clable materi...

Page 8: ...BATTERIES HOUR METER 3 PUSH BUTTON VISUALIZATION HOUR METER DISPLAY 4 SWITCH SPEED SELECTION 5 SWITCH SUCTION MOTOR 6 SIGNAL LAMP BRAKE ON 7 SWITCH BASE MOTOR 8 SWITCH SOLENOID VALVE h t t p s h a r r...

Page 9: ...EVERS DRIVE CONTROL 10 HANDLE BARS 11 CONNECTOR BATTERIES 12 LEVER SOLUTION VALVE 13 LEVER SQUEEGEE LIFTING 14 SQUEEGEE HOSE 15 GUIDE SPRING SQUEEGEE HOSE 16 SCREW CAP FOR INLET SOLUTION TANK 17 BASE...

Page 10: ...Symbol that indicates the obligations of disconnecting the system from the batteries by disconnection the con nector before working on the ma chine Symbol that indicates the obligation of wearing saf...

Page 11: ...eventual transport BATTERY INSTALLATION The machine is equipped either with batteries in serial connection or elements of DIN type assem bled together and connected in series placed in its appropriate...

Page 12: ...ssembled onto the cables of your recharger following the instructions given by the manufacturer ON BOARD BATTERY CHARGER The machine is equipped with the on board bat tery recharger please refer to th...

Page 13: ...ly top up with distilled water at the end of the recharge Never leave the batteries discharged for more than two weeks Danger of gas exhalations and emission of corrosive liquids Fire danger do not ap...

Page 14: ...ts on the support Block the squeegee by rotating the lever 2 clockwise Insert the squeegee hose 3 into its coupling respecting its position as indicated in the figure ADJUSTMENT OF THE SQUEEGEE In ord...

Page 15: ...n sense to increase or reduce the height PAD ASSEMBLY To assemble the pad proceed as follows Move the pedal 13 to lift the base Position the pad under the base and then lower it always through the lev...

Page 16: ...he plug to close the tank Always use low foam detergent To avoid foam presence before starting working operation in troduce into the recovery tank a minimum quan tity of anti foam product Never use pu...

Page 17: ...peed depending on each requirement rotating the lever whatever it is necessary During reverse motion the speed is reduced Moving the machine backwards make sure that the squeegee is lifted SPEED ADJUS...

Page 18: ...n hose and stopping the suction When this happens it is necessary to empty the recovery tank 1 Hold the exhaust hose placed in the front part of the machine 2 Take off the exhaust plug acting upon its...

Page 19: ...water jet SUCTION FILTER CLEANING 1 Take off suction cover 1 after rotating the blocking levers 2 2 Take off the filter and filter protection 3 Clean all parts with a water jet especially in side sur...

Page 20: ...e rubber on the guides and blocking it with the rubber holder blade SQUEEGEE HOSE CLEANING Weekly or in case of insufficient suction it is necessary to check that the squeegee hose is not obstructed E...

Page 21: ...d sliding the stud bolts 1 in their slots 3 Uncouple the hook 1 of the rubber holder blade release the extremities 2 from the squee gee body and take off the rubber 4 4 Unscrew the wing nuts 5 in the...

Page 22: ...arge level of the batteries 3 Check that the battery connector is correctly plugged in 4 Verify that the switch 6 is on 5 Check that the red connector of the suction motor 1 is correctly plugged in If...

Page 23: ...he solution valve 5 Check that the liquid detergent is in the recom mended percentage 6 Increase the base pressure see at paragraph ADJUSTMENT OF THE BASE PRESSURE Contact the authorized technical ass...

Page 24: ...QUEEGEE CLEANING FRONT SQUEEGEE RUBBER REPLACEMENT REAR SQUEEGEE RUBBER REPLACEMENT CHECK SQUEEGEE ADJUSTMENT SQUEEGEE HOSE CLEANING SOLUTION TANK CLEANING CHECK BATTERIES ELECTROLYTE TRACTION MOTOR C...

Page 25: ...ment In square feet meters Total Hard Floor Area Total Carpeted Area Square feet square meters o Contacted by local dealer o Previous experience with Tornado products o Reputation Recommendation o Adv...

Reviews: