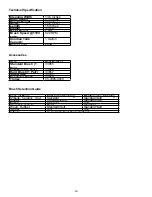
background image

5

IMPORTANT SAFETY INSTRUCTIONS 

FOR COMMERCIAL USE 

WHEN USING AN ELECTRICAL APPLIANCE, BASIC PRECAUTIONS SHOULD 

ALWAYS BE FOLLOWED INCLUDING THE FOLLOWING: 

READ ALL INSTRUCTIONS BEFORE USING THIS MACHINE 

WARNING: TO REDUCE THE RISK OF FIRE, ELECTRIC SHOCK, OR INJURY: 

Do not leave machine unattended when plugged in. Unplug from outlet when not in use and before 

changing pads or attempting any maintenance or adjustment. If handle switch lever is activated 

accidentally, high starting torque will cause machine to move and may cause damage or injury. 

To avoid electrical shock, Use indoors only. Do not use outdoors and do not expose to rain. 

Do not allow to be used as a toy. Close attention is necessary when used by or near children. 

Use only as described in this manual. Use only manufacturer’s recommended attachments. 

Do not use with damaged cord or plug. If machine is not working properly, if it was dropped, 

damaged, left outdoors, or dropped into water, return it to a service center.


Do not pull or carry by cord, use cord as a handle, close a door on cord, or pull cord around sharp 

edges or corners. Do not run machine over cord. Keep cord away from heated surfaces. Do not 

unplug by pulling on cord. To unplug, grasp the plug not the cord. 

Do not handle plug or machine with wet hands. 

Keep hair, loose clothing, fingers, and all parts of body away from openings and moving parts. 

Turn off all controls before unplugging. 

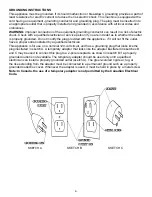
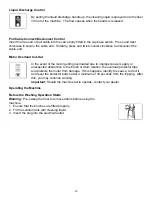
Connect to a properly grounded outlet only. See Grounding Instructions. 

Do not put hands under base - rotating parts could cause injury. 

Always keep hands feet and loose fitting clothing away from moving parts to prevent possible injuries.


Use care to keep electrical supply cable from contacting moving parts, such as floor brushes or pads. 

Risk of explosion: 

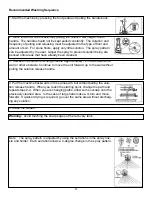
Floor sanding can result in explosive mixture of fine dust and air. Use this 

machine only in a well-ventilated area, free from any flame or match. 

Do not use machine in areas where flammable and/or explosive vapors or dusts are present. 

To avoid fires do not use with a flammable or combustible liquid to clean a floor. 

Make sure voltage and frequency at the wall receptacle correspond with that indicated on nameplate 

before plugging in machine. 

Use only a 12 Ga. three-wire extension cable, which have 3-prong grounding type plugs and 3-prong 

receptacles that accept the plug of the machine. 

SAVE THESE INSTRUCTIONS 

Summary of Contents for BR 13/1

Page 1: ...LES COURT WEST CHICAGO IL 60185 630 818 1300 FAX 630 818 1301 WWW TORNADOVAC COM Operations Maintenance Manual For Commercial Use Only Form No L9735DA 01 13 Tornado Industries LLC All rights reserved...

Page 2: ...hine Parts 9 How it Works 10 Preparing for Use 10 Unpack 10 Assembly 11 Controls 11 Operating the Machine 12 Cleaning the Machine 14 Maintenance 14 Accessories 10 Transport Trolley 15 Side Brush 15 Te...

Page 3: ...arranty Effective January 1 2013 Terms subject to change without notice 1 Except all Windshears Blowers TV 2 Side and Downdraft Insulation Blowers CV 30 CV 38 CW 50 CW 100 CK14 1 CK 14 1 QD CK14 1 PRO...

Page 4: ...4 NOTES...

Page 5: ...orners Do not run machine over cord Keep cord away from heated surfaces Do not unplug by pulling on cord To unplug grasp the plug not the cord Do not handle plug or machine with wet hands Keep hair lo...

Page 6: ...ppliance if it will not fit the outlet have a proper outlet installed by a qualified electrician This appliance is for use on a nominal 120 volt circuit and has a grounding plug that looks like the pl...

Page 7: ...e without notice WARRANTY To protect your investment promptly fill out the required information on the warranty card that comes with the unit and mail it back to Tornado Industries Note Service repair...

Page 8: ...nt When cleaning or performing maintenance to the machine make sure that it is unplugged Regularly inspect the power supply cord If it is damaged it needs to be replaced Be careful when using the mach...

Page 9: ...5 Recovery Tank 6 Filter 7 Lid Cap 8 Boot 9 Nozzle 10 Conveyor Drum 11 Brush 12 Pedal Transporting the Machine Caution This machine is heavy Do not attempt to lift the machine without assistance Incor...

Page 10: ...floor 2 A blade fitted to the recovery tank wipes the drum and collects the dirty water The purpose of these caps is to distinguish between different brushes when the machine is used in different area...

Page 11: ...ush shafts must be fitted before operating the machine Push the shafts through the brushes from the side of the machine To remove brushes push the brush shaft out from the side of the machine using yo...

Page 12: ...he motor getting overloaded due to improper power supply or unexpected obstruction to the brush or drum rotation the overload protector trips and protects the motor from damage If this happens identif...

Page 13: ...pproximately 12 inches before the wall or other obstacle Continue to move the unit forward up to the wall without pulling the solution release handle 4 Pull the machine backwards in the same path but...

Page 14: ...nance operations or adjustments switch off the machine and unplug from the electrical supply To get the maximum life of the machine do the following Supply Cord Regularly inspect sheath plug and cord...

Page 15: ...e trolley is ready for use The machine can be maneuvered easily while holding the top handle Side Brush The side brush can be used to clean corners near the walls Switch off and unplug the machine bef...

Page 16: ...tem Part Number Standard Brush 1 Pair 33855 Soft Brush 1 Pair 33856 Hard Brush 1 Pair 33857 Side Brush 33858 Escalator Brush 33859 Trolley 05 3395 0000 Brush Selection Guide Type of Floor First Time C...

Page 17: ...NUMBER MACHINE SERIAL NUMBER 1 1 2 2 3 3 4 4 Facility Description please circle all that apply 1 School 9 Hospital 17 U S Govt 2 Retail Store 10 Nursing Home 18 Other Govt 3 Restaurant 11 Religious In...

Page 18: ...onctionnement 10 Pr paration l utilisation 10 D ballage 10 Assemblage 11 Commandes 11 Utilisation de l appareil 12 Nettoyage de l appareil 14 Entretien 14 Accessoires 10 Chariot de transport 15 Brosse...

Page 19: ...suivantes qui expire la premi re soit 24 mois pour les pi ces 6 mois pour la main d uvre soit 1 000 heures Garantie limit e de protection de l acheteur long terme Tornado Industries LLC Tornado garant...

Page 20: ...4 REMARQUES...

Page 21: ...ne tirez pas le cordon sur des bords ou des coins saillants Ne faites pas rouler l appareil sur le cordon Maintenez le cordon l cart des surfaces chauff es Ne d branchez pas l appareil en tirant sur l...

Page 22: ...re pas dans la prise faites installer une prise adapt e par un lectricien qualifi Cet appareil a t con u pour tre utilis sur un circuit nominal de 120 volts et dispose d une fiche de terre similaire c...

Page 23: ...investissement remplissez rapidement les informations demand es sur la carte de garantie fournie avec l appareil et retournez la par courrier postal Tornado Industries Remarque les travaux d entretie...

Page 24: ...que vous nettoyez l appareil ou que vous en effectuez un entretien ou des r parations assurez vous qu il soit d branch Inspectez r guli rement le cordon d alimentation lectrique S il est endommag il d...

Page 25: ...oir de r cup ration 6 Filtre 7 Capuchon opercule 8 Carter 9 Embout 10 Tambour transporteur 11 Brosse 12 P dale 2 4 7 9 11 6 8 10 12 Transport de l appareil Mise en garde Cet appareil est lourd N essay...

Page 26: ...e rou leau et r cup re l eau sale Pr paration l utilisation D ballage 1 Poign e inf rieure 2 Corps de la machine 3 Bo tier de la pompe 4 R servoir de solution 5 Poign e sup rieure et traction du c ble...

Page 27: ...l appareil pour l exp dition c est pourquoi les arbres de brosses doivent tre fix s avant de faire fonctionner l appareil Poussez les arbres travers les brosses depuis le c t de l appareil Pour retire...

Page 28: ...r Dans le cas d une surcharge du moteur en raison d une alimentation lectrique inad quate ou d une obstruction non pr vue de la rotation de la brosse ou du rouleau le protecteur de surcharge se d clen...

Page 29: ...2 pouces 30 cm avant le mur ou un autre obstacle Continuez de d placer l appareil vers l avant jusqu au mur sans tirer sur la poign e de pulv risation de la solution 4 Tirez l appareil vers l arri re...

Page 30: ...lage teignez l appareil et d branchez le de l alimentation lectrique Pour maximiser la dur e de vie de l appareil suivez les indications suivantes Cordon d alimentation Inspectez r guli rement la gain...

Page 31: ...acilement man uvr en le tenant par la poign e sup rieure Brosse lat rale Vous pouvez utiliser la brosse lat rale pour nettoyer les coins pr s des murs teignez et d branchez la ma chine avant d ins rer...

Page 32: ...1 paire 33855 Brosse souple 1 paire 33856 Brosse dure 1 paire 33857 Brosse lat rale 33858 Brosse pour escalier roulant 33859 Chariot 05 3395 0000 Type de sol Premier nettoyage Nettoyage d entretien G...

Page 33: ...appliquer en fonction de l appareil sp cifique que vous utilisez En cas d avarie la garantie est annul e si les r parations sont effectu es dans un centre de r paration non autoris par Tornado 2013 T...

Page 34: ...o funciona 10 Preparaci n para el uso 10 Desempacar 10 Ensamblaje 11 Controles 11 Operaci n 12 Limpieza 14 Mantenimiento 14 Accesorios 10 Carro de transporte 15 Cepillo lateral 15 Especificaciones t c...

Page 35: ...regadoras con conductor tienen una garant a de 24 meses garant a por piezas y 6 meses o 1000 horas de mano de obra lo que ocurra primero Garant a de Protecci n Limitada de Largo Plazo para el Comprado...

Page 36: ...4 NOTAS...

Page 37: ...o esquinas pronunciadas No pase la unidad por encima del cable Mantenga el cable alejado de superficies calientes No jale del cable para desenchufar la unidad Si desea desenchufar la unidad tome el en...

Page 38: ...ctamente No modifique el enchufe provisto con el aparato si no se ajusta al tomacorriente solicite a un electricista calificado que instale el tomacorriente adec uado Esta unidad est dise ada para usa...

Page 39: ...o aviso GARANT A Para proteger su inversi n complete cuanto antes la informaci n solicitada en la tarjeta de garant a que viene con la unidad y env ela por correo a Tornado Industries Nota El servicio...

Page 40: ...nto aseg rese de que est desenchufada Inspeccione el cable de alimentaci n con regularidad Si est da ado debe cambiarse Tenga cuidado cuando utilice la unidad cerca de la parte superior de las escaler...

Page 41: ...or 5 Dep sito de recuperaci n 6 filtro 7 cubierta 8 arranque 9 boquilla 10 tambor transportador 11 cepillo 12 pedal 2 4 7 9 11 6 8 10 12 C mo Transportar la Unidad Precauci n Esta unidad es pesada No...

Page 42: ...cuperaci n limpia el tambor y recoge el agua sucia Preparaci n para el uso Desempacar 1 mango inferior 2 cuerpo de la unidad 3 carcasa de la bomba 4 dep sito de la soluci n 5 mango superior y cable de...

Page 43: ...ustar en la unidad Por lo tanto es necesario apretar los ejes de los cepillos antes de utilizar la unidad Empuje los ejes a trav s de los cepillos desde un lado de la unidad Para retirar los cepillos...

Page 44: ...or En caso de que el motor se sobrecargue debido a que el suministro el ctrico es inadecuado o por una obstrucci n inesperada de la rotaci n del tambor o de los cepillos el protector de sobrecarga se...

Page 45: ...de una pared u otro obst culo Siga moviendo la unidad hacia adelante hasta la pared sin jalar el mango de aplicaci n de soluci n 4 Jale la unidad hacia atr s en el mismo recorrido pero sin jalar el m...

Page 46: ...de la red el ctrica Para alargar al m ximo la vida de la unidad haga lo siguiente Cable de alimentaci n Inspeccione regularmente la cubierta el enchufe y el anclaje de los cables para ver si tienen da...

Page 47: ...iobrarse f cilmente mientras se sostiene el mango superior Cepillo lateral Con el cepillo lateral puede limpiar rincones cerca de las paredes Apague y desconecte la unidad antes de retirar el cepillo...

Page 48: ...par 33855 Cepillo suave 1 par 33856 Cepillo duro 1 par 33857 Cepillo lateral 33858 Cepillo para escaleras 33859 Carro 05 3395 0000 Tipo de piso Primera limpieza Limpieza de mantenimiento Granito cer m...

Page 49: ...garant a Otros art culos pueden estar incluidos o no seg n la unidad que tenga Si se produce alg n defecto la garant a se anula en caso de intentar reparar el aparato en centros de servicio no autoriz...

Reviews: