


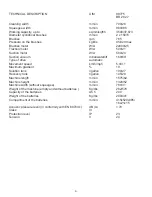

13
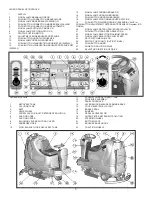
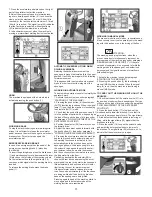
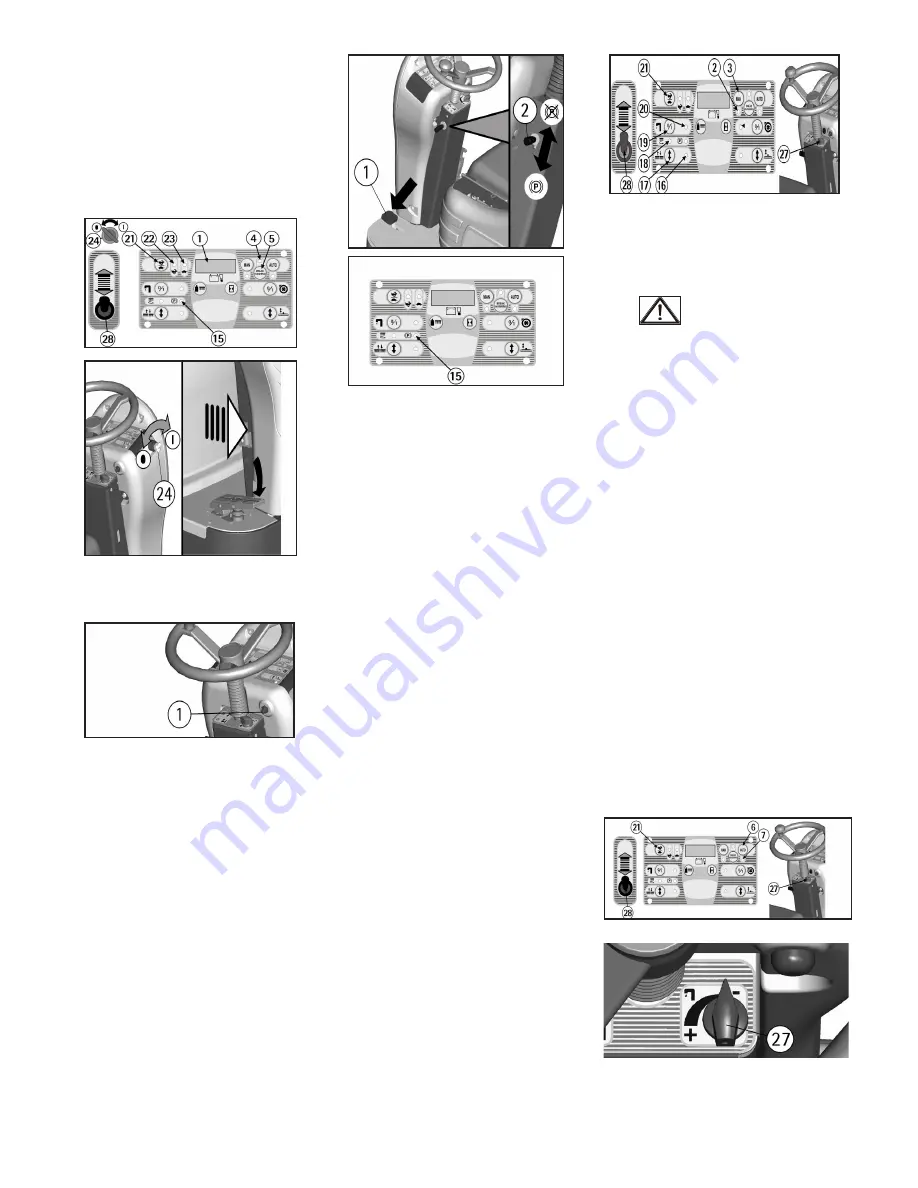
7. Press the accelerator pedal placed on the right
part of the platform to start the machine.
8. Adjust the movement speed in forward press-
ing every time the push button (21) to choose the
slow one (at the maximum 2.2 mph (3,6 km/h) is
reached) or the fast one (at the maximum 3.1 mph
(5 km/h) is reached). The signal lamp (22) indicates
that the fast drive is selected, while signal lamp
(23) indicates that the slow drive is selected.
9. In backward movement, when the machine is
moving, an intermittent warning device is activated.
HORN
The machine is equipped with a horn which is
activated pressing the push button (1).
WORKING BRAKE
To stop the machine during normal working situ-
ations, it is sufficient to release the accelerator
pedal, because the machine has got an electronic
brake system. To restart, press again the
accelerator pedal.
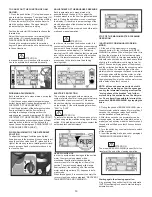
EMERGENCY-PARKING BRAKE
In case of an emergency press the pedal of the
emergency and parking brake (1) placed on
the left side.
To insert the parking brake press the brake pedal
(1) and simultaneously move downwards the lever
(2) placed on the left side of the steering column.
On the instrument board the signal lamp (15)
comes on which signals that the parking brake is
inserted.
To release the parking brake press the brake
pedal (1).
AUTOMATIC SQUEEGEE LIFTING WHEN
GOING BACKWARDS
Selecting the backwards movement the
squeegee is brought automatically to the upper
position. It will then lower again in the following
forward movement.
This happens both in automatic as in manual
mode in order to protect the integrity of the
squeegee.
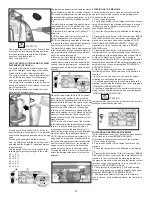
WORKING IN AUTOMATIC MODE
The automatic operation is useful to simplify the
operator’s work.
1. Activate the machine (see under paragraph
“STARTING OF THE MACHINE”).
2. Pressing the push button (6) the automatic
(AUTO) functioning is chosen. When the signal
lamp (7) is on, then the machine is functioning
in automatic (AUTO) mode.
3. Check that the knob of the solution valve (27)
is in the position of optimum flow, depending on
the type of floor and the type of dirt (see under
the paragraph “FLOW ADJUSTMENT OF THE
DETERGENT SOLUTION”).
4. Position the selector (28) forward to choose
the forward drive.
5. Adjust the movement speed in forward with
the push button (21) (see under paragraph
"FORWARD AND BACKWARD MOVEMENT").
6. Pressing the accelerator pedal, the machine
begins to proceed and in automatic mode all
the working functions are activated. In fact,
automatically both the brushes base as the
squeegee go down, the brushes begin to turn,
the solenoid valve opens to permit the deter-
gent solution to flow down onto the brushes
and the suction system is activated to recover
the dirty water from the floor.
Positioning backwards the selector (28) to
choose the rear drive and pressing the accel-
erator pedal the rear drive starts, the squeegee
lifts automatically and will then return to lower
itself during the next for-ward movement.
If the accelerator pedal is released for more
than 3 seconds, automatically all the functions
are being switched off and both the brushes
base as the squeegee are being lifted.
Pressing again the pedal, the machine starts to
move again and in automatic mode all the
working functions are reactivated.
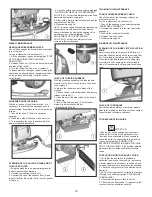
WORKING IN MANUAL MODE
The manual model is useful when, in special cases,
it is necessary to carry out separately only the wash-
ing with the brushes or only the drying of the floor.
ATTENTION:
The washing and drying functions, when they
are not carried out simultaneously, represent an
improper use of the machine (see under paragraph
“GENERAL RULES OF SECURITY”). If they are
carried out separately, it is necessary to forbid the
working areas to the passage of non-authorized
personnel and to signal the areas of moist floors
with suitable signs.
1. Activate the machine (see under paragraph
“STARTING OF THE MACHINE”).
2. Pressing the push button (3) the functioning of
manual (MAN) mode is chosen. When the signal
lamp (2) is on, then the machine is functioning in
manual (MAN) mode.
TO CARRY OUT THE WASHING WITH ONLY THE
BRUSHES
:
1. Check that the knob of the solution valve (27) is in
the position of optimum flow, depending on the type
of floor and the type of dirt (see under the paragraph
“FLOW ADJUSTMENT OF THE DETERGENT
SOLUTION”).
2. Press the push button (17) of up/down of the
brushes base to lower the brushes. Once that it is
lowered, the brushes begin to turn. The signal lamp
(16) indicates that the brushes base is lowering or
lifting, while the signal lamp (18) signals that the
brushes are turning.
3. Press the switch (19) to open the solenoid valve
and permit the detergent solution to lower onto
the brushes. The signal lamp (20) will come on, to
indicate that the solenoid valve is open.
Summary of Contents for BR 28/27
Page 2: ...2...
Page 3: ...3 NOTES...


