


4
SUMMARY
TECHINICAL
DESCRIPTION
5
INTRODUCTORY
COMMENT
6
GENERAL RULES OF SAFETY
7
Transfer
7
Storage
and
disposal
7
Correct
use
7
Maintenance
7
GENERAL RULES OF THE BATTERIES
7
LEGEND INSTRUMENT BOARD AND CONTROLS
8
LEGEND
MACHINE
8
SYMBOLOGY ON THE MACHINE
9
SYMBOLOGY ON THE MANUAL
9
BEFORE USE
10
Handling of the packed machine
10
Unpacking
of
the
machine
10
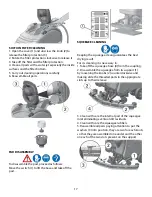
Access to the battery compartment
10
Battery
installation
10
Battery
recharger
11
On-board
battery
recharger
11
Batteries
recharging 11
Batteries recharging with on-board charger
11
Batteries charge level indicator
12
Hour
meter
12
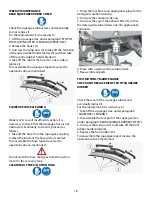
Squeegee
assembly 12
Adjustment
of
the
squeegee
13
Pad
assembly
13
FLOOR CLEANING
13
Connection of the batteries to the machine
13
Recovery
tank
13
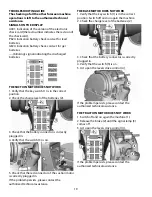
Detergent
solution
tank
14
Starting
of
the
machine
14
Forward
movement 15
Speed
adjustment
15
Working
brake
15
Emergency
brake
15
Adjustment of the base pressure
15
Overflow
device
16
Signal detergent solution reserve (H2O on the display)
16
STOP OF THE MACHINE AFTER CLEANING OPERATION
16
DAILY MAINTENANCE
16
Recovery
tank
cleaning
16
Suction
filter
cleaning
17
Pad
disassembly
17
Squeegee
cleaning
17
WEEKLY MAINTENANCE
18
Rear
squeegee
rubber
check
18
Squeegee
hose
cleaning
18
Cleaning of the solution tank
18
TWO-MONTHLY MAINTENANCE
18
Check and replacement front squeegee rubber
18
TROUBLESHOOTING GUIDE
19
Signals
on
the
display
19
The suction motor does not work
19
The base motor does not work
19
The traction motor does not work
19
Insufficient water on the base
19
The machine does not clean properly
20
The squeegee does not dry perfectly
20
Excessive
foam
production
20
PROGRAMMED MAINTENANCE
20
Summary of Contents for OB 28/20
Page 3: ...3 NOTES...


