background image

8

OPERATION INSTRUCTIONS
Please read the following operating instructions carefully.  They will help you to get the best 

performance from this professional quality vacuum cleaner and to maintain it in optimum condition.
Follow these simple steps for easy and effective operation of the Backpack vacuum.

Open the lid and ensure that the cloth bag is correctly located and the flexible ring provides a proper 

seal when the lid is closed.  For optimum performance, filtration and maximum hygiene, it is advisable 

to use a paper vacuum bag in addition to the standard cloth bag.
If a paper vacuum bag is used, simply insert it into the cloth bag, making sure that the cardboard disk 

is centered on the flexible sealing ring.  When you replace the lid, the short nozzle in the center of the 

lid will be forced into the central hole of the cardboard disk of the paper vacuum bag thus providing 

a tight seal.  Make sure the paper vacuum bag is tightly secured over the short nozzle before 

vacuuming.
Lock the lid down with the two latches.  Always ensure that the cloth vacuum bag is empty and the 

paper bag is no more than ½ full before vacuuming.  The vacuum hose is fitted into the cuff in the lid.  

It should not be necessary to remove the hose in normal operation.

1.  Place the Backpack vacuum on your back, adjust the shoulder straps until you feel comfortable 

and then tighten the waist belt.  The Backpack vacuum is designed to ride higher on your back 

for maximum comfort.

2. 

Attach the extension wand to the hose and fit the floor tool or any of the other vacuuming 

accessories on the wand.

3.  Turn the vacuum on.  The toggle switch is located on the lower housing.
4. 

After you finish cleaning, turn off the main power switch.

https://harrissupplyind.com - To Order Parts Call 608-268-8080

Summary of Contents for Pac-Vac 93016

Page 1: ... FAX 817 551 0719 WWW TORNADOVAC COM Operations Maintenance Manual For Commercial Use Only Form No L3016AC 04 17 Tornado Industries LLC All rights reserved Pac Vac 6 Roam MODEL NO 93016 h t t p s h a r r i s s u p p l y i n d c o m T o O r d e r P a r t s C a l l 6 0 8 2 6 8 8 0 8 0 ...

Page 2: ...e 1 Except all Windshears Blowers Storm TV2SS Side and Downdraft Insulation Blowers CV 30 CV 38 CK14 1 PRO CK 14 2 PRO SWM 31 9 CK LW13 1 CK LW 13 1 ROAM CV 38 48 Dual PV6 PV10 PV6 ROAM Wall Mount Vacuum and all chargers are warranted for 1 one year for both parts and labor 2 All non wear item parts purchased after warranty expiration are warranted for 90 days 3 Warranty starts from the date of sa...

Page 3: ...3 NOTES h t t p s h a r r i s s u p p l y i n d c o m T o O r d e r P a r t s C a l l 6 0 8 2 6 8 8 0 8 0 ...

Page 4: ...OTECT THE ENVIRONMENT Please dispose of packaging materials in an environmentally safe way according to local waste disposal regulations Always remember to recycle Do not operate the vacuum while it is standing on high pile carpet It is essential that the exhaust airflow not be restricted Do not wash or launder the cloth bag as this will destroy the filtration capacity of the fabric SAFETY PRECAUT...

Page 5: ...tachment Keep hair loose clothing fingers and all parts of body away from openings and moving parts Always keep hands feet and loose fitting clothing away from moving parts to prevent possible injuries Do not use machine in areas where flammable and or explosive vapors or dusts are present Make sure voltage and frequency at the wall receptacle correspond with that indicated on nameplate before plu...

Page 6: ...T attempt to repair service or modify the battery system or charger Contact Tornado Cus tomer Service with any issues 14 DO NOT short circuit the battery or charger terminals with conductive items such as paper clips This can deliver high current resulting in heat and fire 15 DO NOT crush drop incinerate or damage the battery pack 16 DO NOT use a battery pack that has been damaged in any way 17 DO...

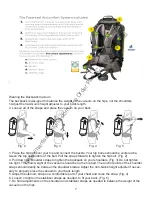
Page 7: ...hten the backpack on your shoulders Fig 3 Do not tighten too tight The main weight of the vacuum should be on the hip belt The anchor points of the shoulder straps should ideally be between the shoulder blades Adjust the Vari Quick height adjuster if neces sary to properly place the vacuum to your back length 5 Adjust the sternum strap on a comfortable part of your chest and close the strap Fig 4 ...

Page 8: ...to the central hole of the cardboard disk of the paper vacuum bag thus providing a tight seal Make sure the paper vacuum bag is tightly secured over the short nozzle before vacuuming Lock the lid down with the two latches Always ensure that the cloth vacuum bag is empty and the paper bag is no more than full before vacuuming The vacuum hose is fitted into the cuff in the lid It should not be neces...

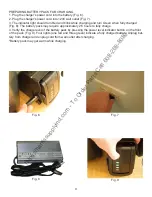
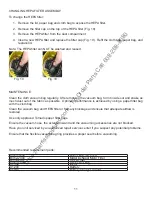
Page 9: ...require approximately 2 5 hours to fully charge 4 Verify the charge level of the battery pack by pressing the power level indicator button on the front of the pack Fig 9 Four lights one red and three green indicate a fully charged battery Unplug bat tery from charger and unplug cord from wall outlet after charging Battery pack may get warm while charging Fig 6 Fig 7 Fig 9 Fig 8 h t t p s h a r r i...

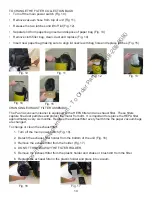
Page 10: ...These filters capture fine dust particles and protect the motor from dirt It is important to replace the HEPA filter approximately every six months Replace the exhaust filter every fourth time the paper vacuum bags are changed To change or clean the exhaust filter 1 Turn off the main power switch Fig 10 2 Detach the exhaust filter holder from the bottom of the unit Fig 16 3 Remove the exhaust filt...

Page 11: ...mance is achieved by using a paper filter bag with the cloth bag Clean the vacuum bag and HEPA filter or free any blockage and ensure that adequate airflow is restored Use only approved Tornado paper filter bags Ensure the vacuum hose the extension wand and the vacuuming accessories are not blocked Have your unit serviced by an authorized repair service center if you suspect any potential problems...

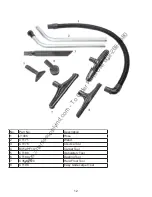
Page 12: ...and 3 CT176 Crevice Tool 4 B352 PF10 Carpet Tool 5 CT188 Upholstery Tool 6 CT184 Dusting Tool 7 C352 PF20 Hard Floor Tool 8 CT194 Easy Glide carpet Tool h t t p s h a r r i s s u p p l y i n d c o m T o O r d e r P a r t s C a l l 6 0 8 2 6 8 8 0 8 0 ...

Page 13: ...re feet meters Total Hard Floor Area Total Carpeted Area Square feet square meters o Contacted by local dealer o Previous experience with Tornado products o Reputation Recommendation o Advertising o Direct mail o Internet o Other o 0 10 000 0 930 o 10 50 000 930 4 650 o 50 250 000 4 650 23 250 o Over 250 000 over 23 260 o 0 10 000 0 930 o 10 50 000 930 4 650 o 50 250 000 4 650 23 250 o Over 250 00...

Reviews: